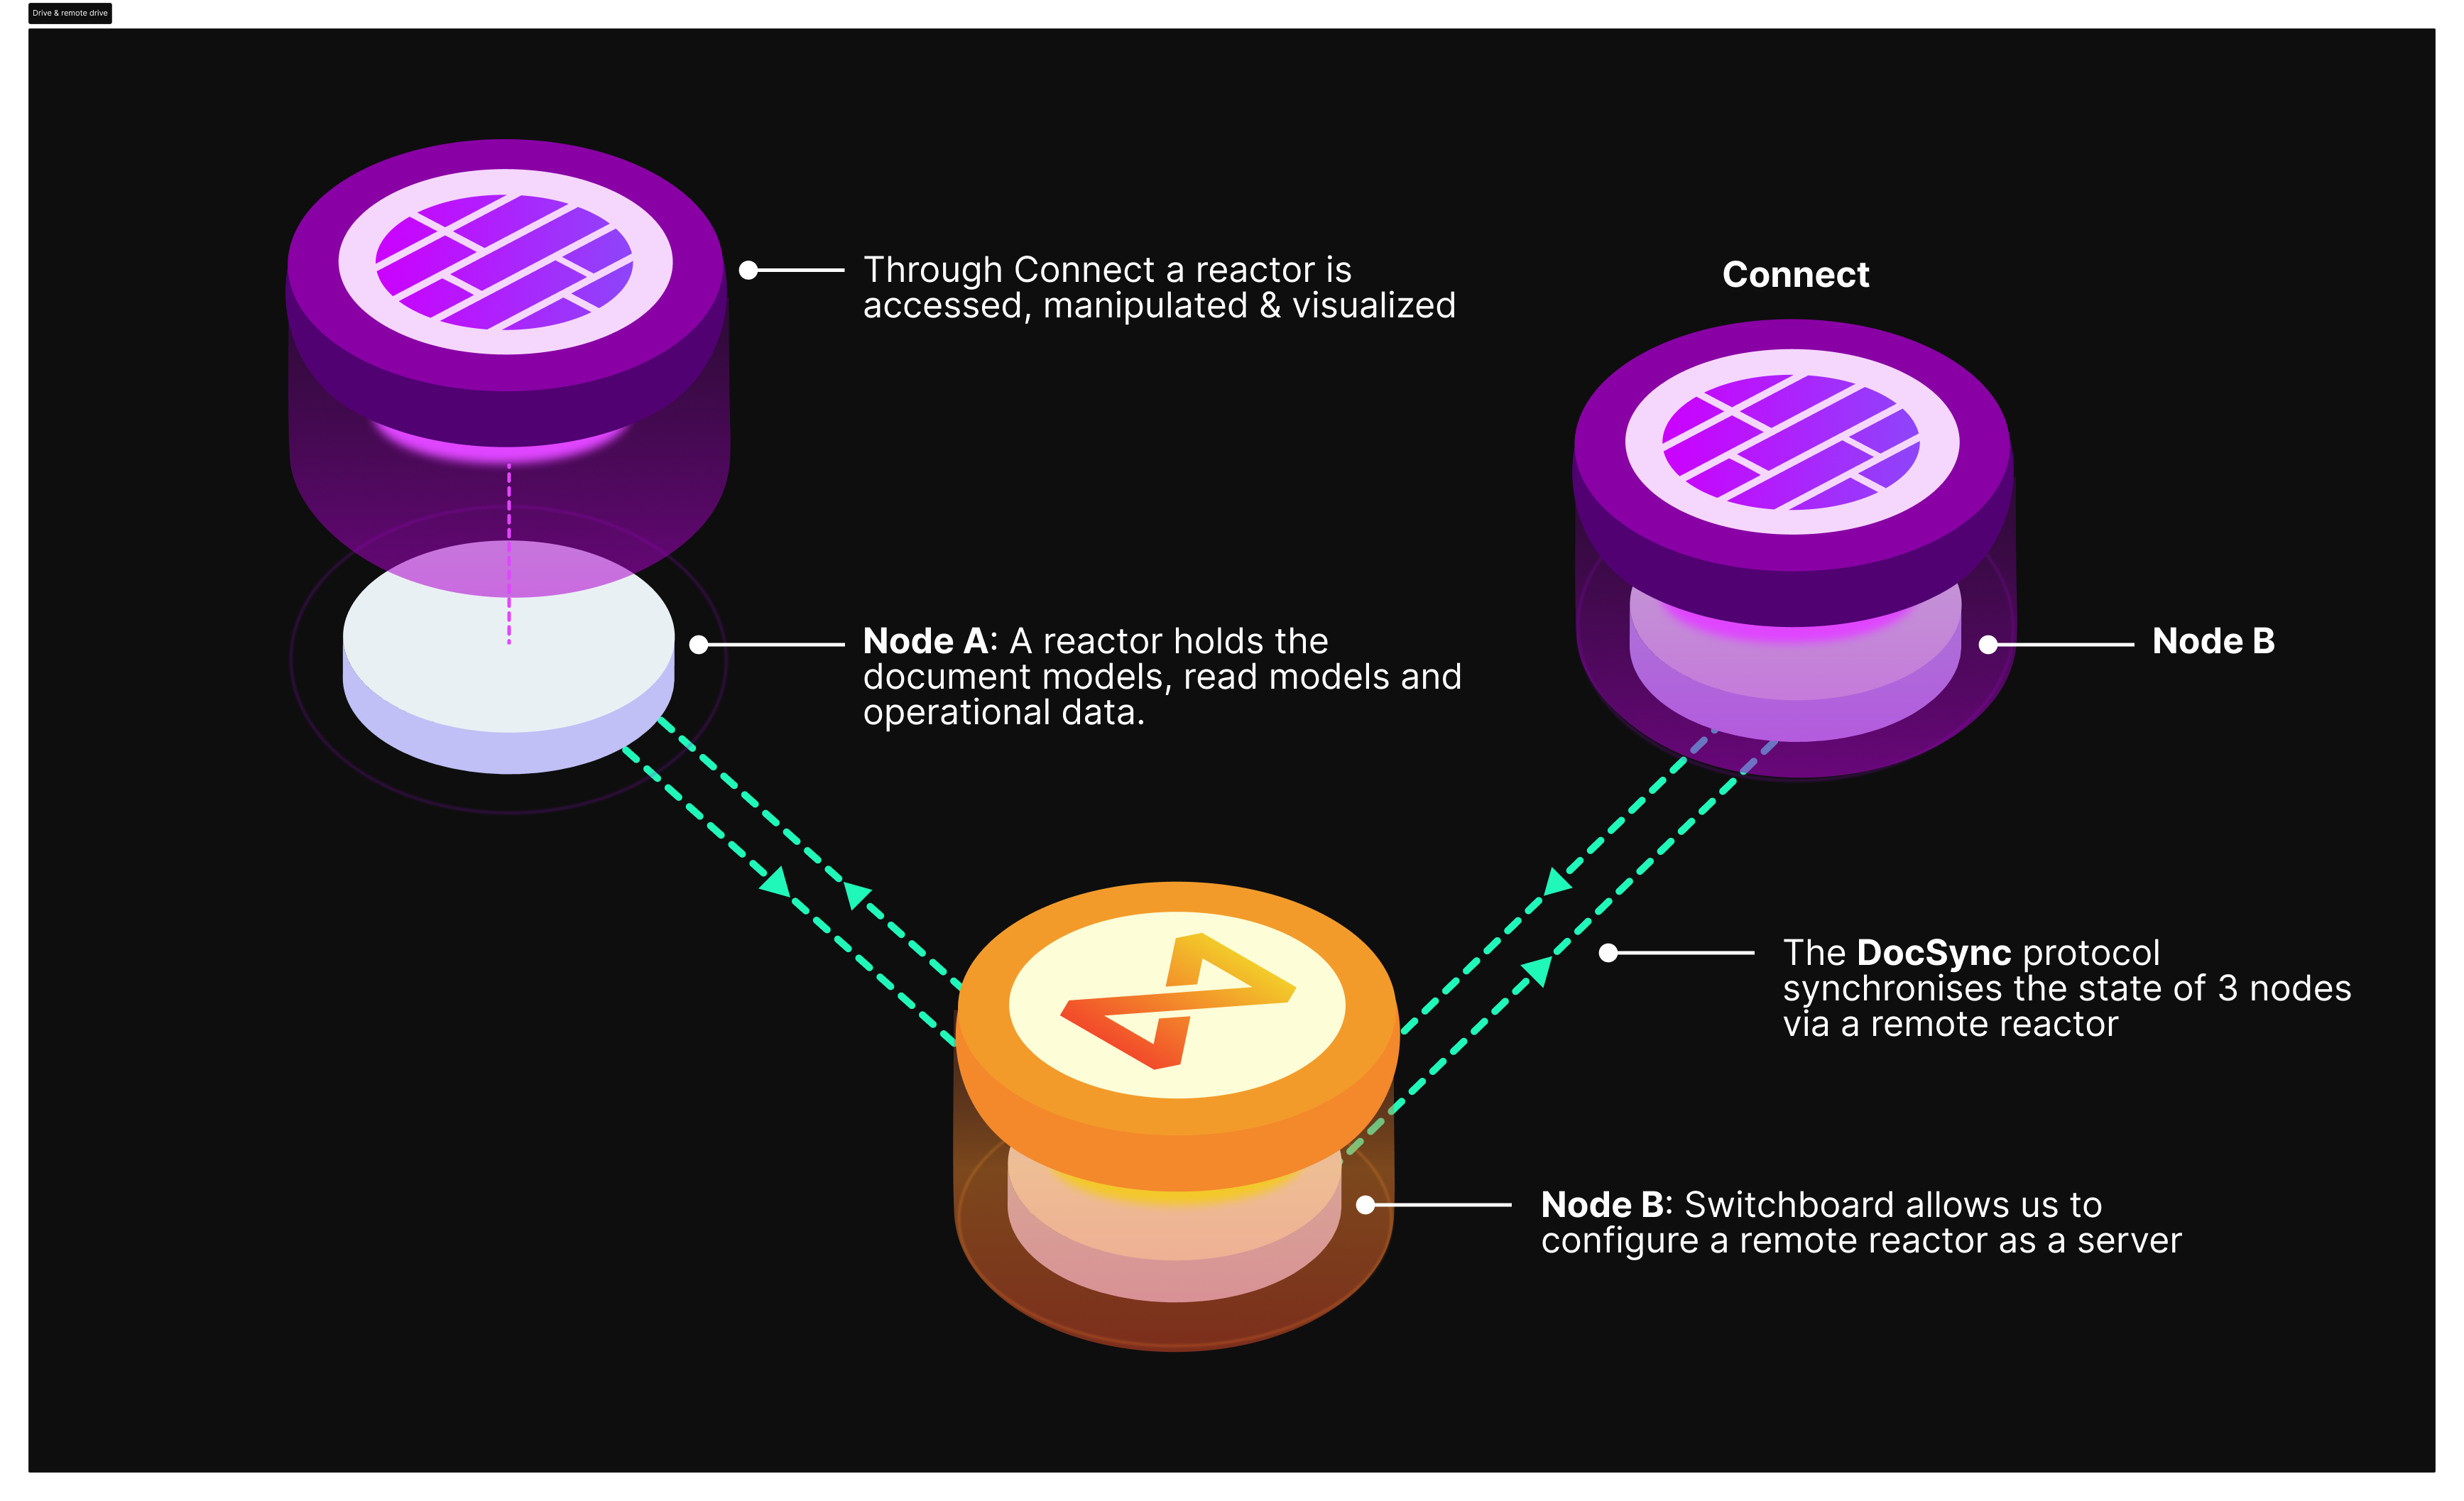
# Powerhouse Academy - Complete Documentation > Generated: 2026-07-07T22:27:24.134Z > Total Documents: 105 > Source: https://academy.vetra.io/llms-full.txt # Get Started ## Vetra Studio > Source: https://academy.vetra.io/academy/GetStarted/VetraStudio Vetra Studio is the browser UI for the Vetra agent. You chat with the agent, watch it work across the four-phase product cycle (Ideate → Specify → Build → Deploy), and see a live preview of the product it builds. Each Studio runs as a **dedicated cloud agent** tied to your identity. Vetra provisions an isolated environment that hosts the agent, its workspace, and the preview services. ## What you can build With the Vetra agent you build **local-first, AI-ready, specification-driven** products and platforms: - Open-source, decentralized back-ends. - SaaS, ERP, CMS, or CRM applications. - Structured-data, document-centric systems with a built-in GraphQL API. --- ## Getting started Vetra Studio is in **pre-alpha**. You reach it with an early-access code from Powerhouse. 1. Open **[vetra.io](https://vetra.io)** and log in with your wallet (via Renown). 2. Click **Vetra Studio** in the top-right header. This opens your **Products** dashboard at `/user`. If your account is not yet enabled, `/user` shows the **early-access gate** ("Vetra Studio — Early access — choose how you'd like to get started") with three paths: - **I have an invite code** — paste the code and click **Get Access**. - **I don't have a code** — join the waitlist by email, or **Request a code on Discord**. - **Run it locally** — no code needed; run Vetra Studio yourself with the `vetra` CLI (see [Running Vetra Studio locally](#running-vetra-studio-locally) below). The first time you enter, a notice reminds you the product is early:
Vetra Studio pre-alpha warning dialog
Vetra Studio is in pre-alpha. Download your documents or push them to GitHub as a back-up at the end of a cycle.
### Create a studio On the Products dashboard, click **Create new product**. With an invite code the studio provisions right away — the API key that powers the agent is supplied for you behind the code, so there is no key to enter. The product card moves through **Provisioning…** (not yet openable) to **Ready**. Click **Open →** to launch the studio in a new tab.
Vetra Studio Products dashboard with a Ready product
The Products dashboard lists your studios. Each is a dedicated cloud agent on its own subdomain, shown as Ready once provisioned.
Each product is one Vetra Studio instance running on its own subdomain (`.vetra.io`). Opening it lands you in Powerhouse Connect at `.vetra.io/d/`. --- ## The layout A studio opens in Powerhouse Connect with two panes: - **Chat pane** (left): lists chat sessions, and renders the active session's message history when one is open. - **Resize handle** (vertical strip): drag to adjust pane width. - **Main pane** (right): shows the phase-cycle cards by default, and opens a phase section, a document, or the build preview when you navigate. - **Toolbar** (far left): **Home**, **Open Account** (Renown), and **Settings**. - **Main-pane top bar**: a **Version info** button, an **Authorize agent** button (see [Authorizing the agent](#authorizing-the-agent)), and the **Auto-follow agent** checkbox. - **Auto-follow agent** (on by default): when checked, the main pane follows the agent and opens documents as the agent creates them.
Vetra Studio home with empty session list and phase cards
A fresh studio: empty session list on the left, the four phase cards on the right under "Product development cycle."
The main pane opens on **Product development cycle**. Alongside the four phase cards it offers a **Take a tour** button and an **example-prompt carousel** — cycle through the sample prompts and **Copy example prompt** to seed your first session. --- ## Creating a session 1. In the chat pane, click **New** (top-right) or **New session** (empty state). 2. A new chat session document is created in the drive and opened immediately. 3. Type your first message and press Enter (or click the send button). Sessions persist across restarts. They are CRDT documents stored in the studio's reactor. Sessions are scoped to your identity: signing in with a different identity shows a different session list. --- ## Talking to the agent The chat session is how you direct the agent. Type a message; the agent responds and runs tools. Each tool call appears inline as an expandable card showing its name, status, and a result preview. While the agent works, the send button becomes **Stop**.
An active Vetra Studio session with agent tool cards and an auto-followed document
An active session. Tool cards stream inline while the main pane auto-follows the document the agent is writing.
Tools you will see include: - `Using skill: ` / `Reading skill: ` — the agent loads a named skill (such as `document-modeling`, `document-editor-creation`, `drive-app-creation`) and reads its reference docs. - `spec-create`, `spec-generate`, `spec-update`, `spec-list`, `spec-schema` — create, generate, and edit specification documents. Create and update cards name the document, for example `spec-create · Hotel Breakfast Problem Sheet`. - `reactor-project-init`, `reactor-project-start`, `reactor-project-check`, `reactor-project-ls`, `reactor-project-ps` — scaffold, run, and inspect the project that hosts the preview. - Workspace actions in the agent's project appear as **Read**, **Write**, **Edit File**, **List**, and **Grep** cards with the file path. - `spec-preview-show` — surface a running app in the BUILD pane. A status bar at the bottom of the chat shows the session state: **Active**, start time, message count, token count, and tool-call count. The agent can: - Create and iterate on **spec documents** (problem, audience, and brand sheets, a feature, and a work breakdown structure). - Design **document models** and generate their reducers, editors, and apps. - Scaffold a **reactor project** that hosts a live editor preview. - Surface a **preview** in the BUILD pane and, when you're ready, publish to the cloud. --- ## The phase cycle The main pane shows four numbered phase cards when no section is open. Click a card to open its section, or navigate with the breadcrumb (`Home › `). | Phase | What happens there | | ------------------------------------ | -------------------------------------------------------------------------------------- | | **1 · Ideate** — Problem Definition | Frame the problem and audience — problem, audience, and brand sheets, a feature, a WBS | | **2 · Specify** — Solution Design | Pin down the data model, workflow, and states — document models grouped by project | | **3 · Build** — Implementation & Testing | Watch the agent generate and test code, with a live preview of the running app | | **4 · Deploy** — Delivery | Publish the package and run it in your cloud environments | A card's availability depends on progress: BUILD shows a preview only after the agent scaffolds a project, and DEPLOY needs you to sign in with Renown. --- ## Ideate and Specify The Ideate and Specify sections hold the documents the agent writes. In Ideate the agent frames the product — a problem sheet, an audience sheet, a brand sheet, a feature, and a work breakdown structure. Specify then groups the **document models** into **projects**: each project is a folder of specs and models.
Specify section grouping documents into projects
Specify groups documents into projects. Each project is a folder of specs and document models.
With **Auto-follow agent** on, a document opens in the main pane as the agent creates it, so you watch each sheet and model take shape without interrupting the run. A document editor has a **Download** action and a revision-history view. For a **document model** you edit its Document Type, Description, Author, Website, and Model Extension, and its state schema under **Global** / **Local** tabs (with **Show standard library** for reference types).
Document-model editor in Vetra Studio
A document-model editor: Global and Local state-schema tabs, initial value, and operations.
--- ## The BUILD preview The BUILD pane deep-links into the reactor project the agent spawned for the session. The sequence: 1. The agent calls `reactor-project-init` and `reactor-project-start` — visible as tool cards in the chat. 2. The dev server warms up (typically 10–30 seconds) and the project reports ready. 3. The agent calls `spec-preview-show` with a project, drive, and app reference to surface the app in the BUILD pane. 4. Any code the agent generates after that is picked up by Vite HMR — the preview updates without a full reload. Until the agent surfaces a preview, the pane reads **"No preview yet — The BUILD preview appears once the agent scaffolds a project for this session."** A running reactor project is not enough on its own; the agent has to surface a preview.
BUILD pane rendering a generated app live
The BUILD pane renders the generated app live. Here the agent built a hotel breakfast-order form.
**WARNING:** The BUILD preview runs the editors and apps in a local dev reactor. **Processors do not run here** — they execute server-side in Switchboard once the studio is deployed. Preview drives are also ephemeral and reset between sessions. So an action wired through a processor (for example, syncing a guest order to a staff board) only takes effect after you deploy. Because it is pre-alpha, the preview does not always mount; if it stays on "No preview yet," deploy the app to see it running end to end. Use the breadcrumb at the top of the pane to navigate back to the phase-cycle home. --- ## Deploy The Deploy section publishes your project's package to **Vetra Cloud**. Sign in with **Renown** first (the top bar then shows your address with a **Disconnect** button). Deploy opens on a **Projects** list. Each project shows a status (**Not deployed**, **Needs release**) and a **Set up deploy** button. Click it to open the deploy detail: 1. Under **Available environments**, the project version (for example `morning-order@1.0.0`) is listed. A new project isn't running anywhere yet. 2. Click **New environment**, give it a name, and click **Create & deploy**. A `vetra.io` subdomain is assigned automatically. 3. The environment rolls out: **Approved → Deploying → Ready**. When it reports **Up to date · v1.0.0**, the deploy is live.
A deployed Vetra Studio environment showing Ready status and service links
A live environment: Ready status, its subdomain, and Open / Connect / Switchboard actions.
Each environment runs **Powerhouse Connect** at `-connect.vetra.io` and **Switchboard** (the GraphQL API) at `-switchboard.vetra.io/graphql`. Use **Open**, **Connect**, and **Switchboard** on the environment card to reach them. For environment management, services, sizing, and versions, see [Vetra Cloud](../docs/docs/01-VetraCloud.md). --- ## Authorizing the agent To let the agent sign actions with your identity, click **Authorize agent**. This runs the Renown flow that authorizes the studio's subdomain to sign actions on your behalf. Once confirmed, the top bar shows **Renown** with your address and a **Disconnect** button. Authorization is independent of chat sessions, and it switches the studio's active identity from a generated `did:key` to your wallet identity (`did:pkh`). Because sessions are scoped per identity, switching identity changes which sessions the list shows. --- ## Session URLs The studio keeps its state in the URL, under `.vetra.io/d/`: - The selected session id is the `?session=` query parameter. Sharing the URL opens the same session in another tab or browser; browser back/forward navigates between sessions; reloading restores the selection. - When the agent opens a document, the URL also carries a `doc=` parameter. --- ## Glossary **Chat session** — a CRDT document that stores message history, agent tool calls, and tool results for one conversation thread. **Phase cycle** — the four-card home view (Ideate / Specify / Build / Deploy). Each card is a stage of the product-development workflow. **Project** — a folder of related specs and document models, shown in the Specify section. **Reactor project** — a dev-mode process the agent spawns to host a live editor preview. One per active build in a chat session. **Preview drive** — a drive inside a reactor project, used for ephemeral preview document instances. **Renown** — the identity layer that lets the studio sign actions on behalf of your wallet without exposing your private key. --- ## Running Vetra Studio locally Prefer to run everything on your own machine? Vetra Studio ships as a CLI you run yourself — no invite code needed. You bring your own **Anthropic API key** (the agent runs on Claude). **Prerequisites:** Node ≥ 24 on macOS or Linux. pnpm is optional — the installer uses it if present, otherwise offers to install it and falls back to npm. ### Quick install One command installs the `ph` and `vetra` CLIs and offers to launch the agent: ```bash curl -fsSL https://get.vetra.io | sh ``` The first launch sets up Claude auth (bring your own Anthropic API key), then prints the Studio URL — open **[http://localhost:8090/](http://localhost:8090/)** in a browser. Start the agent again any time with `vetra`. ### From source Clone [vetra-cli](https://github.com/powerhouse-inc/vetra-cli), then install and start the agent: ```bash pnpm install pnpm dev # interactive agent REPL + embedded Reactor and Switchboard ``` Authenticate the agent once: ```bash export ANTHROPIC_API_KEY=sk-ant-... ``` When the agent starts a build, the logs print `Vetra Studio: http://localhost:8090/d/` — open that URL to see your work live, and iterate by continuing the conversation. To wipe the local dev workspace and start clean, run `pnpm dev:reset`. ### Service ports A single `vetra` process runs the REPL, an embedded Reactor, and an embedded Switchboard. It reserves three ports with no fallback, so free them first if they are already in use: | Service | Port | Purpose | | -------------------- | ----- | -------------------------------------- | | Vetra Studio (proxy) | 8090 | Browser entry point (the URL you open) | | Connect | 27370 | Editor front-end | | Switchboard | 59220 | GraphQL API | --- ## Vetra Cloud > Source: https://academy.vetra.io/academy/GetStarted/VetraCloud Vetra Cloud is the hosted infrastructure layer for Powerhouse applications. It lets you spin up a personal cloud environment that runs **Powerhouse Connect** (the user-facing document editor) and **Powerhouse Switchboard** (the backend GraphQL server) — and extend them with packages from the Vetra registry. --- ## Getting Started ### 1. Connect Your Wallet Navigate to the **Cloud** section in Vetra and authenticate with your Ethereum wallet via **Renown**. Renown lets Connect sign operations on behalf of your on-chain identity without exposing your private key.
Connect Wallet via Renown
Connect your Ethereum wallet via Renown to authenticate with Vetra.
--- ### 2. Create an Environment After authenticating, create a new environment by giving it a name. Each environment gets its own subdomain (e.g. `my-env.vetra.io`) and runs its own isolated set of services.
Create Environment
Give your environment a name to get a dedicated subdomain and isolated set of services.
--- ### 3. Configure Services Inside your environment you can enable and configure three services: | Service | Description | | -------------------------- | -------------------------------------------------------------- | | **Powerhouse Connect** | The document-editor UI served at `connect..vetra.io` | | **Powerhouse Switchboard** | The GraphQL API server at `switchboard..vetra.io/graphql` | | **Powerhouse Fusion** | Optional data-fusion layer (disabled by default) | Use the **Size** dropdown to pick the compute tier for each service and toggle it on or off with the switch on the right.
Services overview
Enable and configure Connect, Switchboard, and Fusion services for your environment.
--- ### 4. Select a Version Each service shows its currently pinned version. Click **Change version** (or **Update All** when updates are available) to pin Connect and Switchboard to a specific release.
Available updates
Pin each service to a specific version or apply all available updates at once.
--- ### 5. Install Packages Packages extend Connect and Switchboard with additional document models, editors, and reactor modules. Click **+ Add package** in the **Installed Packages** section, then search for a package by name. Available packages include community and official Powerhouse packages such as: - `@powerhousedao/builder-profile` - `@powerhousedao/contributor-billing` - `@powerhousedao/knowledge-note` - `@arbitrum/arbgrants`
Add Package
Search and select a package from the Vetra registry to install into your environment.
Once you select a package, a **Pending change** banner appears at the bottom. Click **Approve** to apply the change and redeploy your environment. --- ## Next Steps Once your environment is running you can point your local `ph` CLI at it, or share the Connect URL with collaborators so they can start working with your document models right away. To publish your own packages to the registry, see the [Publishing Packages](/academy/Build/Launch/PublishYourProject) guide. --- # Learn ## Learn the Powerhouse stack > Source: https://academy.vetra.io/academy/Learn/Overview Powerhouse is a framework for building applications whose state evolves through **operations** rather than direct mutations. Instead of storing the current state, it records the ordered operations that produced it — giving every document a complete, auditable history. If you've worked with Git, event sourcing, or CRDTs, much of this will feel familiar. This course explains how the stack is structured and how its pieces fit together. It's **explanation, not step-by-step instructions** — the goal is to understand _what_ the agent builds for you and _why_. To ship with the agent, start at [Get started](/academy/GetStarted/VetraStudio); to build by hand, see [Build](/academy/Build/ManualTodoTutorial/CreateNewPowerhouseProject). ## Why use Powerhouse? Because state is an operation log, teams get a set of hard problems solved by default: - **Track every change** — who did what, when, addressable by index and hash. - **Sync across peers** — offline edits merge deterministically, no last-write-wins. - **Build collaborative apps** — concurrent editing without conflict resolution code. - **Keep auditable histories** — the log _is_ the audit trail. - **Separate business logic from UI** — reducers hold the rules; editors just dispatch. That makes it well suited to operational systems, governance tools, financial workflows, collaborative editors, and other distributed applications. ## What you'll learn By the end of this course you'll understand: - The Powerhouse mental model — documents, state, and operations - Actions and reducers — how state changes are described and applied - Editors and host applications - Connect and distributed synchronization - Switchboard, subgraphs, and read models - How a complete Powerhouse application fits together ## The path The chapters are designed to be read in order — each builds on the last: **Foundations → Architecture → Document models → Editors → Connect → Switchboard → Sync → Going further** Each chapter is a handful of short lessons that end with a quiz to check your understanding. After the course you'll be able to navigate the Powerhouse architecture, reason about how a change flows through the stack, and read what the agent generates with confidence. New to Powerhouse? Begin with [What is Powerhouse?](/academy/Learn/foundations/what-is-powerhouse) — every later lesson builds on the operation-log model it establishes. --- ## 01-what-is-powerhouse > Source: https://academy.vetra.io/academy/Learn/foundations/what-is-powerhouse Powerhouse is a framework for building apps whose state lives in **documents** that evolve through **operations**. If you've built with CRDTs, Event Sourcing, or Git, a lot of this will feel familiar — with one twist: Powerhouse makes the _type_ of each document explicit, so actions are always validated before they turn into operations. By the end of this lesson, you should be able to answer: what does Powerhouse store, and how does an app make changes to it? ## The core loop Everything in Powerhouse flows through the same cycle: 1. **You dispatch an action** — just data describing what you want to happen. 2. **A reducer runs** — a pure function that returns the next state and emits an operation. 3. **The operation is appended** — to the document's immutable history, and eventually synced to peers. ```ts // Dispatch const action = addTodo({ id: "t-1", title: "Learn Powerhouse" }); // The reducer produces the next state const nextDoc = reducer(currentDoc, action); ``` This loop never changes, whether the document is a to-do list, a finance ledger, or a 10,000-line design doc. ## Why operations, not snapshots? Storing _what changed_ instead of _what is_ unlocks a few things: - **Deterministic replay** — hand the operation log to any machine and it rebuilds the same state. - **Conflict-free sync** — two offline clients can both edit, then reconcile by merging operations in order. - **Auditable history** — every change is addressable by index and hash. - **Derived read models** — processors fold operations into search indexes, dashboards, or analytics without re-querying the source. ## The pieces you'll meet These are the terms that show up everywhere in the docs and in the rest of these lessons: | Term | What it is | | ------------------ | ------------------------------------------------------------------------------ | | **Document Model** | A typed schema + the set of actions allowed on it. | | **Document** | An instance of a model, plus its operation history. | | **Action** | Pure data — a name and inputs — describing an intended change. | | **Operation** | An action after it ran through a reducer: stamped with index, timestamp, hash. | | **Reducer** | A pure function `(state, action) → nextState`. | | **Editor** | A React UI that dispatches actions. | | **Processor** | An event-driven handler that derives read models from operations. | | **Reactor** | The engine that runs reducers, persists operations, and syncs them. | --- ## 02-thinking-in-operations > Source: https://academy.vetra.io/academy/Learn/foundations/thinking-in-operations If you've built CRUD apps before, you probably think in terms of _rows_ — the current value of a record in a database. Powerhouse asks you to flip this: think in terms of the _sequence of changes_ that produced that row. This lesson is short on code and heavy on mental model. Once it clicks, the rest of the stack falls into place. ## The snapshot trap Here's a SQL-shaped way to handle "mark todo done": ```sql UPDATE todos SET done = true WHERE id = 't-1'; ``` That statement destroys information. Afterwards, you can't answer: - _When_ did it get marked done? - _Who_ marked it? - _What was it before?_ - Can we undo just this change without rolling back everything since? You can rebuild some of that with audit tables, triggers, or soft deletes — but you're reintroducing history on top of a model that actively throws it away. ## The operation-shaped answer In Powerhouse, the same change is: ```ts dispatch(completeTodo({ id: "t-1" })); ``` Which becomes an operation appended to the document's log: ```json { "index": 42, "timestamp": "2026-04-15T10:12:33Z", "actor": "user:alice", "name": "completeTodo", "input": { "id": "t-1" }, "hash": "…" } ``` State is _derived_. If you want "the current list of done todos," you fold the log. If you want "the state at index 30," you fold up to there. If two peers edit offline, you merge their logs in order — no last-write-wins guesswork. ## What you get for free Once the log exists, a lot of hard problems become easy: - **Undo / redo** — pop (or invert) the last operation. - **Time Travel Debugging** — fold to any index to see the document as it was. - **Audit trails** — every change has an actor, a timestamp, and a hash. - **Derived read models** — a processor subscribes to the stream and maintains a search index, or a counter, or a cache. - **Replays** — reconstruct bugs by replaying the exact operations the user produced. --- ## 01-the-big-picture > Source: https://academy.vetra.io/academy/Learn/architecture/the-big-picture The previous lesson showed how every change becomes an operation appended to an immutable log. Now let's look at _where_ that all actually runs. By the end of this lesson, you'll be able to point at any concept in the course — a reducer, a processor, a React hook — and say confidently: "that runs in the Reactor" or "that lives in Switchboard." ## One engine, two faces The **Reactor** is the core engine. It runs reducers, appends operations to storage, drives processors, and syncs with other Reactors over the DocSync protocol. Every instance of Powerhouse — on your laptop, on a server, on a peer's machine — has a Reactor at its heart. The Reactor doesn't have a UI, and it doesn't have a public API by default. That's the job of **host applications**. The two you'll meet most often are: - **Connect** — the browser-based collaboration workspace where end users edit documents. It embeds a Reactor in the browser, so it works offline and syncs when it reconnects. - **Switchboard** — the server-side host that exposes the Reactor over GraphQL and MCP. This is where processors run in the background, where read models are maintained, and where agents and integrations talk to your data. ``` Your browser Your server ┌──────────────────────┐ ┌──────────────────────────┐ │ Connect │ │ Switchboard │ │ ┌────────────────┐ │ │ ┌────────────────────┐ │ │ │ Reactor │ │◄────►│ │ Reactor │ │ │ │ (browser) │ │ sync │ │ + processors │ │ │ └────────────────┘ │ │ └────────────────────┘ │ └──────────────────────┘ └──────────────────────────┘ ``` Both Reactors speak the same protocol. Edits made offline in Connect flow to Switchboard the moment a connection is available — no polling, no special handling. ## Your code plugs into all three When you build on Powerhouse, you ship a **package** — a bundle containing your document models (schemas + reducers), editor components, and processors. That one package plugs into the whole stack: - The **Reactor** picks up your reducers and runs them whenever an action is dispatched. - **Connect** renders your editor components so users can interact with documents. - **Switchboard** runs your processors, which fold the operation stream into read models and expose them over GraphQL. You write the logic once; the stack decides where it executes. ## What syncs between them The Reactor doesn't sync state — it syncs **operations**. When you edit a document in Connect offline and then reconnect, the Reactor sends the operations you produced to the remote Reactor in Switchboard. The remote Reactor replays them, and both ends land on the same state. No last-write-wins, no manual merge step. This is what the overview doc means by "local-first, built to scale": you get a real app experience on-device, and the operation log keeps everything consistent across the network. ## Host applications — the bigger picture Connect and Switchboard are two of four host applications in the ecosystem. The next lesson covers all of them in depth, including how Fusion and Renown fit in. For now, the three-piece map — Reactor, Connect, Switchboard — is enough to orient everything else you'll learn. --- ## 02-host-applications > Source: https://academy.vetra.io/academy/Learn/architecture/host-applications The previous lesson named the three pieces: document models, a Reactor, and a host application. Now let's make the last one concrete. Because "embed a Reactor" sounds abstract — until you see that a Reactor is just a library, and the host is the thing that gives it a place to live. ## The Reactor is a library, not a server If you've deployed a Node service before, you might picture the Reactor as a long-running process you start and point your app at. It isn't. The Reactor is a package — `@powerhousedao/reactor`. It has no `main()`. It doesn't open a port. It sits inert until something boots it up, hands it a storage backend, and starts sending it actions. That "something" is the host application. The host is what runs, and the Reactor is what the host runs. ## What a host provides A Reactor needs four things it can't supply itself: - **Storage** — where operations are persisted. Connect uses PGlite running in IndexedDB in the browser. Switchboard can point at a real Postgres instance. Your custom host could use anything that implements the storage interface. - **Network** — which other Reactors to sync with, over what transport, with what credentials. - **UI surfaces** — the windows, panels, and modals where editors render. The Reactor has no concept of a DOM. - **Package registry** — which document models, editors, and processors are loaded. The host discovers and registers them with the Reactor at startup. The Reactor's job is to apply reducers, order operations into a deterministic log, and route them to processors and sync channels. Everything else is the host's problem. ## The two ready-made hosts **Connect** is the browser and desktop host. When it boots, it initialises a Reactor with PGlite storage in IndexedDB, loads your installed packages, and exposes the Reactor through React hooks. Every editor you build reaches the Reactor through those hooks — you never construct a Reactor yourself inside an editor. **Switchboard** is the server host. It wraps a Reactor in a GraphQL and MCP API so agents, back-ends, and integrations can reach documents without a browser. A Switchboard instance can sync with one or more Connect clients through the DocSync protocol, so the same operation log flows between browser and server. ## Why the separation matters Because the host owns the runtime, the same document model — the same reducer, the same business logic — can run in a browser and a headless server without any changes. Connect renders the editor and signs actions with the user's identity. Switchboard exposes the same document over an API and runs processors server-side. The document model doesn't know which host it's in, and it doesn't need to. This is the practical payoff of keeping the Reactor a plain library: you get to choose the runtime, and you can have more than one. --- ## 01-documents-and-drives > Source: https://academy.vetra.io/academy/Learn/document-models/documents-and-drives You already know that Powerhouse stores _operations_, not snapshots. Now let's look at what those operations live _inside_ — and why the container for your files is just as much a document as the files themselves. ## A document is one typed thing Every piece of content in Powerhouse is a **document**: an instance of a document model that carries both its current state and the append-only operation log that produced it. Think of a Notion page. It has a type (the template), a body (the state), and an edit history. In Powerhouse, that last part is the canonical source — state is derived by replaying the log, not stored directly. A to-do list, a budget ledger, an invoice — each is its own document with its own ID, its own history, and its own model type that constrains which actions are valid. ## A drive is a document too Here's the twist. A **drive** is a folder of documents — and it is _itself_ a document. Compare it to your filesystem: a folder contains files, but the folder is also an entry in the parent directory. In Powerhouse, that analogy goes one level deeper: the folder has its own full operation log. When you add a file, rename a folder, move something, or remove it, that change is an operation on the drive document — not on the file inside it. This matters when you're reasoning about sync. Two collaborators can both add files to the same drive while offline. When they reconnect, Powerhouse merges their drive operation logs exactly as it would merge edits to any other document: no overwrites, no conflicts, just two interlaced sequences of operations. The drive's model type is `powerhouse/document-drive` and its actions are structural: `ADD_FILE`, `ADD_FOLDER`, `MOVE_NODE`, `DELETE_NODE`. Every one of them is an operation appended to the drive's log. ## Files live on drives When you create a document, it gets added to a drive via an `ADD_FILE` action — dispatched against the _drive_, not conjured from thin air: ```ts // This action is dispatched on the drive, not on the new document addActions({ documentId: "", actions: [ { type: "ADD_FILE", input: { documentType: "my-org/todo-list", name: "Shopping list", parentFolder: null, }, }, ], }); ``` The new document comes into existence because the drive's reducer processed that action and appended the operation. The document's own log starts empty. --- ## 02-state-and-scopes > Source: https://academy.vetra.io/academy/Learn/document-models/state-and-scopes A Powerhouse document doesn't have one monolithic state — it has **scopes**. Each scope is its own state shape, its own operation log, and its own sync rules. Once you see why that separation exists, a lot of tricky design decisions become obvious. ## Two scopes, two purposes Every document starts with two scopes: - **`global`** — the state every collaborator sees. Operations land here, get appended to the global log, and replicate to all peers. - **`local`** — state that belongs only to your device. Operations here stay local; they never sync anywhere. ```ts doc.state.global; // shared with everyone doc.state.local; // yours alone doc.operations.global; // replicated log doc.operations.local; // local-only log ``` Think of a shared todo list. The `global` scope holds the items everyone cares about — titles, completion status, assignees. The `local` scope holds things like whether _you_ have the "show completed" filter on, or which item your cursor is sitting on. Those are yours. Nobody else needs them. ## Scopes stay independent Global and local are separate streams. The operation at index 5 in `global` has nothing to do with index 5 in `local`. The Reactor's sync engine replicates `global` across peers and leaves `local` completely alone. This means you can dispatch an action that only updates your filter preference — it appends to the local log, runs the local reducer, and stops there. Your teammates never see it. Meanwhile, when you add a new todo, that action appends to the global log and propagates to everyone. ## Declaring scopes in the model When you define a document model, each scope gets its own GraphQL state schema. The local schema is optional — omit it and the document only has a global scope. ```graphql type TodoListState { # global scope todos: [Todo!]! } type TodoListLocalState { # local scope (optional) showCompleted: Boolean! activeTodoId: OID } ``` When you dispatch an action, you declare which scope it targets. The reducer for that scope runs against that scope's state — the other scope is untouched. ## The one-question rule Not sure which scope to use? Ask: **should every collaborator see this change?** - Yes → `global` - No, this is mine alone → `local` That's it. The boundary isn't about importance or size — it's about audience. --- ## 03-actions-and-reducers > Source: https://academy.vetra.io/academy/Learn/document-models/actions-and-reducers You've heard the words — action, reducer, operation. This lesson makes the contract precise, so you can reason clearly about what's allowed inside each one. ## Actions are just intent An action is plain data. Nothing more. ```ts { type: "ADD_TODO", input: { id: "t-1", title: "Buy milk" } } ``` No timestamp. No hash. No index. An action describes _what you want to happen_ — it's a request, not a fact. The action alone changes nothing. That's intentional. Separating intent from result means you can validate, replay, or reject a change before it ever touches state. ## Reducers define the only legal transitions A reducer is a pure function: `(state, action) => nextState`. It's the single place where state is allowed to change, and it has strict rules: - Same inputs must always produce the same output. - No network calls, no randomness, no wall-clock time. - Synchronous only — no `async`, no promises. ```ts // Valid reducer — pure transformation addTodoOperation(state, action) { state.todos.push({ id: action.input.id, title: action.input.title, done: false, }); } ``` Why so strict? Because peers reconstruct state by _replaying_ the operation log. If a reducer reads `Date.now()` or calls `Math.random()`, two machines replaying the same log end up with different state. The whole system breaks. Non-deterministic values belong in the **action input** — generated before `dispatch`, outside the reducer: ```ts // In the editor — generate the ID before dispatching dispatch( addTodo({ id: generateId(), createdAt: new Date().toISOString(), title: input.title, }), ); ``` r.json()); state.owner = user.id", explanation: "Reducers must be synchronous and have no I/O. A network call makes the reducer async and unreliable. The owner ID should be included in the action input.", }, { label: "const t = state.todos.find(x => x.id === action.input.id); if (!t) throw new TodoNotFoundError('not found'); t.done = !t.done;", correct: true, explanation: "Pure, synchronous, deterministic — this is exactly what a valid reducer looks like. Same state + same action always produces the same result.", }, ]} /> ## Operations are what gets recorded Once the reducer runs without throwing, the Reactor stamps the action with metadata and appends it to the document log. That record is an **operation**: ```ts { index: 42, timestamp: "2026-04-15T10:00:00.000Z", hash: "sha256-...", action: { type: "ADD_TODO", input: { id: "t-1", title: "Buy milk" } }, error: null, } ``` The operation is immutable history. The action was intent; the operation is fact. If the reducer throws, the operation is still appended — but with `error` set to the message and state left unchanged. Failure is also part of the record. ## Intent vs. result The action/reducer/operation triangle gives you a clean separation: | | Carries | | ------------- | -------------------------------------------------------------- | | **Action** | Intent — a name and inputs, nothing else | | **Reducer** | Logic — the only legal way state can change | | **Operation** | Result — the action plus proof it ran (index, hash, timestamp) | A caller can't sneak state changes past the reducer. A reducer can't introduce uncertainty. An operation can't be revised after the fact. Each piece does exactly one job. --- ## 04-your-first-document-model > Source: https://academy.vetra.io/academy/Learn/document-models/your-first-document-model In this lesson you'll build a minimal **Todo** document model from scratch. You'll define the schema in Vetra Studio, let codegen scaffold the types, and write the reducer that drives every state transition. You'll need: - Node.js ≥ 24 - The `ph` CLI (`npm i -g @powerhousedao/ph-cmd` or see [Installation](/academy/Build/GettingStartedBuilding/Prerequisites)) ## Set up the project From an empty directory: ```bash ph init todo-app cd todo-app pnpm install ph vetra ``` `ph vetra` launches Vetra Studio at `http://localhost:3000` and starts the file watchers. Leave it running in its own terminal throughout this lesson. ## Define the schema in Vetra Studio Open the browser and go to `http://localhost:3000`. You'll see two drives — open the **`vetra-`** drive (the source drive for your package). Click **Document Model** to create a new model specification. Give it: - **Name**: `Todo` (PascalCase, no spaces) - **Document type**: `powerhouse/todo` In the GraphQL editor, author the state schema: ```graphql type TodoState { items: [TodoItem!]! } type TodoItem { id: OID! title: String! done: Boolean! } ``` Add a module called `todos`, then add three operations: `ADD_TODO`, `COMPLETE_TODO`, and `REMOVE_TODO`. Vetra Studio generates the input types automatically. Once the schema is valid, codegen runs and emits files into your project. ## Understand what codegen produces After codegen finishes, your project contains: ``` document-models/todo/ ├── gen/ # auto-generated — never edit │ ├── actions.ts # action type unions │ ├── creators.ts # typed action creators │ ├── types.ts # TypeScript interfaces │ └── reducer.ts # reducer dispatcher ├── src/ │ └── reducers/ │ └── todos.ts # yours to implement ├── schema.graphql └── todo.json ``` Files inside `gen/` are regenerated every time the schema changes — never edit them. Your work lives entirely in `src/reducers/`. ## Write the reducer Open `document-models/todo/src/reducers/todos.ts`. Codegen scaffolds a stub that throws "not implemented" for each operation. Replace those with real logic: ```ts title="document-models/todo/src/reducers/todos.ts" export const todoTodosOperations: TodoTodosOperations = { addTodoOperation(state, action) { state.items.push({ id: action.input.id, title: action.input.title, done: false, }); }, completeTodoOperation(state, action) { const item = state.items.find((t) => t.id === action.input.id); if (item) item.done = true; }, removeTodoOperation(state, action) { state.items = state.items.filter((t) => t.id !== action.input.id); }, }; ``` Powerhouse wraps reducers in [Mutative](https://mutative.js.org/), so you write direct mutations — no need to return a new object. The framework produces an immutable snapshot from each mutation. The `state` argument the operation receives is already the scoped state (`global` or `local`). From outside the reducer, you access items as `doc.state.global.items`. ## Test it Because reducers are pure (deterministic, no I/O), you can test them without a server, a database, or a running Vetra instance: ```ts title="document-models/todo/src/tests/todos.test.ts" describe("todo reducer", () => { it("adds and completes a todo", () => { let doc = utils.createDocument(); doc = reducer(doc, addTodo({ id: "t-1", title: "Write the tutorial" })); doc = reducer(doc, addTodo({ id: "t-2", title: "Review it" })); doc = reducer(doc, completeTodo({ id: "t-1" })); expect(doc.state.global.items).toHaveLength(2); expect(doc.state.global.items[0].done).toBe(true); expect(doc.state.global.items[1].done).toBe(false); }); }); ``` Run it with `pnpm test`. The same three operations can be replayed on any peer to reconstruct exactly this state. --- ## 01-what-is-an-editor > Source: https://academy.vetra.io/academy/Learn/editors/what-is-an-editor You've seen how documents store their history as operations, and how reducers produce the next state from each action. But none of that matters to a user until something renders on screen. That's the editor's job — and only that. ## An editor is a React component, nothing more An editor is a React component bound to one document type. It receives two things: the current document state, and a way to dispatch actions. Everything else — running reducers, persisting operations, syncing across peers — is handled by the Reactor. The editor doesn't know any of that exists. When a user opens a document in Connect, the host looks up which editor is registered for that document type and mounts it. If no editor is registered, there's no UI. That registration step is what links a visual component to a document model. One model can have more than one editor. A budget document might have a simple viewer and a full spreadsheet-style editor. Both are separate React components registered against the same model. ## The dividing line: editors vs reducers This is worth being explicit about, because it's easy to blur: | Job | Belongs in | | ------------------------------------------ | ---------- | | Rendering state on screen | Editor | | Dispatching an action when the user clicks | Editor | | Showing a toast notification | Editor | | Computing the next state from an action | Reducer | | Validating that a field is non-empty | Reducer | | Generating the new document history | Reducer | The pattern is simple: **reducers are pure, editors are impure.** Reducers have no access to the DOM, the network, or the clock. Editors can do all of those things freely — because they're just React components. The editor dispatches. The reducer computes. Never the other way around. ## Registration: how Connect finds your editor An editor isn't just a component — it's a component paired with metadata that says which document type it handles. That pairing is called an editor module, and it lives in `editors/editors.ts`. Connect reads this registry at startup to know which UI to mount for each document type. The registration is generated for you during the codegen phase — you don't write it by hand. But it's worth knowing it exists, because a missing registration is the most common reason an editor doesn't appear in Connect. --- ## 02-your-first-editor > Source: https://academy.vetra.io/academy/Learn/editors/your-first-editor An **editor** in Powerhouse is a React component tied to one Document Model. It has one job: turn user input into actions and render the document's state. This lesson builds a minimal editor for the Todo model from the previous lesson. You'll need `ph vetra` running and the Todo model from the previous step already in place. ## Scaffold the editor In Vetra Studio, open the **`vetra-`** drive, then click **Document Editor** to create a new editor specification. Give it: - **Name**: `todo-editor` - **Document type**: `powerhouse/todo` Once you confirm (not just save as draft — the editor must be **confirmed** for codegen to run), codegen scaffolds the editor files: ``` editors/ └── todo-editor/ ├── editor.tsx # yours to implement ├── module.ts # auto-generated, registers the editor └── index.ts ``` You can also scaffold the editor manually with: ```bash ph generate --editor todo-editor --document-type powerhouse/todo ``` ## Implement the editor The generated `editor.tsx` uses the `useSelectedTodoDocument()` hook to get the current document and a `dispatch` function. No props are passed — the hook connects to whichever Todo document is open. ```tsx title="editors/todo-editor/editor.tsx" addTodo, completeTodo, removeTodo, } from "todo-app/document-models/todo"; export default function Editor() { const [document, dispatch] = useSelectedTodoDocument(); const [title, setTitle] = useState(""); return (
{ e.preventDefault(); if (!title.trim()) return; dispatch(addTodo({ id: crypto.randomUUID(), title })); setTitle(""); }} > setTitle(e.target.value)} placeholder="What needs doing?" />
    {document.state.global.items.map((t) => (
  • ))}
); } ``` Notice what the editor does _not_ do: - It never mutates state directly. - It never talks to the network. - It never generates timestamps or hashes — the Reactor handles that. All the editor does is dispatch. The reducer handles the rest. ## How editors are registered The generated `module.ts` exports an `EditorModule` object that links the component to the document type: ```ts title="editors/todo-editor/module.ts" export const TodoEditor: EditorModule = { Component: lazy(() => import("./editor.js")), documentTypes: ["powerhouse/todo"], config: { id: "todo-editor", name: "Todo Editor", }, }; ``` Your package's `editors/editors.ts` collects all `EditorModule` exports: ```ts title="editors/editors.ts" export const editors: EditorModule[] = [TodoEditor]; ``` Powerhouse reads this file to know which UI to render for which document type. ## Preview in Vetra Studio With `ph vetra` running, open the **`preview-`** drive (labelled "Vetra Preview") in the browser. Create a new Todo document there — your editor renders immediately. Any change you make to `editor.tsx` triggers a hot reload. ## What you have now You've got a full vertical slice: - A typed **document model** describing state and actions. - A pure **reducer** that defines every state transition. - A React **editor** that dispatches actions and reads `doc.state.global.items`. That's already enough to run offline, with replay, undo, and audit available. The next lesson turns the final key — sync. --- ## 03-editor-hooks-and-state > Source: https://academy.vetra.io/academy/Learn/editors/editor-hooks-and-state You've written an editor shell. Now you need to actually _read_ the document and _change_ it. Powerhouse gives you a small set of hooks from `@powerhousedao/reactor-browser` to do exactly that — no manual subscriptions, no wiring. ## The hook you'll use 90% of the time Codegen produces a typed hook for your document model. For a TodoList model, that's `useSelectedTodoListDocument`. Call it at the top of your editor: ```tsx const [doc, dispatch] = useSelectedTodoListDocument(); ``` `doc` is a fully-typed `PHDocument`. Read state off `doc.state.global` or `doc.state.local`. The component re-renders automatically whenever an operation lands — you never poll. `dispatch` sends actions into the Reactor: ```tsx dispatch(addTodo({ id: generateId(), title: "Buy milk" })); ``` Always generate IDs _before_ calling dispatch — reducers must stay pure. ## When the document type isn't known at compile time Sometimes you're building a generic component that works across models. Two hooks cover that: - `useSelectedDocument()` — returns `[PHDocument, DispatchFn]`, untyped. Throws if nothing is selected. - `useSelectedDocumentOfType(type)` — same shape, but narrows to a specific type string. Throws if the selected document is a different type. Use the generated typed hook whenever you can. Fall back to these only when generics genuinely prevent it. ## Loading a document by ID Need a document that isn't the currently selected one? Two options: - `useDocumentById(id)` — returns `[PHDocument | undefined, DispatchFn]`. The doc is `undefined` while loading; render a spinner in that case. - `useDocument(id)` — Suspense-based. It never returns `undefined`; instead it suspends until the document is ready. Wrap the caller in ``. ## The dispatch signature Every hook's dispatch has the same shape: ```ts dispatch( actionOrActions: TAction | TAction[] | undefined, onErrors?: (errors: Error[]) => void, onSuccess?: (result: PHDocument) => void, ): void ``` Pass a single action or an array to batch. Use `onErrors` to surface validation failures in your UI. Use `onSuccess` if you need the updated document immediately after the operation lands. --- ## Full local dev stack > Source: https://academy.vetra.io/academy/Learn/connect/what-is-connect You've got a Reactor running and a document model defined. But where do users actually open a document, browse their files, and click things? That's Connect — the default host application Powerhouse ships, and the place where your code meets real users. ## Connect is a host, not just a UI Back in the architecture overview you saw that a _host application_ embeds a Reactor to get the operation engine, then adds its own UI on top. Connect is the most common host. It runs in a browser (or as a desktop app) and layers three things on top of the bare Reactor: - A **drives sidebar** — a file-browser-style view of all drives the user has access to. - An **editor host** — it looks at the document type you open and mounts whichever editor is registered for it. - A **sync client** — it connects to Switchboard and replicates state in real time. Closing Connect doesn't destroy the Reactor _library_ — that's just code. But the session, the UI, the sync loop, and the drive browser all go away with it. ## How Connect finds your packages When Connect starts, it reads configuration to know which document models and editors to load. The key env variable is `PH_CONNECT_PACKAGES` — a comma-separated list of packages Connect should pull in at runtime. If your todo document model isn't in that list, Connect has no idea it exists. For local development you don't usually set this manually. Running `ph vetra` spins up the full stack — Connect, Switchboard, and MCP — all pointed at your local Reactor Package automatically. ```bash ph vetra # Connect only, pointed at a specific Switchboard ph connect studio ``` On the code side, editors are registered in your package's `editors/editors.ts`: ```ts export const editors: EditorModule[] = [TodoListEditor]; ``` If that array is empty, Connect renders nothing when you open a todo document. ## Studio mode vs. production Connect runs in two modes, and from your editor's point of view they're identical: - **Studio mode** (`PH_CONNECT_STUDIO_MODE=true`) — points at your local Reactor Package. Every save reloads. This is where you build. - **Production mode** — a static bundle deployed to a server, connecting to a production Switchboard. Same editor code, different environment. The built bundle is configured entirely through `PH_CONNECT_*` environment variables — things like which Switchboard drives to default to (`PH_CONNECT_DEFAULT_DRIVES_URL`) or the log level (`PH_CONNECT_LOG_LEVEL`). These are baked in at build time and reach the browser, so never put secrets there. --- ## 02-drive-apps > Source: https://academy.vetra.io/academy/Learn/connect/drive-apps Connect's default drive view is a folder tree with documents inside it. That's fine for generic storage — but once you have a real product, you probably want a Kanban board, a project dashboard, or a curated landing page instead. That's exactly what a **drive app** gives you. ## Editor vs. drive app — the sharp line You've already seen editors: a React component that renders and edits _one document_. A drive app is the complementary piece — it renders the _whole drive_. Think of it this way: - **Editor** — the inside of a document. One task, one contract, one budget row. - **Drive app** — the outside. A list of all tasks. A summary dashboard. A workflow screen that composes multiple documents into a single view. Connect calls one or the other depending on what's selected. When a user has a drive open but no document selected, the drive app runs. When they open a specific document, the appropriate editor takes over — and the drive app can still wrap it as a shell. ## What a drive app looks like Codegen scaffolds a drive app with a `DriveExplorer` component. It receives `children` — the active document's editor — and decides where to render it: ```tsx export function DriveExplorer({ children }: EditorProps) { const showDocumentEditor = !!children; return (
{showDocumentEditor ? children : }
); } ``` When a document is open, `children` is truthy and the editor appears. Otherwise, your custom `DriveContents` fills the space — a Kanban board, a document grid, whatever fits your product. ## Drive apps ship real products The combination of drive app + editors is how teams turn Powerhouse into a finished product. The drive app owns the navigation, the cross-document dashboard, and any workflow that spans multiple documents. Editors own the detail view for each one. Together they cover the full surface area of a real frontend — without leaving Connect. Hooks like `useDocumentsInSelectedDrive()` let the drive app read every document in the drive, and `showCreateDocumentModal()` wires up the "new document" flow — all from `@powerhousedao/reactor-browser`. --- ## Reactor booted > Source: https://academy.vetra.io/academy/Learn/switchboard/what-is-switchboard You've seen Connect give users a browser UI for editing documents. Switchboard is the other side of that coin — it runs the same Reactor engine, but on a Node server, and instead of a UI it hands clients an API. Same documents, same operation log, different surface. ## Just another host Remember the host-application pattern: any runtime that boots a Reactor and loads a package is a host. Connect is one. Switchboard is another. The difference is what each host exposes outward: - **Connect** renders editors — it gives _people_ a UI. - **Switchboard** exposes GraphQL and MCP endpoints — it gives _code_ an API. Because both run the same Reactor library with the same document models installed, they stay in sync. An operation written through Connect arrives in Switchboard; a mutation dispatched via GraphQL shows up immediately in Connect. One Reactor, two surfaces. ## What Switchboard exposes Switchboard serves two protocols at once: - **GraphQL** — composed from _subgraphs_, one per installed package. Web apps, mobile clients, and integrations query documents and dispatch actions here. - **MCP** (Model Context Protocol) — the same Reactor, surfaced as tools an AI agent can call. You'll dig into subgraphs in the next lesson. For now, just think of them as "the GraphQL layer, split by package domain, then stitched back into one unified schema." ## Where processors fit in Processors are event-driven handlers that subscribe to the operation stream and fold it into _read models_ — optimised views for search indexes, dashboards, aggregates, or anything else that's awkward to derive from a single document's state at query time. Processors run inside Switchboard, and subgraphs query the read models they produce. You'll get a full lesson on processors too. The short version: if a query spans many documents or needs pre-computed data, a processor builds it; a subgraph exposes it. ## Running Switchboard locally During development, `ph vetra` spins up a local Switchboard alongside Connect. It hot-reloads your subgraphs as you edit them and attaches MCP so you can test agent workflows without a production deployment. ```bash ph vetra # Subgraphs composed — GraphQL at http://localhost:4001/graphql # MCP at http://localhost:4001/mcp ``` In production, Switchboard deploys as a Docker container — same code, persistent Reactor store, as many instances as you need behind a load balancer. --- ## 02-subgraphs > Source: https://academy.vetra.io/academy/Learn/switchboard/subgraphs You've got documents. You've got operations. Now you need the outside world — a web app, a mobile client, an AI agent — to be able to read and write that data over the network. That's exactly what a subgraph does. ## One endpoint, many packages Switchboard doesn't expose a single monolithic schema. Instead, every Reactor Package ships its _own_ GraphQL schema fragment — its subgraph. When Switchboard boots, it composes all of those fragments into one unified endpoint. The practical payoff: a client can query data from two completely independent packages in a single request. Neither package knows about the other. Switchboard handles the stitching. ```graphql query { todoList(id: "doc-123") { id todos { id title done } } } ``` That query hits one endpoint. Behind the scenes, it's resolved by whatever package owns the `todoList` type. ## Subgraphs are the API face of your document model If a document model defines the _shape_ of your data and the _actions_ allowed on it, the subgraph is how that shape appears to callers on the network. Each subgraph exposes three things: - **Queries** — for reading documents and processor read models. - **Mutations** — for dispatching actions to documents. - **Custom types** — domain-specific GraphQL types your resolvers return. Because each package owns its subgraph, the package is the unit of delivery. Ship a new package and its API comes with it — no central schema registry to update. ## Where mutations go A mutation in a subgraph isn't stored as a database write. It dispatches an **action** to the underlying document via the Reactor. ```ts Mutation: { async addTodo(_parent, { input }, ctx) { return ctx.reactor.dispatch("", [ { type: "ADD_TODO", input } ]); } } ``` The Reactor runs the action through the reducer, stamps it as an operation, appends it to the document history, and syncs it to connected peers. The subgraph layer is thin — it translates network calls into document actions and hands off. --- ## 03-processors-and-read-models > Source: https://academy.vetra.io/academy/Learn/switchboard/processors-and-read-models A document's operation log is authoritative but not always convenient. If you want to ask "which todos did Alice complete last week?" you don't want to replay the entire log every time. That's what **processors** are for: event-driven handlers that subscribe to the operation stream and maintain a **read model** on the side. ## The mental model Think of processors as **materialised views** over the operation log. Each processor: 1. Subscribes to one or more document types (or specific documents). 2. Receives every operation as it's appended. 3. Updates its own storage — a table, an index, a counter. Your reducers stay lean; your queries stay fast; neither has to know about the other. ## The IProcessor interface Every processor implements `IProcessor` from `@powerhousedao/reactor-browser`: ```ts IProcessor, OperationWithContext, } from "@powerhousedao/reactor-browser"; export interface IProcessor { onOperations(operations: OperationWithContext[]): Promise; onDisconnect(): Promise; } ``` - `onOperations` is called each time operations arrive, in order. Batch all your updates inside one call rather than writing one-by-one. - `onDisconnect` is called when the Reactor removes the processor — use it to close connections or flush caches. ## Scaffold a processor Generate the scaffolding with: ```bash ph generate --processor todo-stats --processor-apps switchboard ``` This creates `processors/todo-stats/` with a class that implements `IProcessor` and a factory that registers it with the Reactor. ## A minimal processor Fill in `onOperations` to build your read model: ```ts title="processors/todo-stats/index.ts" IProcessor, OperationWithContext, } from "@powerhousedao/reactor-browser"; export class TodoStatsProcessor implements IProcessor { private counts = { added: 0, completed: 0, removed: 0 }; async onOperations(operations: OperationWithContext[]): Promise { for (const { operation, context } of operations) { if (context.documentType !== "powerhouse/todo") continue; switch (operation.type) { case "ADD_TODO": this.counts.added++; break; case "COMPLETE_TODO": this.counts.completed++; break; case "REMOVE_TODO": this.counts.removed++; break; } } } async onDisconnect(): Promise { // release any resources here } getStats() { return { ...this.counts }; } } ``` That's it. No polling, no cron, no diffing. Every operation flows through `onOperations` exactly once, in order. ## Replay-safe from day one A processor's job is to reduce the log. So if you change the processor's code — add a new counter, fix a bug, reshape the output — you can drop its state and replay from operation zero. The log never changed; only the lens did. This is how Powerhouse keeps processors "forgiving": you can evolve them without corrupting the source of truth. ## Filtering operations The factory registers a `ProcessorRecord` that tells the Reactor which operations to deliver. A typical filter targets a specific document type and scope: ```ts title="processors/todo-stats/factory.ts" export async function todoStatsProcessorFactory(): Promise { const processor = new TodoStatsProcessor(); return [ { processor, filter: { documentType: ["powerhouse/todo"], scope: ["global"], branch: ["main"], }, }, ]; } ``` When your package registers the factory with the Reactor, only operations matching that filter reach `onOperations`. ## You've seen the whole stack Reducers, editors, sync, and now processors. That's the full Powerhouse shape: ``` dispatch(action) → reducer → operation (in log) │ ├─► synced to peers └─► fanned out to processors → read models → UI / agents ``` Once you have the log, every downstream feature is just another lens on it. --- ## 01-sync-and-collaborate > Source: https://academy.vetra.io/academy/Learn/sync/sync-and-collaborate So far your Todo document lives in a single Reactor in a single tab. This lesson makes it collaborative: open it in two browsers, take one offline, and see operations reconcile when it comes back. Nothing in your model or editor changes. Sync is infrastructure — it rides on top of the operation log you already have. ## What "syncing" actually means Two Reactors hold the same document if they hold the same ordered log of operations. Sync is just the protocol that gets them there: 1. Each Reactor keeps its local log. 2. When connected, they exchange missing operations. 3. Both sides fold the combined log and arrive at the same state. Because each operation carries its own index and hash, there's no guessing what's new and no ambiguity about order. ## Try it With `ph vetra` running and the Todo model and editor from the previous two lessons in place, open two browser windows pointing at `http://localhost:3000`. In both windows, open the same Todo document from the **`preview-`** drive and start editing. Additions, completions, and deletions flow between them in under a second. Now, in window A: - Open DevTools → Network → toggle "Offline." - Add three new todos. - Complete one of window B's existing todos. Window B keeps working — it doesn't know A is offline. It also keeps editing. Turn A's network back on. Within a moment: - A's three new todos appear in B. - B's changes appear in A. - Both logs have the same operations, in the same order, with the same hashes. That's it. No merge UI, no "whose version do you want to keep?" popup. ## When do conflicts _really_ happen? The one place you still need to think is **semantic conflict**: two operations that are each fine on their own, but contradictory together. For example, if Alice renames todo `t-1` to "Groceries" and Bob renames it to "Errands" while offline, both renames will be in the log after sync, and the later one will win as the current title — but both actors' _intent_ is preserved in the history. If your app needs a different resolution rule (for example, "the first writer wins"), you encode it in the reducer — not in sync. The sync layer never has to make a judgement call, because your reducer already has. ## You've shipped the loop You now have a document model, a reducer, an editor, and a fully-synced, offline-first, multi-device experience — built on the same operation log the rest of Powerhouse uses for undo, audit, and replays. --- ## 01-reducers-in-depth > Source: https://academy.vetra.io/academy/Learn/deep-dives/reducers-in-depth Reducers are the one part of a Powerhouse app that _must_ be pure. Everything downstream — sync, replay, undo, audit — assumes that running the same reducer against the same inputs produces the same outputs, forever. This lesson covers the patterns that keep reducers tidy and the ones that quietly break them. ## Three rules, always 1. **No I/O.** No `fetch`, no `localStorage`, no `console.log`. 2. **No time or randomness.** No `Date.now()`, no `Math.random()`, no `crypto.randomUUID()` — those values come from action inputs. 3. **Mutate only the provided draft.** Powerhouse wraps reducers in Mutative, so you mutate `state` in place. Never touch module-level variables or anything outside the `state` argument. If you want any of those things, they belong in one of: - **Action inputs** — the caller provides the id, timestamp, or external data. - **Processors** — derived read models that react to operations after they're appended. - **The editor** — for UI-facing side-effects. ## State scopes Real documents have more than one kind of state. Powerhouse splits the state of a document into **scopes**: | Scope | What it holds | Who can write | | -------- | -------------------------------------- | ---------------------------- | | `global` | The canonical shape of the document | Any authenticated actor | | `local` | Per-actor UI state (cursor, selection) | Only the actor it belongs to | Reducers are split along the same lines. When you define an operation in Vetra Studio, you mark which scope it writes to. Codegen emits a typed action creator that passes the scope through to `createAction` automatically: ```ts // generated in document-models/my-doc/gen/creators.ts export const setCursor = (input: SetCursorInput) => createAction( "SET_CURSOR", { ...input }, undefined, SetCursorInputSchema, "local", ); ``` You never call `createAction` directly — use the generated creator (`setCursor(...)`) from `document-models//gen/creators.ts`. ## Pattern: invert for undo Because reducers are pure, undo is a pattern, not a feature you have to implement inside the reducer. For each action you support, emit a paired "inverse" action that the app can dispatch to roll it back. ```ts function invert(op: Operation): Action | null { switch (op.type) { case "ADD_TODO": return removeTodo({ id: op.input.id }); case "REMOVE_TODO": return addTodo({ id: op.input.id, title: op.input.restoreTitle }); case "COMPLETE_TODO": return uncompleteTodo({ id: op.input.id }); default: return null; } } ``` Dispatching the inverse produces a _new_ operation in the log — you keep the history, and the effect is undone. Nothing about the log is rewritten. ## Testing reducers Because reducers are pure functions, they test like pure functions. No mocking, no fixtures, no in-memory DB: ```ts test("completing a todo marks it done", () => { let doc = utils.createDocument(); doc = reducer(doc, addTodo({ id: "t-1", title: "Test" })); const afterComplete = reducer(doc, completeTodo({ id: "t-1" })); expect(afterComplete.state.global.items[0].done).toBe(true); expect(doc.state.global.items[0].done).toBe(false); // original snapshot untouched }); ``` Two things you should always cover: - **Determinism** — the same inputs produce the same output on two separate runs. - **Snapshot isolation** — the document passed into `reducer` is unchanged after the call; Mutative ensures that. If either assertion fails, your reducer isn't pure — and sync will eventually betray you. --- ## 02-identity-and-signing > Source: https://academy.vetra.io/academy/Learn/deep-dives/identity-and-signing You've seen that a document _is_ its operation log, and that the log is what syncs between peers. That raises a question every collaborative system has to answer: **who produced each operation, and can a peer trust it?** This lesson connects the operation model you already know to Powerhouse's identity and signing story. By the end you should be able to explain what a signed operation proves — and what it doesn't. ## Operations carry an actor Every operation already records _who_ dispatched it. In the foundations lesson you saw an operation shaped like this: ```json { "index": 42, "name": "completeTodo", "input": { "id": "t-1" }, "actor": "user:alice", "hash": "…" } ``` That `actor` comes from an **identity**. In Powerhouse, identities are issued through Renown — a decentralized identity layer, so a user's identity isn't owned by any single server. When someone connects in Connect, they authenticate with Renown and every action they dispatch is attributed to that identity. ## A claim is not a proof An `actor` field on its own is just a _claim_. Nothing stops a malicious peer from writing `"actor": "user:alice"` onto an operation Alice never made. In a local-first system where operations flow between machines you don't control, that's a real problem. This is where **signing** comes in. When an operation is signed, the actor's private key produces a signature over the operation's content and position in the log. Any peer can then verify, using the public key, that: - the operation really came from that identity, and - it hasn't been altered since it was signed. Because the signature covers the operation's place in the history, you can't lift a signed operation out of one document and replay it into another — the hash chain won't match. ## Three gates, not one It's worth separating the concerns that all meet at a single operation: | Gate | Question | Where it lives | | ------------------ | ------------------------------------------------------ | ---------------------- | | **Authentication** | Who is this identity? | Renown | | **Signing** | Did this identity really produce this exact operation? | Signature verification | | **Authorization** | Is this identity allowed to perform this action here? | Document permissions | | **Validity** | Is the resulting state legal? | The reducer | A signed operation can be perfectly authentic and still be rejected — because the signer lacks permission on that document, or because the reducer's rules don't allow the change. Identity establishes _trust_; it doesn't replace the other checks. ## Why this falls out of the operation log None of this needs a bolt-on audit system. Because state is already an ordered, hash-linked log of operations, attaching a signature to each entry is enough to make the whole history **tamper-evident**: change any past operation and every signature and hash after it stops verifying. The same structure that gives you deterministic replay and conflict-free sync gives you a trustworthy audit trail for free. --- # Reference ## Powerhouse Architecture > Source: https://academy.vetra.io/academy/Reference/Architecture/PowerhouseArchitecture **Vetra is part of the Powerhouse Ecosystem** and acts as the builder platform for creating an independent, open-source and decentralized back-end for any SaaS, ERP, CMS or CRM needs. ## Local First. Built to Scale. Vetra helps you build any type of web application on a **Reactive Document Architecture**. Define workflows once, deploy them globally, and co-own the software you create. The architecture is built on a minimal but powerful tech-stack: **GraphQL**, **TypeScript**, and **React**. ### Reactive Document Architecture The Powerhouse framework is built around structured document models and declarative design: - **Reactive**: Real-time, responsive, and message-driven with an elastic scalable architecture. - **Document-Centric**: Documents as local-first, self-contained data structures and nodes in a decentralized network. - **Git-like UX**: State-of-the-art editing with history branching, merging, and commenting. - **Stateful**: Documents with well-defined operations as state transitions become mini-APIs. - **Scalable**: CQRS and EDA-inspired architecture with read models for data aggregation. ### Specification Driven Design & Development Complementing the Reactive Document Architecture, Powerhouse embraces **Specification Driven Design & Development**. This approach enables you to communicate your solution and intent through structured specification documents designed for AI collaboration. Specifications serve as a shared language—enabling precise, iterative edits that turn messy intent into clean execution. Our documents are machine-readable and executable, laying the groundwork for a "Git for Intent" for your AI agents. Therefore, Vetra is the stack for sovereign infrastructure and AI-run, AI-mediated, AI-executed business, organizations, and networks. ## Target Audiences Vetra supports a variety of organizations with a headless open-source back-end: - Decentralized Autonomous Organizations (DAOs) - Scalable Network Organizations (an evolution of DAOs within the Powerhouse framework) - NGOs and Governmental Organizations - Cooperatives and distributed teams ## Host Applications The Powerhouse ecosystem makes use of 4 core host applications that together form a modular, scalable operating system for any organization or business. Each application serves a distinct role, yet they are interdependent—working as a unified system to streamline operations, enhance collaboration, and drive automation. 1. **Connect** – A collaboration hub and private workspace for independent contributors. 2. **Switchboard** – The data infrastructure and API engine for managing remote instances. 3. **Fusion** – An SDK for visualizing collected data and public-facing collaboration. 4. **Renown** – A decentralized reputation and identity system. ## How It All Connects: Reactors The host applications sync their documents with one another through **Reactors**. A reactor is a node within any Powerhouse network responsible for storing documents, resolving conflicts, and verifying document event histories. Reactors can be configured for: - **Local Storage** – For offline or on-device access. - **Cloud Storage** – For centralized, scalable data management. - **Decentralized Storage** – Such as Ceramic or IPFS for distributed storage. The documents within the network react to one another through the **DocSync** protocol—which sends updates from one reactor to another, ensuring all data stays synchronized across the system. ![Powerhouse Host Apps Interaction](../docs/docs/images/PowerhouseArchitecture.png) ## Powerhouse Platforms With the help of these host applications, Powerhouse is launching 2 platforms that demonstrate the infrastructure that can be built with the Powerhouse tech-stack: - [**Vetra Builder Platform**](https://vetra.io/): Sovereign infrastructure for scalable network organizations—local first, built to scale. - [**Achra Decentralized Operations Platform**](https://achra.com/): Where open organizations can procure and purchase services. --- ## Working with the Reactor > Source: https://academy.vetra.io/academy/Reference/Reactor/WorkingWithTheReactor **TIP:** Document models are the common design pattern that is used for all documents and files. DocSync is a decentralized synchronization protocol that is storage agnostic. **Document Models** are _what_ is synced and **DocSync** is _how_ document models are synced. But who is doing the syncing? We call these participants **Reactors**. ### Powerhouse Reactors **What is a Reactor?** Powerhouse Reactors are the nodes in the network that store documents, resolve conflicts and rerun operations to verify document event histories. Reactors can be configured for local storage, centralized cloud storage or on a decentralized storage network. A Reactor is essentially a storage node used in Powerhouse's framework to handle documents and traditional files. It supports multiple storage solutions, including: - **Local Storage**: For offline or on-device access. - **Cloud Storage**: For centralized, scalable data management. - **Decentralized Storage**: Such as Ceramic or IPFS, enabling distributed and blockchain-based storage options. ### Core Functions of Reactors - **Data Synchronization**: Reactors ensure that all data, whether local or distributed, remains up-to-date and consistent across the system. - **Modular Storage Adapters**: They support integration with different storage backends depending on organizational needs. - **Collaboration Support**: Reactors facilitate document sharing and peer-to-peer collaboration across contributors within the network. **TIP:** The DocSync protocol _sends updates from one reactor to another_ - **smashing document operations into one another** - to ensure all data is synced. A **reactor** is responsible for storing data and resolving merge conflicts. Editing data and submitting new operations must be done through Powerhouse's native applications (Connect, Switchboard, Fusion). Each instance of these applications contains a Reactor that is responsible for storing data and syncing data through DocSync. In other words, Powerhouse applications are how Reactors can be accessed, manipulated, steered, visualized and modified. A local Connect desktop application's reactor can therefore sync with the Reactor of a remote drive (e.g. Switchboard instance). Powerhouse Storage Layer ### Why Are Reactors Important? They are key to ensuring the scalability and resilience of decentralized operations. By acting as the backbone for document models in the Powerhouse framework, they enable seamless version control and event-driven updates. Reactors provide the foundation for advanced features like real-time collaboration, history tracking, and decentralized audits. This modular, flexible infrastructure enables organizations to build efficient and robust decentralized systems, tailored for modern network organizations ## Getting an IReactorClient There are a few ways to obtain an `IReactorClient`, depending on where your code runs. **In an app (React).** Call the `useReactorClient()` hook from `@powerhousedao/reactor-browser`. It returns the `IReactorClient` for the running reactor. ```typescript const client = useReactorClient(); ``` The same module exposes sibling hooks: `useSync` (the `ISyncManager`), `useSyncList` (its remotes), `useModelRegistry` (the document-model registry), `useDatabase` (the Kysely database), and `usePGlite` (the PGlite instance). **Standalone (scripts, tests, servers).** Build a client with `ReactorClientBuilder`. Wire a reactor with either `.withReactorBuilder(builder)` or `.withReactor(reactor, eventBus, documentIndexer, documentView)`, add `.withSigner(...)` and `.withDocumentModelLoader(...)` as needed, then call `.build()` (returns the client) or `.buildModule()` (returns the client plus the wired module). ```typescript const client = await new ReactorClientBuilder() .withReactorBuilder(reactorBuilder) .withSigner(signer) .build(); ``` `buildModule()` throws if neither `withReactorBuilder` nor `withReactor` was set. For the low-level builder detail, see [Advanced Reactor Usage](/academy/Reference/Reactor/AdvancedReactorUsage). **In a generated subgraph (server-side).** A generated subgraph extends `BaseSubgraph`, which holds the client as the `reactorClient` property. The generated `getResolvers(subgraph)` reads it off the instance; inside a method on the subgraph class, use `this.reactorClient`. The GraphQL resolver `context` does not carry the reactor. ```typescript // resolvers.ts (generated scaffold) export const getResolvers = (subgraph: BaseSubgraph) => { const reactor = subgraph.reactorClient; // IReactorClient return { Query: { todoList: (_parent: unknown, args: { id: string }) => reactor.get(args.id), }, }; }; ``` **In a generated processor (server-side).** The processor factory builder receives the host module; the client is `module.client`. The parameter is typed as the base `IProcessorHostModule`, which exposes `relationalDb`, `analyticsStore`, `dispatch`, and `getReadModel` but not `client`. Widen it to `IReactorProcessorHostModule` to reach `client` (and `attachments`). See [Processors](/academy/Reference/Reactor/Processors) for the full registration flow. ```typescript IReactorProcessorHostModule, ProcessorFactoryBuilder, } from "@powerhousedao/reactor-browser"; // factory.ts (generated scaffold) export const factoryBuilder: ProcessorFactoryBuilder = (module) => { // `module` is typed as the base IProcessorHostModule; widen it to reach `client`. const { client } = module as IReactorProcessorHostModule; // client: IReactorClient return async () => { // use client.get(...), client.drives, client.execute(...) return []; }; }; ``` ## The ReactorClient API The `IReactorClient` is the primary interface for interacting with a reactor programmatically. It wraps lower-level APIs to provide a simpler, Promise-based interface for document operations. ```typescript ``` **INFO:** `@powerhousedao/reactor-browser` re-exports a curated subset of reactor types for browser environments (editors, drive-apps, subgraphs) — including `IReactorClient`, `DocumentChangeType`, `ReactorBuilder`, and `ReactorClientBuilder`. Other types used on these pages (`ViewFilter`, `SearchFilter`, `PagingOptions`, `PagedResults`, `PropagationMode`, `JobInfo`, `JobStatus`, `DocumentChangeEvent`, `OperationFilter`, `IReactor`, `ReactorEventTypes`, `SyncEventTypes`, `QueueEventTypes`) are not re-exported; import them from `@powerhousedao/reactor`. Outside the browser, import everything from `@powerhousedao/reactor`. ### Reading documents | Method | Description | | ------------------------------------------------------------------------------ | ------------------------------------------------- | | `get(identifier, view?)` | Retrieve a document by id or slug | | `resolveIdOrSlug(identifier)` | Resolve an id or slug to the canonical document id | | `getOutgoingRelationships(sourceIdentifier, relationshipType, view?, paging?)` | List documents related from a source | | `getIncomingRelationships(targetIdentifier, relationshipType, view?, paging?)` | List documents related into a target | | `find(search, view?, paging?)` | Search documents by type, parentId, ids, or slugs | | `getOperations(documentIdentifier, view?, filter?, paging?)` | Retrieve operations for a document | | `getDocumentModelModules(namespace?, paging?)` | List registered document model modules | | `getDocumentModelModule(documentType)` | Get a specific document model module | The optional `ViewFilter` lets you target a specific branch, set of scopes, or revision: ```typescript type ViewFilter = { branch?: string; scopes?: string[]; revision?: number; }; ``` The `SearchFilter` lets you narrow results: ```typescript type SearchFilter = { type?: string; parentId?: string; ids?: string[]; slugs?: string[]; }; ``` All list methods support pagination via `PagingOptions` (`{ cursor, limit }`) and return `PagedResults` with a `next()` helper for fetching the next page. ### Writing documents | Method | Description | | ------------------------------------------------------------------------------------------- | ------------------------------------------------------------------ | | `create(document, parentIdentifier?)` | Create a document from a full `PHDocument` object | | `createEmpty(documentModelType, options?)` | Create an empty document of a given type | | `execute(documentIdentifier, branch, actions)` | Apply actions and wait for completion | | `executeAsync(documentIdentifier, branch, actions)` | Submit actions and return immediately with a `JobInfo` | | `executeBatch(request)` | Apply multiple jobs in dependency order and wait for all | | `loadBatch(request)` | Load batches of pre-existing operations across documents | | `rename(documentIdentifier, name, branch?)` | Rename a document | | `setPreferredEditor(documentIdentifier, preferredEditor, branch?)` | Set the document's preferred editor (`null` clears it) | | `addRelationship(sourceIdentifier, targetIdentifier, relationshipType, branch?)` | Add a typed relationship between two documents | | `removeRelationship(sourceIdentifier, targetIdentifier, relationshipType, branch?)` | Remove a typed relationship between two documents | | `moveRelationship(sourceParent, targetParent, targetIdentifier, relationshipType, branch?)` | Move a relationship from one source to another | | `deleteDocument(identifier, propagate?)` | Delete a document (`PropagationMode.Cascade` deletes children too) | | `deleteDocuments(identifiers, propagate?)` | Bulk delete | To create a document inside a drive, use `client.drives.addFile`. See the [Drives](/academy/Reference/Reactor/ReactorClient#drives-clientdrives) section on the IReactorClient reference page. ### Subscribing to changes ```typescript const unsubscribe = reactorClient.subscribe( { type: "powerhouse/todo-list" }, // SearchFilter (event) => { // event.type is one of: Created, Deleted, Updated, // ChildAdded, ChildRemoved console.log(event.type, event.documents); }, ); ``` ### Job tracking Write operations return `JobInfo` objects. A job tracks the lifecycle of a set of actions as they move through the reactor. ```typescript const job = await reactorClient.executeAsync(docId, "main", actions); const completed = await reactorClient.waitForJob(job.id); ``` You can also poll with `getJobStatus(jobId)`. For the full API reference, see [IReactorClient API Reference](/academy/Reference/Reactor/ReactorClient). ## Job lifecycle Every mutation in the reactor is processed as a **job**. Jobs move through these statuses: ``` PENDING → RUNNING → WRITE_READY → READ_READY ↘ FAILED ``` | Status | Meaning | | ------------- | --------------------------------------------------------------------- | | `PENDING` | Job is queued but not yet started | | `RUNNING` | Job is currently being executed by the reducer | | `WRITE_READY` | Operations have been written to the operation store | | `READ_READY` | All read models have finished processing — document is fully readable | | `FAILED` | Job encountered an unrecoverable error | Only `READ_READY` and `FAILED` are terminal statuses. The `execute()` method on `IReactorClient` waits until `READ_READY` before resolving; `executeAsync()` returns immediately with a `JobInfo` at `PENDING`. ## Reactor event system The reactor uses an internal event bus to coordinate between subsystems. The event-type enums you subscribe to most often are: ### Core job events (`ReactorEventTypes`) | Event | Numeric ID | When it fires | | ----------------- | ---------- | --------------------------------------------- | | `JOB_PENDING` | 10001 | Job is registered and waiting to execute | | `JOB_RUNNING` | 10002 | Job starts executing | | `JOB_WRITE_READY` | 10003 | Operations are written to the operation store | | `JOB_READ_READY` | 10004 | All read models have finished processing | | `JOB_FAILED` | 10005 | Job failed with an unrecoverable error | | `READMODEL_BATCH_COMPLETED` | 10006 | The read-model coordinator finishes a projection batch (carries per-stage timings) | | `READMODEL_INDEXED` | 10007 | An individual read model finishes indexing a batch in one stage | | `MODEL_LOADED` | 10008 | The resolver loads a document model module on demand | ### Sync events (`SyncEventTypes`) | Event | Numeric ID | When it fires | | -------------------------- | ---------- | ------------------------------------------------ | | `SYNC_PENDING` | 20001 | Sync operations are queued in outboxes | | `SYNC_SUCCEEDED` | 20002 | All sync operations for a job succeed | | `SYNC_FAILED` | 20003 | At least one sync operation failed | | `DEAD_LETTER_ADDED` | 20004 | A sync operation is moved to dead letter storage | | `CONNECTION_STATE_CHANGED` | 20005 | Remote connection state changes | ### Queue events (`QueueEventTypes`) | Event | Numeric ID | When it fires | | --------------- | ---------- | --------------------------------------- | | `JOB_AVAILABLE` | 10000 | Queue has work available for processing | ### Executor lifecycle events (`JobExecutorEventTypes`) The executor managers emit a lower-level set of events for individual job execution and executor startup/shutdown. Most application code subscribes to `ReactorEventTypes` instead. | Event | Numeric ID | When it fires | | ------------------ | ---------- | -------------------------------------- | | `JOB_STARTED` | 20000 | An executor starts running a job | | `JOB_COMPLETED` | 20001 | An executor finishes a job | | `JOB_FAILED` | 20002 | An executor's job fails | | `EXECUTOR_STARTED` | 20003 | An executor starts | | `EXECUTOR_STOPPED` | 20004 | An executor stops | ## Configuring your reactor In addition to the choice of storage, Reactors also have other configurations. - The **operational data** and **read models** associated with the document models inside a reactor allow to query the gathered data inside a document model or quickly visualize the crucial insights at a glance. - **Processors** are components that receive operations and perform side effects — analytics tracking, relational database indexing, webhooks, and more. You register processor factories with the reactor, and it automatically creates processor instances for each drive. The processor pipeline works as follows: 1. **Operations are written** — a job completes its write phase, persisting operations to storage 2. **Pre-ready read models update** — built-in read models like `DocumentView` and `DocumentIndexer` update their state 3. **`JOB_READ_READY` event fires** — signaling that the document is fully readable 4. **Post-ready read models update** — the `ProcessorManager` routes matching operations to user-defined processors via `onOperations()` For a step-by-step guide to building processors, see [Building a Processor](/academy/Build/WorkWithData/BuildingAProcessor). For the reactor-side registration API, see [Processors](/academy/Reference/Reactor/Processors). ### Ordering guarantees - **Global ordinal**: Every operation gets a monotonically increasing `ordinal` in its `OperationContext`, enabling cross-document ordering - **Within a processor**: Operations arrive sorted by ordinal (chronological order) - **Between processors**: Processors for the same drive execute in parallel — there is no inter-processor ordering guarantee - **Per-document serialization**: The queue serializes execution per document, even across scopes and branches - **Catch-up on restart**: Processors automatically replay missed operations after a restart (each processor's progress is tracked via the `ProcessorCursor` table) If you are working with the Reactor directly or need additional information regarding its architecture you can visit: https://github.com/powerhouse-inc/powerhouse/blob/main/packages/reactor/docs/ARCHITECTURE.md --- ## IReactorClient > Source: https://academy.vetra.io/academy/Reference/Reactor/ReactorClient The `IReactorClient` interface is the primary way to interact with a Powerhouse reactor programmatically. It wraps lower-level APIs to provide a simpler, Promise-based interface for document operations. ```typescript ``` **INFO:** `@powerhousedao/reactor-browser` re-exports a curated subset of reactor values and types for browser environments (editors, drive-apps, subgraphs). `IReactorClient`, `DocumentChangeType`, `ReactorBuilder`, and `ReactorClientBuilder` are re-exported there. Most other types on this page are not re-exported and must come from `@powerhousedao/reactor`: `ViewFilter`, `SearchFilter`, `PagingOptions`, `PagedResults`, `PropagationMode`, `JobInfo`, `JobStatus`, `DocumentChangeEvent`, and `OperationFilter`. Outside the browser (a standalone Node.js script, CLI tool, or server-side processor), import everything from `@powerhousedao/reactor`. For an architectural overview of the reactor, see [Working with the Reactor](/academy/Reference/Reactor/WorkingWithTheReactor). For the low-level `IReactor` interface and access to internal components, see [Advanced Reactor Usage](/academy/Reference/Reactor/AdvancedReactorUsage). ## Common parameter types Several types appear across multiple methods. They are described here once. ### `ViewFilter` Targets a specific branch, scopes, or revision when reading documents. ```typescript type ViewFilter = { branch?: string; scopes?: string[]; revision?: number; }; ``` | Field | Description | | ---------- | ----------------------------------------------- | | `branch` | The branch to read from (e.g. `"main"`) | | `scopes` | Scopes to include (e.g. `["global"]`) | | `revision` | Read the document at a specific revision number | ### `SearchFilter` Narrows which documents a query returns. ```typescript type SearchFilter = { type?: string; parentId?: string; ids?: string[]; slugs?: string[]; }; ``` ### `PagingOptions` Controls pagination for list methods. ```typescript type PagingOptions = { cursor: string; limit: number; }; ``` ### `PagedResults` Returned by all list methods. Includes a `next()` helper for fetching the next page. ```typescript type PagedResults = { results: T[]; options: PagingOptions; next?: () => Promise>; nextCursor?: string; totalCount?: number; }; ``` ### `PropagationMode` Controls how deletions handle child documents. ```typescript enum PropagationMode { None = "none", // Only delete the specified document Cascade = "cascade", // Also delete all child documents } ``` ### `CreateDocumentOptions` Options for `createEmpty()`. ```typescript type CreateDocumentOptions = { parentIdentifier?: string; // id or slug of parent document documentModelVersion?: number; // defaults to latest }; ``` ### `JobInfo` Tracks the status and result of a mutation job. ```typescript type JobInfo = { id: string; documentId: string; // empty string when the job is unknown status: JobStatus; createdAtUtcIso: string; completedAtUtcIso?: string; error?: ErrorInfo; errorHistory?: ErrorInfo[]; result?: any; consistencyToken: ConsistencyToken; meta: JobMeta; job?: Job; // populated on failure for debugging }; ``` See [Job lifecycle](/academy/Reference/Reactor/WorkingWithTheReactor#job-lifecycle) for details on `JobStatus` values. --- ## Pagination best practices All list methods (`find`, `getOutgoingRelationships`, `getIncomingRelationships`, `getOperations`, `getDocumentModelModules`) accept `PagingOptions` and return `PagedResults`. Here are some guidelines for working with paginated results effectively. **Use `next()` for sequential iteration.** The `next()` helper on `PagedResults` handles cursor management for you: ```typescript let page = await reactorClient.find({ type: "powerhouse/todo-list" }); while (page) { for (const doc of page.results) { console.log(doc.header.id); } page = page.next ? await page.next() : undefined; } ``` **Set a reasonable `limit`.** The default page size varies by method. If you know you only need a few results, set a small limit to reduce response size: ```typescript const topFive = await reactorClient.getOutgoingRelationships( driveId, "child", undefined, { cursor: "0", limit: 5, }, ); ``` **Check `nextCursor` to know if more pages exist.** When `nextCursor` is `undefined`, you have reached the end: ```typescript const page = await reactorClient.getOperations(docId); if (page.nextCursor) { // There are more operations to fetch } ``` **Avoid fetching all pages in tight loops for large datasets.** If you are processing thousands of documents or operations, consider processing each page before fetching the next to keep memory usage predictable. --- ## Cancellation with AbortSignal Most `IReactorClient` methods accept an optional `AbortSignal` parameter. This lets you cancel in-flight requests — useful for cleaning up when a component unmounts, a user navigates away, or a timeout is reached. The two methods that do not take an `AbortSignal` are `getDocumentModelModule` and `subscribe`. **Cancel on component unmount (React):** ```typescript useEffect(() => { const controller = new AbortController(); reactorClient .find( { type: "powerhouse/todo-list" }, undefined, undefined, controller.signal, ) .then(setResults) .catch((err) => { if (!isAbortError(err)) throw err; // isAbortError is exported from @powerhousedao/reactor }); return () => controller.abort(); }, []); ``` **Cancel with a timeout:** ```typescript const result = await reactorClient.get( docId, undefined, AbortSignal.timeout(5000), ); ``` **Cancel long-running writes.** Write methods like `execute()` wait for the job to reach `READ_READY`. If this takes too long, an abort signal lets you bail out: ```typescript const controller = new AbortController(); // Set a 10-second deadline setTimeout(() => controller.abort(), 10_000); const updated = await reactorClient.execute( docId, "main", actions, controller.signal, ); ``` When a request is aborted, the method throws an `AbortError`. Detect it with `isAbortError(err)` from `@powerhousedao/reactor` rather than matching `err.name`. The underlying reactor job may still complete; aborting only cancels the client-side wait, not the server-side processing. --- ## Read methods ### `get` Retrieve a single document by id or slug. ```typescript get( identifier: string, view?: ViewFilter, signal?: AbortSignal, ): Promise ``` **Parameters:** | Name | Type | Required | Description | | ------------ | ------------- | -------- | ---------------------------------- | | `identifier` | `string` | Yes | Document id or slug | | `view` | `ViewFilter` | No | Branch, scopes, or revision filter | | `signal` | `AbortSignal` | No | Cancel the request | **Example:** ```typescript const doc = await reactorClient.get("my-todo-list"); const atRevision = await reactorClient.get("my-todo-list", { revision: 5 }); ``` --- ### `resolveIdOrSlug` Resolve an id or slug to the canonical document id. Resolution runs against the `main` branch. Throws if the identifier cannot be resolved or is ambiguous. ```typescript resolveIdOrSlug( identifier: string, signal?: AbortSignal, ): Promise ``` **Parameters:** | Name | Type | Required | Description | | ------------ | ------------- | -------- | ------------------- | | `identifier` | `string` | Yes | Document id or slug | | `signal` | `AbortSignal` | No | Cancel the request | --- ### `getOutgoingRelationships` List documents that the given source has outgoing relationships to, filtered by relationship type. For example, pass `"child"` to list a parent's children. ```typescript getOutgoingRelationships( sourceIdentifier: string, relationshipType: string, view?: ViewFilter, paging?: PagingOptions, signal?: AbortSignal, ): Promise> ``` **Parameters:** | Name | Type | Required | Description | | ------------------ | --------------- | -------- | ----------------------------------------------- | | `sourceIdentifier` | `string` | Yes | Source document id or slug | | `relationshipType` | `string` | Yes | Relationship type to filter by (e.g. `"child"`) | | `view` | `ViewFilter` | No | Branch/scopes filter | | `paging` | `PagingOptions` | No | Pagination cursor and limit | | `signal` | `AbortSignal` | No | Cancel the request | --- ### `getIncomingRelationships` List documents that have incoming relationships pointing at the given target, filtered by relationship type. For example, pass `"child"` to list a document's parents. ```typescript getIncomingRelationships( targetIdentifier: string, relationshipType: string, view?: ViewFilter, paging?: PagingOptions, signal?: AbortSignal, ): Promise> ``` **Parameters:** | Name | Type | Required | Description | | ------------------ | --------------- | -------- | ----------------------------------------------- | | `targetIdentifier` | `string` | Yes | Target document id or slug | | `relationshipType` | `string` | Yes | Relationship type to filter by (e.g. `"child"`) | | `view` | `ViewFilter` | No | Branch/scopes filter | | `paging` | `PagingOptions` | No | Pagination cursor and limit | | `signal` | `AbortSignal` | No | Cancel the request | --- ### `find` Search for documents matching criteria. ```typescript find( search: SearchFilter, view?: ViewFilter, paging?: PagingOptions, signal?: AbortSignal, ): Promise> ``` **Parameters:** | Name | Type | Required | Description | | -------- | --------------- | -------- | --------------------------------------- | | `search` | `SearchFilter` | Yes | Filter by type, parentId, ids, or slugs | | `view` | `ViewFilter` | No | Branch/scopes filter | | `paging` | `PagingOptions` | No | Pagination cursor and limit | | `signal` | `AbortSignal` | No | Cancel the request | **Example:** ```typescript const todoLists = await reactorClient.find({ type: "powerhouse/todo-list", parentId: driveId, }); for (const doc of todoLists.results) { console.log(doc.header.id, doc.header.name); } ``` --- ### `getOperations` Retrieve the operation history of a document. ```typescript getOperations( documentIdentifier: string, view?: ViewFilter, filter?: OperationFilter, paging?: PagingOptions, signal?: AbortSignal, ): Promise> ``` **Parameters:** | Name | Type | Required | Description | | -------------------- | ----------------- | -------- | ----------------------------------------------- | | `documentIdentifier` | `string` | Yes | Document id or slug | | `view` | `ViewFilter` | No | Branch/scopes filter | | `filter` | `OperationFilter` | No | Filter by action types, timestamps, or revision | | `paging` | `PagingOptions` | No | Pagination cursor and limit | | `signal` | `AbortSignal` | No | Cancel the request | **`OperationFilter`:** ```typescript interface OperationFilter { actionTypes?: string[]; // e.g. ["ADD_TODO_ITEM"] timestampFrom?: string; // ISO string timestampTo?: string; // ISO string sinceRevision?: number; // operations with index >= this value } ``` `getOperations` merges operations across all of the document's scopes and sorts them by operation index, paging through them with a composite cursor that tracks each scope's position. Paging defaults to `{ cursor: "0", limit: 100 }` — the default cursor is `"0"`, not `""`. --- ### `getDocumentModelModules` List registered document model modules. ```typescript getDocumentModelModules( namespace?: string, paging?: PagingOptions, signal?: AbortSignal, ): Promise> ``` **Parameters:** | Name | Type | Required | Description | | ----------- | --------------- | -------- | -------------------------------------------------- | | `namespace` | `string` | No | Filter by namespace (e.g. `"powerhouse"`, `"sky"`) | | `paging` | `PagingOptions` | No | Pagination cursor and limit | | `signal` | `AbortSignal` | No | Cancel the request | --- ### `getDocumentModelModule` Get a specific document model module by document type. ```typescript getDocumentModelModule( documentType: string, ): Promise> ``` **Parameters:** | Name | Type | Required | Description | | -------------- | -------- | -------- | ----------------------------- | | `documentType` | `string` | Yes | e.g. `"powerhouse/todo-list"` | --- ## Write methods All write methods internally create jobs and wait for them to reach `READ_READY` before resolving (except `executeAsync` which returns immediately). ### `create` Create a document from a full `PHDocument` object. ```typescript create( document: PHDocument, parentIdentifier?: string, signal?: AbortSignal, ): Promise ``` **Parameters:** | Name | Type | Required | Description | | ------------------ | ------------- | -------- | -------------------------------------------------------- | | `document` | `PHDocument` | Yes | Document with optional id, slug, type, and initial state | | `parentIdentifier` | `string` | No | Id or slug of parent document | | `signal` | `AbortSignal` | No | Cancel the request | --- ### `createEmpty` Create an empty document of a given type. ```typescript createEmpty( documentModelType: string, options?: CreateDocumentOptions, signal?: AbortSignal, ): Promise ``` **Parameters:** | Name | Type | Required | Description | | ------------------- | ----------------------- | -------- | -------------------------------------- | | `documentModelType` | `string` | Yes | e.g. `"powerhouse/todo-list"` | | `options` | `CreateDocumentOptions` | No | Parent identifier and/or model version | | `signal` | `AbortSignal` | No | Cancel the request | --- ### Creating a document in a drive To create a document inside a drive, use `client.drives.addFile`. It issues the CREATE_DOCUMENT, UPGRADE_DOCUMENT, ADD_RELATIONSHIP, and ADD_FILE actions in a single dependent batch. See [Drives (`client.drives`)](#drives-clientdrives) for the full signature. --- ### `execute` Apply actions to a document and wait for completion. ```typescript execute( documentIdentifier: string, branch: string, actions: Action[], signal?: AbortSignal, ): Promise ``` **Parameters:** | Name | Type | Required | Description | | -------------------- | ------------- | -------- | ------------------------------------------ | | `documentIdentifier` | `string` | Yes | Document id or slug | | `branch` | `string` | Yes | Branch to apply actions to (e.g. `"main"`) | | `actions` | `Action[]` | Yes | List of actions to apply | | `signal` | `AbortSignal` | No | Cancel the request | **Returns** the updated document after all actions are applied and read models are updated. **Example:** ```typescript const updated = await reactorClient.execute(docId, "main", [ actions.addTodoItem({ text: "Buy groceries" }), actions.addTodoItem({ text: "Walk the dog" }), ]); ``` --- ### `executeAsync` Submit actions without waiting for completion. Returns a `JobInfo` at `PENDING` status. ```typescript executeAsync( documentIdentifier: string, branch: string, actions: Action[], signal?: AbortSignal, ): Promise ``` Use `waitForJob()` or `getJobStatus()` to track progress. --- ### `rename` Rename a document. ```typescript rename( documentIdentifier: string, name: string, branch?: string, signal?: AbortSignal, ): Promise ``` **Parameters:** | Name | Type | Required | Description | | -------------------- | ------------- | -------- | -------------------- | | `documentIdentifier` | `string` | Yes | Document id or slug | | `name` | `string` | Yes | New name | | `branch` | `string` | No | Defaults to `"main"` | | `signal` | `AbortSignal` | No | Cancel the request | --- ### `setPreferredEditor` Update the preferred editor recorded in the document header meta. Pass `null` to clear it. ```typescript setPreferredEditor( documentIdentifier: string, preferredEditor: string | null, branch?: string, signal?: AbortSignal, ): Promise ``` **Parameters:** | Name | Type | Required | Description | | -------------------- | ---------------- | -------- | --------------------------------- | | `documentIdentifier` | `string` | Yes | Document id or slug | | `preferredEditor` | `string \| null` | Yes | Editor id, or `null` to clear it | | `branch` | `string` | No | Defaults to `"main"` | | `signal` | `AbortSignal` | No | Cancel the request | --- ### `addRelationship` Add a typed relationship from a source document to a target document. To add a child, pass `"child"` as the `relationshipType`. ```typescript addRelationship( sourceIdentifier: string, targetIdentifier: string, relationshipType: string, branch?: string, signal?: AbortSignal, ): Promise ``` **Parameters:** | Name | Type | Required | Description | | ------------------ | ------------- | -------- | ---------------------------------- | | `sourceIdentifier` | `string` | Yes | Source document id or slug | | `targetIdentifier` | `string` | Yes | Target document id or slug | | `relationshipType` | `string` | Yes | Relationship type (e.g. `"child"`) | | `branch` | `string` | No | Defaults to `"main"` | | `signal` | `AbortSignal` | No | Cancel the request | --- ### `removeRelationship` Remove a typed relationship from a source document to a target document. ```typescript removeRelationship( sourceIdentifier: string, targetIdentifier: string, relationshipType: string, branch?: string, signal?: AbortSignal, ): Promise ``` **Parameters:** | Name | Type | Required | Description | | ------------------ | ------------- | -------- | ---------------------------------- | | `sourceIdentifier` | `string` | Yes | Source document id or slug | | `targetIdentifier` | `string` | Yes | Target document id or slug | | `relationshipType` | `string` | Yes | Relationship type (e.g. `"child"`) | | `branch` | `string` | No | Defaults to `"main"` | | `signal` | `AbortSignal` | No | Cancel the request | --- ### `moveRelationship` Move a typed relationship from one source document to another, keeping the same target. ```typescript moveRelationship( sourceParentIdentifier: string, targetParentIdentifier: string, targetIdentifier: string, relationshipType: string, branch?: string, signal?: AbortSignal, ): Promise<{ source: PHDocument; target: PHDocument }> ``` **Parameters:** | Name | Type | Required | Description | | ------------------------ | ------------- | -------- | ---------------------------------- | | `sourceParentIdentifier` | `string` | Yes | Current source document id or slug | | `targetParentIdentifier` | `string` | Yes | New source document id or slug | | `targetIdentifier` | `string` | Yes | The target document id or slug | | `relationshipType` | `string` | Yes | Relationship type (e.g. `"child"`) | | `branch` | `string` | No | Defaults to `"main"` | | `signal` | `AbortSignal` | No | Cancel the request | --- ### `deleteDocument` Delete a single document. ```typescript deleteDocument( identifier: string, propagate?: PropagationMode, signal?: AbortSignal, ): Promise ``` **Parameters:** | Name | Type | Required | Description | | ------------ | ----------------- | -------- | --------------------------------- | | `identifier` | `string` | Yes | Document id or slug | | `propagate` | `PropagationMode` | No | `Cascade` to also delete children | | `signal` | `AbortSignal` | No | Cancel the request | --- ### `deleteDocuments` Bulk delete multiple documents. ```typescript deleteDocuments( identifiers: string[], propagate?: PropagationMode, signal?: AbortSignal, ): Promise ``` --- ### `executeBatch` Apply multiple mutation jobs in dependency order. The client signs each job's actions, dispatches them, and waits for all jobs to complete. If a job fails, `executeBatch` throws with that job's error message; the other jobs may still execute because dispatch is fire-and-await-all. ```typescript executeBatch( request: BatchExecutionRequest, signal?: AbortSignal, ): Promise ``` Each job carries a `key` (used to express dependencies) and a `dependsOn` list of other job keys. ```typescript type ExecutionJobPlan = { key: string; documentId: string; scope: string; branch: string; actions: Action[]; dependsOn: string[]; }; type BatchExecutionRequest = { jobs: ExecutionJobPlan[]; }; type BatchExecutionResult = { jobs: Record; }; ``` The result's `jobs` record is keyed by each plan's `key`. --- ### `loadBatch` Submit multiple batches of pre-existing operations across documents, with dependency ordering, and wait for all jobs to complete. Use this to load operations that already exist (for example from sync), as opposed to `executeBatch`, which signs and applies new actions. ```typescript loadBatch( request: BatchLoadRequest, signal?: AbortSignal, ): Promise ``` Each job carries `operations` instead of actions. `dependsOn` lists intra-batch plan keys; `externalDeps` lists already-resolved job ids from prior batches. ```typescript type LoadJobPlan = { key: string; documentId: string; scope: string; branch: string; operations: Operation[]; dependsOn: string[]; externalDeps: string[]; }; type BatchLoadRequest = { jobs: LoadJobPlan[]; }; type BatchLoadResult = { jobs: Record; }; ``` The result's `jobs` record is keyed by each plan's `key`. If a job fails, `loadBatch` throws with that job's error message. --- ## Drives (`client.drives`) `client.drives` is a `readonly` `IDriveClient` namespace for drive-aware operations. These methods orchestrate the multi-action, multi-document work needed to keep a drive's `state.global.nodes` array consistent with the relationship index and the underlying documents. Use the flat `IReactorClient` methods (`get`, `execute`, `find`) for everything that is not drive-aware. Every method takes a trailing optional `signal?: AbortSignal`. ### `addFile` Create a document inside a drive as a single dependent batch. This issues CREATE_DOCUMENT, UPGRADE_DOCUMENT, and ADD_RELATIONSHIP on the new document, plus ADD_FILE on the drive. This is the way to create a document in a drive. ```typescript addFile( driveIdentifier: string, document: PHDocument, parentFolder?: string, signal?: AbortSignal, ): Promise ``` **Parameters:** | Name | Type | Required | Description | | ----------------- | ------------- | -------- | -------------------------- | | `driveIdentifier` | `string` | Yes | Drive document id or slug | | `document` | `PHDocument` | Yes | The document to create | | `parentFolder` | `string` | No | Folder id within the drive | | `signal` | `AbortSignal` | No | Cancel the request | ### `create` Create a new drive document and wait for completion. ```typescript create( input: DriveInput, signal?: AbortSignal, ): Promise ``` ### `addFolder` Add a folder node to a drive. ```typescript addFolder( driveIdentifier: string, name: string, parentFolder?: string, signal?: AbortSignal, ): Promise ``` ### `removeNode` Remove a node from a drive. Folder nodes cascade: descendant file documents are deleted first, then the folder node entry. ```typescript removeNode( driveIdentifier: string, nodeId: string, signal?: AbortSignal, ): Promise ``` ### `renameNode` Rename a node. Updates both the underlying document header and the drive's node entry. ```typescript renameNode( driveIdentifier: string, nodeId: string, name: string, signal?: AbortSignal, ): Promise ``` ### `setPreferredEditorOnNode` Update the preferred editor recorded in the node's document header meta. Pass `null` to clear it. ```typescript setPreferredEditorOnNode( nodeId: string, preferredEditor: string | null, signal?: AbortSignal, ): Promise ``` ### `moveNode` Move a node to a different parent folder within the same drive. Pass `undefined` as `targetParentFolderId` to move the node to the drive root. ```typescript moveNode( driveIdentifier: string, srcNodeId: string, targetParentFolderId: string | undefined, signal?: AbortSignal, ): Promise ``` ### `copyNode` Copy a node, and its subtree if it is a folder, within a drive. Each copied file gets a new id and a duplicated document. ```typescript copyNode( driveIdentifier: string, srcNodeId: string, targetParentFolderId: string | undefined, signal?: AbortSignal, ): Promise ``` ### `getNode` Return a single node from the drive's `state.global.nodes` array. ```typescript getNode( driveIdentifier: string, nodeId: string, signal?: AbortSignal, ): Promise ``` ### `listNodes` Return nodes in the drive, optionally filtered by parent folder. Returns a paged result so you can stream through drives with large node counts. ```typescript listNodes( driveIdentifier: string, parentFolder?: string | null, paging?: PagingOptions, signal?: AbortSignal, ): Promise> ``` The `parentFolder` argument controls scope: | Value | Result | | ----------- | -------------------------------------------- | | `undefined` | Every node in the drive | | `null` | Only root-level nodes | | a folder id | Only the direct children of that folder | --- ## Subscriptions ### `subscribe` Subscribe to document change events matching a filter. ```typescript subscribe( search: SearchFilter, callback: (event: DocumentChangeEvent) => void, view?: ViewFilter, ): () => void ``` **Returns** an unsubscribe function. **`DocumentChangeEvent`:** ```typescript type DocumentChangeEvent = { type: DocumentChangeType; documents: PHDocument[]; context?: { parentId?: string; childId?: string; }; }; ``` **`DocumentChangeType`** values: | Value | Description | | -------------- | -------------------------- | | `Created` | A new document was created | | `Deleted` | A document was deleted | | `Updated` | A document's state changed | | `ChildAdded` | A child relationship was added | | `ChildRemoved` | A child relationship was removed | `subscribe` emits the five values above. `ParentAdded` and `ParentRemoved` exist in the `DocumentChangeType` enum but are not currently emitted by `subscribe`. Which fields populate depends on the change type: - `Created` and `Updated` carry the changed documents in `documents`. - `Deleted` carries `documents: []` and the document id in `context.childId`. - `ChildAdded` and `ChildRemoved` carry `documents: []` and the ids in `context.parentId` and `context.childId`. **Example:** ```typescript // Watch for all todo-list changes const unsubscribe = reactorClient.subscribe( { type: "powerhouse/todo-list" }, (event) => { if (event.type === DocumentChangeType.Updated) { console.log( "Updated:", event.documents.map((d) => d.header.id), ); } }, ); // Later, stop listening unsubscribe(); ``` --- ## Job tracking ### `getJobStatus` Check the current status of a job. ```typescript getJobStatus( jobId: string, signal?: AbortSignal, ): Promise ``` --- ### `waitForJob` Wait for a job to reach a terminal status (`READ_READY` or `FAILED`). ```typescript waitForJob( jobId: string | JobInfo, signal?: AbortSignal, ): Promise ``` **Example:** ```typescript const job = await reactorClient.executeAsync(docId, "main", actions); console.log(job.status); // "PENDING" const completed = await reactorClient.waitForJob(job); console.log(completed.status); // "READ_READY" or "FAILED" ``` --- ## Advanced reactor usage > Source: https://academy.vetra.io/academy/Reference/Reactor/AdvancedReactorUsage This page covers the low-level `IReactor` interface and the internal components you can access through `ReactorModule`. Most developers should use `IReactorClient` (see [IReactorClient API Reference](/academy/Reference/Reactor/ReactorClient)) — the information here is for advanced scenarios such as: - Building custom tooling or infrastructure on top of the reactor - Working with consistency tokens for read-after-write guarantees - Subscribing directly to internal event bus events - Constructing a reactor with custom storage or executor configurations - Writing integration tests that need access to internals ## IReactor vs IReactorClient `IReactorClient` is a high-level wrapper around `IReactor`. The table below summarizes the key differences: | Aspect | `IReactor` | `IReactorClient` | | ----------------------- | ---------------------------------------------------------- | ------------------------------------------------------------------------------------------------------- | | **Write return values** | Returns `JobInfo` immediately (fire-and-forget) | Waits for job completion, returns the final document | | **Signing** | Caller passes an `ISigner` explicitly | Client manages signing internally | | **Document lookup** | Separate `get()`, `getBySlug()`, `getByIdOrSlug()` methods | Single `get(identifier)` that accepts either | | **Children/parents** | Returns `string[]` (document IDs only) | Returns `PagedResults` (full documents) | | **Convenience methods** | Basic CRUD | Plus: `createEmpty()`, `rename()`, `moveRelationship()`, `deleteDocuments()`, and `client.drives.addFile()` | | **Subscriptions** | Not available (use the event bus directly) | `subscribe(search, callback, view?)` for real-time document changes | | **Consistency tokens** | Explicit — pass tokens to reads after writes | Handled internally by the client | **When to use `IReactor` directly:** - You need fire-and-forget job submission without waiting for completion - You want explicit control over consistency tokens - You are building infrastructure that manages its own signing - You need access to `executeBatch()` for multi-document atomic operations with dependency ordering ## Building a reactor with ReactorBuilder `ReactorBuilder` uses a fluent API to construct and wire all internal components. ```typescript const reactor = await new ReactorBuilder() .withDocumentModels([todoListModule, invoiceModule]) .withLogger(new ConsoleLogger()) .withExecutorConfig({ maxConcurrency: 4, jobTimeoutMs: 30_000 }) .withWriteCacheConfig({ maxDocuments: 100, ringBufferSize: 10 }) .withMigrationStrategy("auto") .withChannelScheme(ChannelScheme.CONNECT) .build(); ``` `build()` returns an `IReactor`. If you need access to internal components, use `buildModule()` instead — it returns an `InProcessReactorModule` containing the reactor plus all its internals (see [ReactorModule](#reactormodule)). ### Builder methods | Method | Description | | --------------------------------- | ------------------------------------------------------------------------ | | `withDocumentModels(models)` | Register document model modules | | `withUpgradeManifests(manifests)` | Register [upgrade manifests](/academy/Reference/Reactor/DocumentModelRegistry) for document model versioning | | `withLogger(logger)` | Set the logger (defaults to `ConsoleLogger`) | | `withExecutorConfig(config)` | Configure `maxConcurrency` and `jobTimeoutMs` | | `withWriteCacheConfig(config)` | Configure `maxDocuments` and `ringBufferSize` for the write cache | | `withMigrationStrategy(strategy)` | Set to `"auto"` to run database migrations on build | | `withKysely(kysely)` | Provide a custom Kysely database instance (defaults to in-memory PGlite) | | `withQueue(queue)` | Provide a custom job queue (defaults to `InMemoryQueue`) | | `withEventBus(eventBus)` | Provide a custom event bus | | `withExecutor(executor)` | Provide a custom job executor manager | | `withReadModel(readModel)` | Register an additional read model | | `withReadModelFactory(factory)` | Register a factory that builds a pre-ready read model after the operation index, write cache, and processor-manager tracker exist | | `withReadModelCoordinator(coordinator)` | Provide a custom read model coordinator | | `withSync(syncBuilder)` | Enable [synchronization with remote reactors](/academy/Reference/Reactor/Synchronization) | | `withChannelScheme(scheme)` | Set the sync channel scheme | | `withFeatures(features)` | Set feature flags | | `withSignatureVerifier(verifier)` | Set a signature verification handler | | `withJwtHandler(handler)` | Set a JWT handler for authentication | | `withDocumentModelLoader(loader)` | Set a custom document model loader | | `withDocumentModelSpecs(specs)` | Register document model specs the reactor (or its workers) resolves by package or file path | | `withDriveContainerTypes(types)` | Set the document types treated as drive containers | | `withInstrumentedPool(instrumentation)` | Register an externally-built `pg.Pool` so its metrics surface through `pools` | | `withShutdownHook(hook)` | Register an async cleanup hook to run during graceful shutdown | | `withSignalHandlers()` | Register OS signal handlers for graceful shutdown | | `withWorkerPool(config)` | Run jobs in a worker pool instead of in-process (see [Storage and scaling](/academy/Reference/Reactor/StorageAndScaling)) | | `withWorkerDbConfig(db)` | Postgres connection info forwarded to each worker | | `withWorkerSignatureVerifierSpec(spec)` | Factory spec each worker imports to build its signature verifier | | `withWorkerFactory(factory)` | Inject a custom worker factory (transport) | | `withProjectionShards(config)` | Run N sharded projection workers (see [Storage and scaling](/academy/Reference/Reactor/StorageAndScaling)) | | `withProjectionWorkerFactory(factory)` | Inject a custom projection worker factory | `withProjectionShards` (and worker-pool mode) require `withWorkerDbConfig`: the workers need connection info to open their own pools, and `build()` throws otherwise. See [Storage and scaling](/academy/Reference/Reactor/StorageAndScaling) for worker pools and projection shards, and [Synchronization and remote drives](/academy/Reference/Reactor/Synchronization) for sync. ## IReactor API ### Reading documents ```typescript // By exact ID const doc = await reactor.get(docId); // By slug const doc = await reactor.getBySlug("my-document"); // By either ID or slug (throws if ambiguous) const doc = await reactor.getByIdOrSlug(identifier); // With consistency token for read-after-write const doc = await reactor.get(docId, undefined, token); // Outgoing and incoming relationships (returns string[] of IDs, not full documents) const childIds = await reactor.getOutgoingRelationships(parentId, "child"); const parentIds = await reactor.getIncomingRelationships(childId, "child"); // Search const results = await reactor.find({ type: "powerhouse/todo-list" }); // Operations: keyed by scope, each a PagedResults // (unlike the client's getOperations, which returns a flat PagedResults) const ops = await reactor.getOperations(docId); const globalOps = ops["global"].results; // Document model modules (the IReactor analogue of the client's // getDocumentModelModules) const models = await reactor.getDocumentModels(); // PagedResults ``` `getDocumentModels(namespace?, paging?, signal?)` returns `Promise>`. `getOperations` accepts optional `view`, `OperationFilter`, and paging, and returns `Promise>>` — index it by scope. ### Writing documents All write methods return `JobInfo` immediately — they do not wait for the job to complete. ```typescript // Create a document const job = await reactor.create(document, signer); // Execute actions const job = await reactor.execute(docId, "main", actions); // Load pre-existing operations (e.g., from sync) const job = await reactor.load(docId, "main", operations); // Delete const job = await reactor.deleteDocument(docId, signer); // Manage relationships const job = await reactor.addRelationship(parentId, childId1, "child"); const job = await reactor.removeRelationship(parentId, childId1, "child"); ``` `create`, `deleteDocument`, `execute`, `load`, `executeBatch`, and `loadBatch` accept an optional trailing `meta?: Record` that is merged into the job's `JobMeta`. Use it for tracing or correlation. ### Batch operations `executeBatch` lets you submit multiple mutation jobs with dependency ordering. Jobs are executed in the order dictated by their `dependsOn` keys. ```typescript const result = await reactor.executeBatch({ jobs: [ { key: "create-drive", documentId: driveId, scope: "global", branch: "main", actions: [createDriveAction], dependsOn: [], }, { key: "add-document", documentId: driveId, scope: "global", branch: "main", actions: [addFileAction], dependsOn: ["create-drive"], // Waits for drive creation }, ], }); // result.jobs["create-drive"] and result.jobs["add-document"] are JobInfo objects ``` `loadBatch` is the load-side counterpart. It submits batches of pre-existing operations (e.g. from sync) with the same dependency ordering. A `LoadJobPlan` uses `operations` instead of `actions`, and adds `externalDeps: string[]` — pre-resolved job UUIDs from prior batches that are appended to the queue hint without plan-key resolution. ```typescript const result = await reactor.loadBatch({ jobs: [ { key: "load-doc", documentId: docId, scope: "global", branch: "main", operations: incomingOperations, dependsOn: [], externalDeps: [], }, ], }); // result.jobs["load-doc"] is a JobInfo object ``` ### Job tracking and shutdown ```typescript // Check job status const info = await reactor.getJobStatus(jobId); // info.status is PENDING | RUNNING | WRITE_READY | READ_READY | FAILED // Graceful shutdown const shutdown = reactor.kill(); // shutdown.isShutdown is true immediately await shutdown.completed; // Resolves when all in-flight jobs finish ``` `kill()` returns a `ShutdownStatus` synchronously (it is not a Promise): `{ get isShutdown(): boolean; completed: Promise }`. `isShutdown` flips to `true` immediately; `await shutdown.completed` to block until in-flight jobs drain. Do not `await reactor.kill()`. ## Consistency tokens Every write operation returns a `JobInfo` that includes a `ConsistencyToken`. This token captures the exact operation coordinates that the write produced: ```typescript type ConsistencyToken = { version: 1; createdAtUtcIso: string; coordinates: Array<{ documentId: string; scope: string; branch: string; operationIndex: number; }>; }; ``` Pass this token to subsequent reads to guarantee you see the effects of your write: ```typescript const job = await reactor.execute(docId, "main", actions); const token = job.consistencyToken; // This read is guaranteed to include the operations from the write above const doc = await reactor.get(docId, undefined, token); ``` Without a consistency token, reads may return stale data if the read models have not yet indexed the latest operations. `IReactorClient` handles this automatically — it waits for `READ_READY` before returning — but when using `IReactor` directly, consistency tokens give you explicit control. ## ReactorModule `ReactorBuilder.buildModule()` returns an `InProcessReactorModule` that exposes the full in-process dependency graph: ```typescript const module = await new ReactorBuilder() .withDocumentModels([todoListModule]) .buildModule(); const { reactor, eventBus, processorManager, operationStore } = module; ``` The base `ReactorModule` interface has only three fields (`documentModelRegistry`, `syncModule`, `eventBus`) — the subset a client resolves regardless of where the reactor graph lives. `buildModule()` returns the in-process extension `InProcessReactorModule`, which adds the components below. ### Available components `InProcessReactorModule`: | Component | Interface | Purpose | | ---------------------- | ----------------------------- | -------------------------------------------------------- | | `reactor` | `IReactor` | The reactor instance | | `documentModelRegistry`| `IDocumentModelRegistry` | Registered document model modules and version upgrades | | `eventBus` | `IEventBus` | Internal pub/sub for reactor events | | `queue` | `IQueue` | Job queue with per-document ordering | | `jobTracker` | `IJobTracker` | Tracks job lifecycle (PENDING through READ_READY/FAILED) | | `executorManager` | `IJobExecutorManager` | Manages job executor instances | | `operationStore` | `IOperationStore` | Append-only operation log | | `keyframeStore` | `IKeyframeStore` | Document state snapshots | | `writeCache` | `IWriteCache` | Write-path document cache | | `operationIndex` | `IOperationIndex` | Global ordinal assignment | | `documentView` | `IDocumentView` | Maintains document snapshots for reads | | `documentViewConsistencyTracker` | `IConsistencyTracker` | Tracks document-view indexing for read-after-write | | `documentIndexer` | `IDocumentIndexer` | Tracks document relationships (parent/child graph) | | `documentIndexerConsistencyTracker` | `IConsistencyTracker` | Tracks document-indexer indexing for read-after-write | | `readModelCoordinator` | `IReadModelCoordinator` | Dispatches operations to all read models | | `subscriptionManager` | `IReactorSubscriptionManager` | Manages document change subscriptions | | `processorManager` | `IProcessorManager` | Routes operations to user-defined [processors](/academy/Reference/Reactor/Processors) | | `processorManagerConsistencyTracker` | `IConsistencyTracker` | Tracks processor-manager catch-up | | `database` | `Kysely` | The underlying database connection | | `syncModule` | `InProcessSyncModule \| undefined` | Sync infrastructure (if configured) | | `pools` | `PoolInstrumentation[]` | Instrumented `pg.Pool` handles; empty for PGlite | ## Subscribing to the event bus The `IEventBus` lets you listen to internal reactor events. Subscribers are called sequentially in registration order. ```typescript // Listen for all completed jobs const unsubscribe = module.eventBus.subscribe( ReactorEventTypes.JOB_READ_READY, (type, event) => { console.log("Job completed:", event.jobId); console.log("Operations:", event.operations.length); }, ); // Listen for sync failures module.eventBus.subscribe(SyncEventTypes.SYNC_FAILED, (type, event) => { console.error("Sync failed for job:", event.jobId, event.errors); }); ``` Besides `ReactorEventTypes`, `SyncEventTypes`, and `QueueEventTypes`, the executor managers emit `JobExecutorEventTypes` (`JOB_STARTED: 20000`, `JOB_COMPLETED: 20001`, `JOB_FAILED: 20002`, `EXECUTOR_STARTED: 20003`, `EXECUTOR_STOPPED: 20004`). **WARNING:** Two distinct `JobFailedEvent` shapes exist. The reactor-level `ReactorEventTypes.JOB_FAILED` (10005) carries `error: Error`; the executor-level `JobExecutorEventTypes.JOB_FAILED` (20002) carries `error: string`. Check which enum you subscribed to before reading `error`. See [Reactor event system](/academy/Reference/Reactor/WorkingWithTheReactor#reactor-event-system) for the full list of event types. ## Working with the operation store The `IOperationStore` provides direct access to the append-only operation log. ```typescript const { operationStore } = module; // Get operations since a specific revision const ops = await operationStore.getSince(docId, "global", "main", 5); // Get the latest revision per scope const revisions = await operationStore.getRevisions(docId, "main"); ``` **WARNING:** Writing directly to the operation store bypasses the job queue, reducers, and read models. In almost all cases, use `reactor.execute()` or `reactor.load()` instead. Direct store access is intended for read-only inspection, debugging, and testing. ## Registering custom read models A read model receives operations after each job's write phase completes and builds a derived view of the data. ```typescript class MyCustomReadModel implements IReadModel { // `name` identifies the read model for lookup via getReadModel readonly name = "my-custom-read-model"; async indexOperations(operations: OperationWithContext[]): Promise { for (const { operation, context } of operations) { // Build your derived view } } } const reactor = await new ReactorBuilder() .withDocumentModels([todoListModule]) .withReadModel(new MyCustomReadModel()) .build(); ``` Read models registered via `withReadModel()` run in the pre-ready phase — they complete before `JOB_READ_READY` fires. This is in contrast to processors (registered via `ProcessorManager`), which run in the post-ready phase. ## Example: integration test setup A common use case for the low-level API is writing integration tests that need full control over the reactor lifecycle: `ReactorClientBuilder.buildModule()` returns both the `client` and the `reactorModule` (the same `InProcessReactorModule` you get from `ReactorBuilder.buildModule()`). Hand it a `ReactorBuilder` via `withReactorBuilder` and it builds the reactor for you: ```typescript async function createTestReactor() { const builder = new ReactorBuilder() .withDocumentModels([todoListModule]) .withLogger(new ConsoleLogger()); // buildModule returns both the client and the reactor module internals const { client, reactorModule } = await new ReactorClientBuilder() .withReactorBuilder(builder) .buildModule(); return { client, reactorModule }; } // In your test const { client, reactorModule } = await createTestReactor(); // Use client for high-level operations const doc = await client.createEmpty("powerhouse/todo-list"); // Use the reactor module for low-level inspection const ops = await reactorModule.operationStore.getSince( doc.header.id, "global", "main", 0, ); expect(ops.results.length).toBe(1); // Cleanup reactorModule.reactor.kill(); ``` If you already built a reactor and have its internals, wire them directly instead of passing a builder: ```typescript const client = await new ReactorClientBuilder() .withReactor( module.reactor, module.eventBus, module.documentIndexer, module.documentView, ) .build(); ``` ### ReactorClientBuilder methods | Method | Description | | ----------------------------------- | -------------------------------------------------------------------- | | `withLogger(logger)` | Set the logger (defaults to `ConsoleLogger`) | | `withReactorBuilder(builder)` | Build the reactor from a `ReactorBuilder` (mutually exclusive with `withReactor`) | | `withReactor(reactor, eventBus, documentIndexer, documentView)` | Wire an already-built reactor and its internals | | `withSigner(config)` | Set an `ISigner` or `SignerConfig` for signing/verification | | `withSubscriptionManager(manager)` | Provide a custom subscription manager | | `withJobAwaiter(awaiter)` | Provide a custom job awaiter | | `withDocumentModelLoader(loader)` | Set a custom document model loader (forwarded to the reactor builder) | | `build()` | Build and return the `IReactorClient` | | `buildModule()` | Build and return the client plus its reactor module internals | You must call exactly one of `withReactorBuilder` or `withReactor` before `build()`/`buildModule()`, or the build throws. --- ## Synchronization and remote drives > Source: https://academy.vetra.io/academy/Reference/Reactor/Synchronization Sync makes one reactor mirror operations with a remote drive. The local reactor pushes operations it produces and pulls operations the remote produces, so two reactors converge on the same document history. You need it whenever a reactor must share state with another reactor: a Connect tab syncing to a Switchboard server, or two services replicating a drive. The sync subsystem lives in `@powerhousedao/reactor`. The orchestrator is `ISyncManager`; each remote drive is a `Remote` backed by an `IChannel`. Today the only shipped transport is GraphQL over HTTP: `GqlRequestChannel` (the client/poller side, used by Connect) and `GqlResponseChannel` (the server/push side, used by Switchboard). The channel config `type` string is `"gql"`. For the reactor itself and the builder, see [Working with the Reactor](/academy/Reference/Reactor/WorkingWithTheReactor) and [Advanced Reactor Usage](/academy/Reference/Reactor/AdvancedReactorUsage). For sync error categories and auth failures, see [Error handling](/academy/Reference/Reactor/ErrorHandling). ## Enabling sync on a reactor Sync is off by default. A reactor has no sync manager unless you call either `withChannelScheme` or `withSync` on the `ReactorBuilder`. Use one or the other, not both. ### The shortcut: `withChannelScheme` `withChannelScheme(scheme)` builds the channel factory and `SyncBuilder` for you, then starts the sync manager during `build()`. Pick the scheme by which side you are: - `ChannelScheme.CONNECT` builds a `GqlRequestChannelFactory` (the polling client side). - `ChannelScheme.SWITCHBOARD` builds a `GqlResponseChannelFactory` (the push server side). ```typescript const module = await new ReactorBuilder() .withDocumentModels([/* ... */]) .withChannelScheme(ChannelScheme.CONNECT) .withJwtHandler(async (url) => getTokenForAudience(url)) // optional, CONNECT only .buildModule(); const sync = module.syncModule?.syncManager; // ISyncManager | undefined ``` `withJwtHandler` only flows through the `CONNECT` factory; on the `SWITCHBOARD` path it is ignored. The handler is called per request with the target URL and returns the bearer token or `undefined` when unauthenticated: ```typescript type JwtHandler = (url: string) => Promise; ``` If you set both `withChannelScheme` and `withSync`, only the scheme path runs and your custom `SyncBuilder` is discarded. The scheme path always constructs a fresh `SyncBuilder` with the scheme's factory. ### Full control: `withSync` Pass a pre-configured `SyncBuilder` when you need a custom channel factory, custom storages, or different limits. The reactor builder still calls `syncManager.startup()` for you on this path. ```typescript ReactorBuilder, SyncBuilder, GqlRequestChannelFactory, } from "@powerhousedao/reactor"; const syncBuilder = new SyncBuilder() .withChannelFactory(new GqlRequestChannelFactory(logger, jwtHandler, queue)) .withMaxInboxBatchSize(32) .withMaxDeadLettersPerRemote(100); const module = await new ReactorBuilder() .withDocumentModels([/* ... */]) .withSync(syncBuilder) .buildModule(); ``` If neither method is called, `module.syncModule` is `undefined` and the reactor does not sync. ## `SyncBuilder` reference `SyncBuilder` configures the sync module. Every `withX` method returns `this`. The only required call is `withChannelFactory` — `build`/`buildModule` throws `"Channel factory is required"` without it. | Method | Effect | Required | | --- | --- | --- | | `withChannelFactory(factory: IChannelFactory)` | Sets the transport factory. | Yes | | `withRemoteStorage(storage: ISyncRemoteStorage)` | Overrides where remote records persist. Defaults to a Kysely-backed store on the reactor database. | No | | `withCursorStorage(storage: ISyncCursorStorage)` | Overrides sync-cursor storage. Defaults to a Kysely-backed store. | No | | `withDeadLetterStorage(storage: ISyncDeadLetterStorage)` | Overrides dead-letter storage. Defaults to a Kysely-backed store. | No | | `withMaxDeadLettersPerRemote(limit: number)` | Caps retained dead letters per remote. Default `100`. | No | | `withMaxInboxBatchSize(limit: number)` | Caps how many inbound operations apply per batch. Default `32`. | No | Terminal methods. `build(...)` returns the `ISyncManager`; `buildModule(...)` returns the full `InProcessSyncModule` (`{ remoteStorage, cursorStorage, deadLetterStorage, channelFactory, syncManager }`). Both take, in order: `reactor`, `logger`, `operationIndex`, `eventBus`, `db`, `driveContainerTypes`. ```typescript buildModule( reactor: IReactor, logger: ILogger, operationIndex: IOperationIndex, eventBus: IEventBus, db: Kysely, driveContainerTypes: ReadonlySet, ): InProcessSyncModule ``` Neither `build` nor `buildModule` calls `startup()`. If you construct a `SyncBuilder` directly instead of going through `ReactorBuilder`, you must call `syncManager.startup()` yourself before adding remotes. ## Adding a remote `ISyncManager.add` registers a remote drive, persists it, creates its channel, and calls `channel.init()`. ```typescript add( name: string, collectionId: DriveCollectionId, channelConfig: ChannelConfig, filter?: RemoteFilter, options?: RemoteOptions, id?: string, ): Promise; ``` - `name` is the unique key for the remote across the manager. Reusing a name throws ``Remote with name '${name}' already exists``. - `collectionId` identifies the drive to sync. Build it with `DriveCollectionId.forDrive(driveId, branch?)` (branch defaults to `"main"`). - `channelConfig` wires the transport. - `filter` defaults to `{ documentId: [], scope: [], branch: "" }` (no restriction). - `options` defaults to `{ sinceTimestampUtcMs: "0" }` (sync from the start of history). - `id` defaults to a generated UUID. If `channel.init()` throws, `add` rolls the remote back out of both the map and storage and rethrows the original error. Calling `add` after `shutdown()` throws `"SyncManager is shutdown and cannot add remotes"`. ### `ChannelConfig` ```typescript type ChannelConfig = { type: string; parameters: Record }; ``` For the GraphQL request channel, `type` is `"gql"` and `parameters` must include `url`. The factory validates `parameters` at `add`/startup time and throws if `url` is missing or empty: ```typescript { type: "gql", parameters: { url: "https://switchboard.example/d/my-drive/graphql", // optional, with their defaults: // pollIntervalMs: 2000, // retryBaseDelayMs: 1000, // retryMaxDelayMs: 300000, // maxQueueDepth: 100, // backpressureCheckIntervalMs: 500, // fetchFn: customFetch, }, } ``` Any optional parameter present with the wrong type throws at registration, for example `'"pollIntervalMs" parameter must be a number'`. ### `RemoteFilter` ```typescript type RemoteFilter = { documentId: string[]; scope: string[]; branch: string }; ``` An empty `documentId` or `scope` array means "no restriction" on that dimension. An empty `branch` string means "no branch restriction". Otherwise the filter is a membership or equality test against each operation. ### `RemoteOptions` ```typescript type RemoteOptions = { sinceTimestampUtcMs?: string; // stringified UTC ms; "0"/undefined sync from start pollBehavior?: PollBehavior; // defaults to Auto }; ``` When `sinceTimestampUtcMs` is set and not `"0"`, outbox operations older than that timestamp are excluded. ### `ChannelScheme` ```typescript enum ChannelScheme { CONNECT = "connect", SWITCHBOARD = "switchboard", } ``` `CONNECT` selects `GqlRequestChannelFactory` (polls and pushes). `SWITCHBOARD` selects `GqlResponseChannelFactory` (push-driven, server-side). `GqlRequestChannelFactory` takes `(logger, jwtHandler, queue)` — the queue is needed for poll backpressure. `GqlResponseChannelFactory` takes `(logger)`. ### How Connect adds a drive The app-level helper `addRemoteDrive(url, driveId?, options?)` in `@powerhousedao/reactor-browser` shows the canonical call. It reads `window.ph.reactorClient` and the sync manager (throwing `"ReactorClient not initialized"` or `"Sync not initialized"` if absent), fetches `{ id, graphqlEndpoint }` from `url`, then registers the remote: ```typescript const collectionId = DriveCollectionId.forDrive(resolvedDriveId); await sync.add( crypto.randomUUID(), // name collectionId, { type: "gql", parameters: { url: driveInfo.graphqlEndpoint } }, undefined, // filter -> no restriction options?.pollBehavior ? { pollBehavior: options.pollBehavior } : undefined, ); ``` Before adding, it dedupes against `sync.list().find((r) => r.meta.collectionId.equals(collectionId))`. If `add` throws and `isDriveAuthError(error)` is true, it shows the drive-auth modal and rethrows. To remove a drive, find every remote whose `meta.collectionId.equals(...)` and call `sync.remove(remote.meta.name)`. ## Polling and pulling `PollBehavior` controls a remote's poll schedule: ```typescript enum PollBehavior { Auto = "auto", Manual = "manual", } ``` - `Auto` (default): the channel runs its interval timer in the background. The first tick fires immediately on `init()`, then repeats at `pollIntervalMs` (default 2000 ms). - `Manual`: the channel registers and connects, but the timer never ticks on its own. Pull on demand with `ISyncManager.triggerPull(name)`. ```typescript triggerPull(name: string): void; ``` `triggerPull` runs one pull cycle. For a `Manual` remote it does not start recurring polling — the remote stays Manual and a single fetch runs. `triggerPull` on a missing remote throws ``Remote with name '${name}' does not exist``. On a `GqlResponseChannel` (Switchboard side) `triggerPull` is a no-op, because that channel is push-driven. Polling also applies backpressure: a tick defers when the reactor queue depth exceeds `maxQueueDepth` and rechecks after `backpressureCheckIntervalMs`. Transient poll failures retry with exponential backoff between `retryBaseDelayMs` and `retryMaxDelayMs`. ## Watching sync status There are three views into sync state: per-document status, per-job completion, and per-remote connection state. ### Per-document status ```typescript getSyncStatus(documentId: string): SyncStatus | undefined; onSyncStatusChange(callback: SyncStatusChangeCallback): () => void; ``` `getSyncStatus` returns `undefined` for a document that has never been tracked. `onSyncStatusChange` returns an unsubscribe function. `SyncStatusChangeCallback` is `(documentId: string, status: SyncStatus) => void`. ```typescript enum SyncStatus { Synced = "SYNCED", Outgoing = "OUTGOING", Incoming = "INCOMING", OutgoingAndIncoming = "OUTGOING_AND_INCOMING", Error = "ERROR", } ``` Status derives from mailbox depth: any error gives `Error`; pending in both directions gives `OutgoingAndIncoming`; otherwise `Incoming`, `Outgoing`, or `Synced`. ### Per-job completion ```typescript waitForSync(jobId: string, signal?: AbortSignal): Promise; ``` `waitForSync` resolves when the job's sync operations finish. It resolves on both success and failure — a failed sync resolves with `status: "failed"`, it does not reject. The promise only rejects on abort or manager shutdown. If the job already finished, it returns the cached result immediately. ```typescript type SyncResult = { jobId: string; status: "succeeded" | "failed"; syncOperationCount: number; successCount: number; failureCount: number; errors: Array<{ remoteName: string; documentId: string; error: string }>; }; ``` `SyncResult` is the documented return shape but is not exported as a named type from `@powerhousedao/reactor`; treat it structurally. Note the worker boundary. When the sync manager runs in a SharedWorker and you hold the tab-side RPC proxy, `waitForSync` always rejects with `"waitForSync is not supported over the worker RPC boundary"`. Use `getSyncStatus`/`onSyncStatusChange` or per-remote connection state instead. ### Per-remote connection state Each `Remote` exposes its live channel. Read or subscribe to its connection state: ```typescript getConnectionState(): ConnectionStateSnapshot; onConnectionStateChange(cb: (snapshot: ConnectionStateSnapshot) => void): () => void; ``` ```typescript type ConnectionState = | "connecting" | "connected" | "disconnected" | "reconnecting" | "error"; type ConnectionStateSnapshot = { state: ConnectionState; failureCount: number; lastSuccessUtcMs: number; lastFailureUtcMs: number; pushBlocked: boolean; pushFailureCount: number; receivingPages: boolean; requiresAuth: boolean; // only meaningful while state === "error" }; ``` `requiresAuth` is set when the remote rejected the caller as unauthenticated (HTTP 401/403 or a Forbidden GraphQL error) and is only meaningful while `state` is `"error"`. See [Error handling](/academy/Reference/Reactor/ErrorHandling) for the full error taxonomy and `isDriveAuthError`. ### React hooks `@powerhousedao/reactor-browser` exposes two hooks: ```typescript const sync = useSync(); // ISyncManager | undefined const remotes = useSyncList(); // Remote[] ``` `useSync` returns the sync manager off the reactor client module, or `undefined` when sync is not wired. `useSyncList` returns `sync.list()` (or `[]`). It recomputes on every render and does not subscribe to add/remove, so combine it with a connection-state subscription if you need a re-render when state changes: ```typescript const remotes = useSyncList(); const remote = remotes.find((r) => r.meta.collectionId.equals(DriveCollectionId.forDrive(driveId)), ); const snapshot = remote?.channel.getConnectionState(); // remote.meta is cloneable; remote.channel is the live channel. // To read the GraphQL URL: (remote.channel as GqlRequestChannel).config.url ``` ### Sync events The sync subsystem uses a 20000-range event namespace, distinct from the 10000-range reactor events. Subscribe through the reactor's `IEventBus` (see the event-bus section on [Working with the Reactor](/academy/Reference/Reactor/WorkingWithTheReactor)). ```typescript const SyncEventTypes = { SYNC_PENDING: 20001, SYNC_SUCCEEDED: 20002, SYNC_FAILED: 20003, DEAD_LETTER_ADDED: 20004, CONNECTION_STATE_CHANGED: 20005, } as const; ``` Payload shapes: ```typescript type SyncPendingEvent = { jobId: string; syncOperationCount: number; remoteNames: string[]; }; type SyncSucceededEvent = { jobId: string; syncOperationCount: number }; type SyncFailedEvent = { jobId: string; successCount: number; failureCount: number; errors: Array<{ remoteName: string; documentId: string; error: string }>; }; type ConnectionStateChangedEvent = { remoteName: string; remoteId: string; previous: ConnectionState; current: ConnectionState; snapshot: ConnectionStateSnapshot; }; ``` `CONNECTION_STATE_CHANGED` (20005) fires on every channel transition; subscribe to it for a global view across all remotes. The manager does not track the prior state, so `previous` currently mirrors `current` — read `snapshot.state` rather than relying on `previous`. `SYNC_SUCCEEDED`/`SYNC_FAILED` back `waitForSync`; prefer `waitForSync` over subscribing to them directly. ## Dead letters A dead letter is a sync operation that failed and cannot be retried — a bad signature, a hash mismatch, or an unrecoverable transport error. When a channel routes an operation to its dead-letter mailbox, the sync manager logs it, quarantines the document, persists a record to dead-letter storage, and emits `DEAD_LETTER_ADDED`. ```typescript type DeadLetterAddedEvent = { id: string; jobId: string; remoteName: string; documentId: string; errorSource: ChannelErrorSource; }; enum ChannelErrorSource { None = "none", Channel = "channel", Inbox = "inbox", Outbox = "outbox", } ``` Quarantine is per document. Once a document is quarantined, its inbound operations are dropped and its outbound operations are filtered out, so a single poisoned document does not stall the rest of the drive. Each remote retains at most `maxDeadLettersPerRemote` (default 100) dead letters; the oldest are evicted past that. Subscribe to `DEAD_LETTER_ADDED` to surface failures that need manual intervention. ## Gotchas | Call | Throws | | --- | --- | | `SyncBuilder.build`/`buildModule` without `withChannelFactory` | `"Channel factory is required"` | | `sync.add(name, ...)` with a duplicate name | ``Remote with name '${name}' already exists`` | | `sync.add` after `shutdown()` | `"SyncManager is shutdown and cannot add remotes"` | | `sync.startup()` after `shutdown()` | `"SyncManager is already shutdown and cannot be started"` | | `getByName` / `triggerPull` / `remove` on an unknown remote | ``Remote with name '${name}' does not exist`` | | `getById` on an unknown remote | ``Remote with id '${id}' does not exist`` | | `add` with a `"gql"` config missing/empty `url` | `'GqlRequestChannelFactory requires "url" parameter in config.parameters'` | | `waitForSync` over the worker RPC proxy | `"waitForSync is not supported over the worker RPC boundary"` | ## Not yet stable - The `IChannelFactory.instance` parameters `cursorStorage` and `operationIndex` are marked for removal in source. Do not depend on the factory signature staying fixed. - `GqlResponseChannel`/`GqlResponseChannelFactory` are Switchboard-side primitives, relevant to reactor-api wiring rather than typical app code. - `ConnectionStateChangedEvent.previous` does not currently carry the real prior state. ## Related - [Working with the Reactor](/academy/Reference/Reactor/WorkingWithTheReactor) — the event bus and reactor lifecycle. - [Advanced Reactor Usage](/academy/Reference/Reactor/AdvancedReactorUsage) — `ReactorBuilder` and low-level `IReactor`. - [Error handling](/academy/Reference/Reactor/ErrorHandling) — sync error categories, `isDriveAuthError`, retries. - [Storage and scaling](/academy/Reference/Reactor/StorageAndScaling) — storage backends behind cursors and dead letters. - [Processors](/academy/Reference/Reactor/Processors) and [Building a processor](/academy/Build/WorkWithData/BuildingAProcessor) — reacting to synced operations. --- ## Processors > Source: https://academy.vetra.io/academy/Reference/Reactor/Processors A **processor** receives operations after the write phase and performs side effects: analytics rollups, relational indexing, webhooks, dispatching follow-up actions. Its `onOperations` method runs **post-ready** — after the reactor emits `JOB_READ_READY` for a chain, when the document is already readable and consistent. This is the contrast with **read models**. Read models index **pre-ready**: their `indexOperations` runs before `JOB_READ_READY` fires, so they gate read-after-write consistency. A reader holding a [consistency token](/academy/Reference/Reactor/WorkingWithTheReactor) is unblocked only once the pre-ready models finish. Processors are not on that critical path; they observe operations only after readers can already see them. For the full pre-ready/post-ready ordering see [Working with the Reactor](/academy/Reference/Reactor/WorkingWithTheReactor), and for read models see [Advanced Reactor Usage](/academy/Reference/Reactor/AdvancedReactorUsage). This page is the reactor-side reference: the types you implement, the manager that drives them, and how catch-up works. For the editor-side authoring flow (scaffolding a processor in a package) see the [processor tutorial](/academy/Build/WorkWithData/BuildingAProcessor). **WARNING:** Processors run only on the **in-process reactor path**. On the SharedWorker reactor path, processor registration is **not bridged** — Connect logs a warning and skips every factory (`apps/connect/src/store/reactor.ts`). Worker-hosted reactors do not run processors today. ## Registering a processor Register a factory with the **processor manager**. The manager interface is `IProcessorManager`: ```typescript interface IProcessorManager { registerFactory(identifier: string, factory: ProcessorFactory): Promise; unregisterFactory(identifier: string): Promise; get(processorId: string): TrackedProcessor | undefined; getAll(): TrackedProcessor[]; } ``` `identifier` is the registration key and the `factoryId` prefix of every processor the factory produces. Real callers pass the package name. Registering the same `identifier` twice unregisters the prior factory first, so re-registration is idempotent. The manager is not a method on `IReactor`. It lives on the in-process reactor module as `processorManager`. In Connect you reach it through the browser-path reactor module: ```typescript const reactorModule = reactorClientModule.kind === "browser" ? reactorClientModule.reactorModule : undefined; await reactorModule?.processorManager.registerFactory(id, factory); ``` ### What the factory receives and returns A `ProcessorFactory` is called once per drive. It receives the drive header and returns the processors for that drive: ```typescript type ProcessorFactory = ( driveHeader: PHDocumentHeader, processorApp?: ProcessorApp, ) => Promise | ProcessorRecord[]; ``` Return `[]` to create no processors for a drive. The factory may be sync or async. The `processorApp?` parameter is part of the type but the manager **never supplies it** — it calls `factory(driveHeader)` with one argument. Read the running app from `module.processorApp` instead (see [the processor host](#the-processor-host)). If the factory throws, the manager catches it, logs `Factory '' failed for drive ''`, and skips that drive. Registration does not crash. Each element of the returned array is a `ProcessorRecord` — the exact shape the factory must produce: ```typescript type ProcessorRecord = { processor: IProcessor; filter: ProcessorFilter; startFrom?: "beginning" | "current"; }; ``` `processor` and `filter` are required. `startFrom` is covered under [catch-up and ordering](#catch-up-and-ordering). ### The IProcessor interface ```typescript interface IProcessor { onOperations(operations: OperationWithContext[]): Promise; onDisconnect(): Promise; } ``` `onOperations` is called post-ready with the operations that matched this processor's filter, during both live routing and backfill. Each `OperationWithContext` is `{ operation, context }`; `context` carries `documentId`, `documentType`, `scope`, `branch`, the global `ordinal`, and optionally `resultingState`. `onDisconnect` runs when the factory is unregistered or its drive is deleted. The manager wraps this call: a throw is caught and logged, never propagated. Most processors subclass `RelationalDbProcessor` rather than implementing `IProcessor` by hand. Its constructor takes `(namespace, filter, relationalDb)`, and you implement `onOperations`, `initAndUpgrade`, and `onDisconnect`. See [Storage and scaling](/academy/Reference/Reactor/StorageAndScaling) for the relational DB surface. ### A complete factory builder Packages export a `ProcessorFactoryBuilder`, not a bare factory. The builder receives the [host module](#the-processor-host) and returns a `ProcessorFactory`: ```typescript type ProcessorFactoryBuilder = ( module: IProcessorHostModule, ) => Promise | ProcessorFactory; ``` This is the shape codegen emits for a relational processor: ```typescript IProcessorHostModule, ProcessorApp, ProcessorFactoryBuilder, ProcessorFilter, ProcessorRecord, } from "@powerhousedao/reactor-browser"; export const todoIndexerFactoryBuilder: ProcessorFactoryBuilder = (module: IProcessorHostModule) => async (driveHeader: PHDocumentHeader, processorApp?: ProcessorApp) => { const namespace = TodoIndexer.getNamespace(driveHeader.id); const store = await module.relationalDb.createNamespace(namespace); const filter: ProcessorFilter = { branch: ["main"], documentId: ["*"], documentType: ["powerhouse/todo"], scope: ["global"], }; const processor = new TodoIndexer(namespace, filter, store); return [{ processor, filter }]; }; ``` Wiring at startup is two stages: build the host module, call the builder to get a factory, then register it. ```typescript const factory = await todoIndexerFactoryBuilder(processorHostModule); await reactorModule.processorManager.registerFactory("@my-org/my-package", factory); ``` Processor types are re-exported from `@powerhousedao/reactor-browser` as types only. `RelationalDbProcessor` is re-exported as a value. `IProcessorManager`, `ProcessorStatus`, `TrackedProcessor`, and the concrete `ProcessorManager` class are exported from `@powerhousedao/reactor`, not from reactor-browser. ## ProcessorFilter The filter decides which operations reach a processor: ```typescript type ProcessorFilter = { documentType?: string[]; scope?: string[]; branch?: string[]; documentId?: string[]; }; ``` Every field is an optional array. Matching is per field: a field that is `undefined` or `[]` matches everything; a field with values matches an operation whose corresponding context value is in the array. All present fields must match. ```typescript // Global-scope operations on any todo document, main branch only. const filter: ProcessorFilter = { documentType: ["powerhouse/todo"], scope: ["global"], branch: ["main"], documentId: ["*"], }; ``` The `"*"` wildcard is honored **only in `documentId`**. There it means "any document". In `documentType`, `scope`, and `branch` there is no wildcard special-case: a literal `"*"` matches only an operation whose value is the string `"*"`. To match all scopes, omit `scope` or set it to `[]` — do not write `scope: ["*"]`. **WARNING:** The codegen analytics template emits `scope: ["*"]`. Under the matcher this matches a scope literally named `"*"`, which matches nothing real. Set `scope` to the concrete scopes you want, or omit it. `startFrom` on the `ProcessorRecord` controls the catch-up starting point, not which operations match — see [catch-up and ordering](#catch-up-and-ordering). ## The processor host The host module is the context a processor gets through its factory builder. The base interface is `IProcessorHostModule`: ```typescript interface IProcessorHostModule { analyticsStore: IAnalyticsStore; relationalDb: IRelationalDb; processorApp: ProcessorApp; dispatch: IProcessorDispatch; getReadModel(name: string): T; config?: Map; } ``` - **`analyticsStore`** — the analytics store for time-series rollups. - **`relationalDb`** — an `IRelationalDb` (a Kysely instance plus `createNamespace` / `queryNamespace`) for relational indexing. See [Storage and scaling](/academy/Reference/Reactor/StorageAndScaling). - **`processorApp`** — `"connect" | "switchboard"`. How a processor learns which app hosts it. Read this rather than the factory's `processorApp?` argument. - **`dispatch`** — writes back to the reactor via `dispatch.execute(docId, branch, actions, signal?, meta?)`, returning `{ id, status }`. In Connect this is wired to the reactor client's async execute. - **`getReadModel(name)`** — looks up a registered read model by its `name`. Connect's implementation throws `Read model "" not found` when there is no match. - **`config?`** — optional `Map` of host config. Connect builds an extended module, `IReactorProcessorHostModule`, which adds `client: IReactorClient` and `attachments: IAttachmentClient`. It is defined in reactor-browser to avoid a circular package dependency, and sets `processorApp: "connect"`. See [IReactorClient](/academy/Reference/Reactor/ReactorClient) and the [Attachment service](/academy/Reference/Reactor/AttachmentService). `IProcessorDispatch` and `ProcessorDispatchResult` are defined in shared but are not part of the public reactor export surface; treat the `dispatch` handle on the module as the supported entry point. ## Catch-up and ordering Each processor has a **cursor** that records the highest operation `ordinal` it has handled. The manager tracks this per processor as `TrackedProcessor`: ```typescript type TrackedProcessor = { processorId: string; // `${factoryId}:${driveId}:${index}` factoryId: string; driveId: string; processorIndex: number; record: ProcessorRecord; lastOrdinal: number; status: ProcessorStatus; // "active" | "errored" lastError: string | undefined; lastErrorTimestamp: Date | undefined; retry: () => Promise; }; ``` **Ordering.** Operations arrive sorted by global ordinal. On each batch the manager filters to operations with `ordinal > lastOrdinal`, applies the filter, and calls `onOperations` on the matches. On success it advances `lastOrdinal` to the maximum ordinal in the batch (including unmatched operations), so the cursor moves forward even when nothing matched. **`startFrom`.** When a processor is first created and no cursor row exists yet: - `"beginning"` (the default) starts the cursor at ordinal 0, so the processor backfills the drive's full history. - `"current"` starts the cursor at the manager's current ordinal, so the processor sees only operations from now on. `startFrom` applies **only on first creation**. Once a cursor row exists, it is ignored — the persisted cursor wins. Restarting the reactor never re-runs `startFrom`. **Backfill and replay.** When a processor's `lastOrdinal` is behind the manager, the manager pages through history with `operationIndex.getSinceOrdinal(lastOrdinal)`, filters each page, calls `onOperations`, advances the cursor to the page's max ordinal, persists it, and follows the continuation until exhausted. This runs when a factory registers against a drive that already has history, and after a restart to replay anything missed while the reactor was down. **Persistence.** Cursors are stored in the `ProcessorCursor` table, keyed by `processorId`, and survive restarts. On startup the manager rehydrates every cursor, then catch-up replays the gap. **Failure isolation.** Processors run in parallel, each in its own try/catch. If `onOperations` throws, that processor goes to `status: "errored"`, its `lastError` and `lastErrorTimestamp` are recorded, and its cursor stops advancing. Other processors are unaffected. There is no automatic retry: an errored processor stays errored and is skipped on later batches until you call `tracked.retry()` (which re-activates it and re-runs backfill) or re-register its factory. See [Error handling](/academy/Reference/Reactor/ErrorHandling). To inspect state, use the manager: `get(processorId)` for one processor or `getAll()` for every tracked processor across all drives. For how processors relate to sync and remote drives, see [Synchronization](/academy/Reference/Reactor/Synchronization). For the document types a filter can target, see the [Document model registry](/academy/Reference/Reactor/DocumentModelRegistry). --- ## Document model registry and version upgrades > Source: https://academy.vetra.io/academy/Reference/Reactor/DocumentModelRegistry The **document model registry** holds document model modules keyed by document type and version. The reactor uses it to resolve the reducer, utils, and specification for a given document when it executes a job. It also holds **upgrade manifests** that describe how to migrate a document from one model version to the next. You register modules and manifests on the [`ReactorBuilder`](/academy/Reference/Reactor/AdvancedReactorUsage). At runtime you read the registry through the reactor module field `documentModelRegistry`, or through the [`useModelRegistry`](#accessing-the-registry) hook in the browser. ```typescript const reactor = await new ReactorBuilder() .withDocumentModels([todoModuleV1, todoModuleV2]) .withUpgradeManifests([todoUpgradeManifest]) .build(); ``` `withDocumentModels` and `withUpgradeManifests` each **replace** the array passed to them — calling either twice keeps only the last array, it does not append. Order between the two calls does not matter: the builder always registers manifests before modules. Registration at build time is non-fatal. A duplicate or invalid module or manifest is logged through the builder's logger and skipped; the build still completes. Do not wrap `.build()` in a try/catch expecting a registration failure to throw — check the logs instead. ## Accessing the registry The registry instance lives on the reactor module as `documentModelRegistry: IDocumentModelRegistry`. This field is present on both in-process and worker-backed reactors. In the browser, read it with `useModelRegistry`: ```typescript const registry = useModelRegistry(); // IDocumentModelRegistry | undefined ``` `useModelRegistry` returns `undefined` until the reactor client module is set on the PH global. Guard the result before calling registry methods. The core `IReactor` interface does not expose the registry directly. To list model data through the reactor, use `reactor.getDocumentModels(namespace?, paging?, signal?)`, which reads `getAllModules()` internally and filters by document-type prefix. ## `IDocumentModelRegistry` reference `IDocumentModelRegistry` is the contract for both module management and the upgrade API. The default in-memory implementation is `DocumentModelRegistry`. Both are exported from `@powerhousedao/reactor`. The document type used as the lookup key is `module.documentModel.global.id`. A module's version comes from its optional `version` field, which the registry treats as `1` when absent. ### Module management #### `registerModules` ```typescript registerModules( ...modules: DocumentModelModule[] ): RegistrationResult>[]; ``` Registers one or more modules. Modules without a `version` default to version 1. Two different versions of the same document type coexist. A module whose `(documentType, version)` pair is already registered produces a `DuplicateModuleError` in its result. This method **never throws** — it returns one [`RegistrationResult`](#registrationresult) per input module, in input order. Invalid or duplicate modules are skipped without affecting the rest. #### `unregisterModules` ```typescript unregisterModules(...documentTypes: string[]): boolean; ``` Removes all versions of each given document type. Returns `true` only if every requested type was found. Returns `false` if any was missing, while still removing the types that exist. #### `getModule` ```typescript getModule(documentType: string, version?: number): DocumentModelModule; ``` Returns the module for a document type. With `version` omitted, returns the highest registered version. With `version` given, returns that exact version. Throws `ModuleNotFoundError` if the type is unknown, or if the specific version is not registered even when other versions exist. #### `getAllModules` ```typescript getAllModules(): DocumentModelModule[]; ``` Returns a copy of every registered module across all types and versions. #### `getSupportedVersions` ```typescript getSupportedVersions(documentType: string): number[]; ``` Returns the registered version numbers for a type, sorted ascending. Throws `ModuleNotFoundError` if none are registered for the type. #### `getLatestVersion` ```typescript getLatestVersion(documentType: string): number; ``` Returns the highest registered version number for a type. Throws `ModuleNotFoundError` if none are registered. #### `clear` ```typescript clear(): void; ``` Removes all modules and all upgrade manifests. ### `RegistrationResult` `registerModules` and `registerUpgradeManifests` report per-item outcomes instead of throwing: ```typescript export type RegistrationResult = | { status: "success"; item: T } | { status: "error"; item: T; error: Error }; ``` `item` is present on both branches — the registered or offending object is echoed back even on error. Check `result.status === "error"` for each element. ```typescript const results = registry.registerModules(todoModuleV1, todoModuleV2); for (const result of results) { if (result.status === "error") { console.error("skipped", result.item.documentModel.global.id, result.error.message); } } ``` `RegistrationResult` is not exported from `@powerhousedao/reactor`, and the package has no `registry` subpath. Reference it structurally, or read `result.status` (`"success"` or `"error"`) directly as shown above. ### `DocumentModelModule` The shape registered with the registry: ```typescript export type DocumentModelModule = { version?: number; reducer: Reducer; actions: Actions; utils: DocumentModelUtils; documentModel: DocumentModelPHState; // .global.id is the document type key }; ``` `version` is optional. The source marks it "should be made required"; module versioning is not finalized, and the registry defaults a missing `version` to `1` everywhere. ## Version upgrades An **upgrade manifest** declares the supported versions of a document type and the transition that moves a document up each single version step. The registry stores one manifest per document type and exposes methods to look it up and to compute the steps between two versions. ### Upgrade types These types come from `@powerhousedao/shared/document-model` (aliased as `document-model` in generated files). ```typescript export type UpgradeReducer< TFrom extends PHBaseState, TTo extends PHBaseState, > = (document: PHDocument, action: Action) => PHDocument; export type UpgradeTransition = { toVersion: number; upgradeReducer: UpgradeReducer; description?: string; }; export type UpgradeManifest = { documentType: string; latestVersion: TupleMember; // union of versions, e.g. 1 | 2 | 3 supportedVersions: TVersions; // the tuple, e.g. [1, 2, 3] upgrades: { // keys: "v2" | "v3" | ... — no "v1" key (v1 is the base) [V in Exclude, 1> as `v${V}`]: UpgradeTransition; }; }; ``` Pass `TVersions` as a `readonly number[]` tuple (use `as const`). The type forces an `upgrades` key for every supported version except `1`: a manifest for `[1, 2, 3]` requires `v2` and `v3`. There is no `v1` key, because v1 is the base version. Registry methods type the manifest loosely as `UpgradeManifest`. The registry does not cross-check a manifest's versions against registered modules. Registering a manifest whose `supportedVersions` do not match the registered module versions succeeds. ### Authoring a manifest Manifest files are codegen output and carry a `WARNING: DO NOT EDIT` header. You author them by adding versions and upgrade reducers through codegen, not by editing the manifest by hand. The generated shape splits across three files. `versions.ts` declares the tuple: ```typescript export const supportedVersions = [1, 2] as const; export const latestVersion = supportedVersions[1]; ``` A transition file (`v2.ts`) holds the reducer for one step: ```typescript export const v2: UpgradeTransition = { toVersion: 2, upgradeReducer, // (document: PHDocument, action) => PHDocument description: "", }; ``` `upgrade-manifest.ts` assembles them: ```typescript export const todoUpgradeManifest: UpgradeManifest = { documentType: "test/todo", latestVersion, supportedVersions, upgrades: { v2 }, // key "v2", no "v1" }; ``` A manifest with only v1 has an empty `upgrades: {}`. ### Upgrade API #### `registerUpgradeManifests` ```typescript registerUpgradeManifests( ...manifests: UpgradeManifest[] ): RegistrationResult>[]; ``` Registers one or more manifests. A manifest with a falsy `documentType`, or one whose type already has a manifest (`DuplicateManifestError`), produces an error result. Like `registerModules`, this method never throws and returns one [`RegistrationResult`](#registrationresult) per input. Use `withUpgradeManifests` on the builder to register at build time. #### `unregisterUpgradeManifests` ```typescript unregisterUpgradeManifests(...documentTypes: string[]): boolean; ``` Removes the manifest for each given type. Returns `true` only if every type had a manifest; removes those that exist regardless. #### `getUpgradeManifest` ```typescript getUpgradeManifest(documentType: string): UpgradeManifest; ``` Returns the registered manifest. Throws `ManifestNotFoundError` if none exists for the type. #### `computeUpgradePath` ```typescript computeUpgradePath( documentType: string, fromVersion: number, toVersion: number, ): UpgradeTransition[]; ``` Returns the ordered transitions to move from `fromVersion` to `toVersion`. It walks the keys `v(from+1)..v(to)`. Behavior: - `from === to` returns `[]` and skips the manifest lookup, so it does not throw when no manifest is registered. - `to < from` throws `DowngradeNotSupportedError` before the manifest lookup. - No manifest for the type throws `ManifestNotFoundError`. - A missing step in the range throws `MissingUpgradeTransitionError`. #### `getUpgradeReducer` ```typescript getUpgradeReducer( documentType: string, fromVersion: number, toVersion: number, ): UpgradeReducer; ``` Returns the reducer for a **single** step, where `toVersion` must equal `fromVersion + 1`. The single-step check runs before the manifest lookup, so `InvalidUpgradeStepError` fires even with no manifest registered. Throws `ManifestNotFoundError` if no manifest exists, or `MissingUpgradeTransitionError` if that one transition is absent. ### Upgrade path example Given `todoUpgradeManifest` for `test/todo` with `supportedVersions = [1, 2]`: ```typescript const registry = useModelRegistry(); if (!registry) return; // Steps from v1 to v2: [v2 transition] const path = registry.computeUpgradePath("test/todo", 1, 2); // Same version: [] — no manifest needed const none = registry.computeUpgradePath("test/todo", 2, 2); // Single-step reducer for v1 -> v2 const reducer = registry.getUpgradeReducer("test/todo", 1, 2); // Downgrade throws DowngradeNotSupportedError registry.computeUpgradePath("test/todo", 2, 1); // Non-single-step throws InvalidUpgradeStepError (no v3 manifest needed to fail) registry.getUpgradeReducer("test/todo", 1, 3); ``` ## Errors All registry errors extend `Error` and set `name`. Each class with a static `isError(error): error is X` guard checks `Error.isError(error) && error.name === "..."`. | Error | `name` | Thrown when | | --- | --- | --- | | `ModuleNotFoundError` | `"ModuleNotFoundError"` | `getModule` for an unknown type or version; `getSupportedVersions` / `getLatestVersion` with no modules for the type. Carries `documentType`, `requestedVersion`. | | `DuplicateModuleError` | `"DuplicateModuleError"` | `registerModules` when the `(documentType, version)` pair is already registered (returned in the result, not thrown). | | `InvalidModuleError` | `"InvalidModuleError"` | Reserved for malformed modules. The in-memory `DocumentModelRegistry` does **not** throw it — duplicate is its only validation. | | `DuplicateManifestError` | `"DuplicateManifestError"` | `registerUpgradeManifests` when the type already has a manifest (returned in the result). | | `ManifestNotFoundError` | `"ManifestNotFoundError"` | `getUpgradeManifest`, and `computeUpgradePath` / `getUpgradeReducer`, when no manifest is registered for the type. | | `DowngradeNotSupportedError` | `"DowngradeNotSupportedError"` | `computeUpgradePath` when `toVersion < fromVersion`. Carries `documentType`, `fromVersion`, `toVersion`. | | `MissingUpgradeTransitionError` | `"MissingUpgradeTransitionError"` | `computeUpgradePath` (a `v{n}` step in range is absent) and `getUpgradeReducer` (the single `v{to}` step is absent). | | `InvalidUpgradeStepError` | `"InvalidUpgradeStepError"` | `getUpgradeReducer` when `toVersion !== fromVersion + 1`. | Of these, `ModuleNotFoundError`, `DuplicateModuleError`, and `DuplicateManifestError` have an `isError` guard. `InvalidModuleError`, `ManifestNotFoundError`, `MissingUpgradeTransitionError`, and `InvalidUpgradeStepError` do not — match on `error.name` instead. Export-surface gap: only `ModuleNotFoundError`, `DuplicateModuleError`, `InvalidModuleError`, and `DuplicateManifestError` are exported from `@powerhousedao/reactor`. `ManifestNotFoundError`, `MissingUpgradeTransitionError`, and `InvalidUpgradeStepError` are not exported, and the package has no `registry` subpath, so match those three on `error.name` even though `getUpgradeManifest`, `computeUpgradePath`, and `getUpgradeReducer` throw them. `DowngradeNotSupportedError` is available from `@powerhousedao/shared/document-model`. For the full reactor error taxonomy across job execution, sync, and storage, see [Error handling](/academy/Reference/Reactor/ErrorHandling). ## Related - [Working with the Reactor](/academy/Reference/Reactor/WorkingWithTheReactor) - [Advanced Reactor Usage](/academy/Reference/Reactor/AdvancedReactorUsage) — `ReactorBuilder` wiring - [IReactorClient](/academy/Reference/Reactor/ReactorClient) - [Processors](/academy/Reference/Reactor/Processors) and [Building a processor](/academy/Build/WorkWithData/BuildingAProcessor) --- ## Storage backends and scaling > Source: https://academy.vetra.io/academy/Reference/Reactor/StorageAndScaling The reactor persists every operation through a Kysely-backed storage layer. You pick the backend and the execution topology on the [`ReactorBuilder`](/academy/Reference/Reactor/WorkingWithTheReactor) before you call `build()`. This page covers the default in-memory backend, switching to Postgres, and the two scaling paths: an executor worker pool and sharded projection workers. Both scaling features are recent and design-doc-tracked. Where a path is not yet stable, this page says so. ## Default: in-memory PGlite Out of the box the builder gives you an in-memory [PGlite](https://pglite.dev/) database. When you build a reactor with only document models registered, the builder calls an internal `createDefaultDatabase()` that constructs `new Kysely({ dialect: new PGliteDialect(new PGlite()) })`. ```typescript const reactor = await new ReactorBuilder() .withDocumentModels([myDocumentModel]) .build(); ``` `new PGlite()` with no arguments is **in-memory**. Nothing is written to disk and nothing survives the process. This is the right backend for unit tests and local development, where you want a fresh, isolated database every run with no external service. What you get in this path: - Migrations run automatically. The migration strategy defaults to `"auto"`, so the builder runs `runMigrations(db, REACTOR_SCHEMA)` to create the `reactor` schema and apply the current migration set. - All storage operates under the `"reactor"` Postgres schema (`REACTOR_SCHEMA === "reactor"`). - A single in-process executor runs jobs (`maxConcurrency` defaults to `1`). - An in-process read-model coordinator keeps the document view and indexer up to date. - `module.pools` is `[]` — there is no `pg.Pool` to instrument. State is ephemeral. Move to Postgres when you need data to survive a restart, when more than one process must share storage, or when you scale to a worker pool or projection shards (neither can run on PGlite — see below). ## Choosing a backend The builder picks the base database in this precedence order, inside `buildModule()`: 1. The instance you passed to `withKysely(...)`, if any. 2. A Postgres pool, if the worker pool is enabled and a worker DB config is set. 3. The in-memory PGlite default. ### Bring your own Kysely instance `withKysely` injects a pre-built Kysely instance and overrides default database creation. ```typescript withKysely(kysely: Kysely): this ``` `Database` is the combined schema the reactor operates over: ```typescript type Database = StorageDatabase & DocumentViewDatabase & DocumentIndexerDatabase; ``` `StorageDatabase` holds the operation log and sync tables (`Operation`, `Keyframe`, `document_collections`, `operation_index_operations`, `sync_remotes`, `sync_cursors`, `sync_dead_letters`); the other two cover the document view and the document indexer. `Database`, `StorageDatabase`, `DocumentIndexerDatabase`, and `OperationTable` are exported from the package root. A persistent backend needs a Postgres-compatible dialect and the `reactor` schema. Pass a real Postgres `Kysely` here when you want to control pool construction yourself; otherwise use the worker DB config (next section), which builds the pool for you. If you build the pool yourself, register its instrumentation with `withInstrumentedPool(instrumentation)` so pool stats surface through `module.pools`. ### Postgres via the worker DB config When the worker pool is enabled (below), the builder builds the parent reactor's Postgres pool for you from the `DbConfig` you pass to `withWorkerDbConfig`. The internal `createPostgresDatabase` constructs a `pg.Pool` and wraps it in a `PostgresDialect`: ```typescript new Pool({ host: config.host, port: config.port, database: config.database, user: config.user, password: config.password, ssl: config.ssl ? { rejectUnauthorized: false } : undefined, application_name: config.applicationName, max: config.poolSize, connectionTimeoutMillis: config.connectionTimeoutMillis, idleTimeoutMillis: config.idleTimeoutMillis, }); ``` The pool is instrumented with `instrumentPgPool(pool, config.applicationName ?? "reactor-host")` and exposed via `module.pools`. ### Migrations The migration strategy is set with `withMigrationStrategy`: ```typescript withMigrationStrategy(strategy: MigrationStrategy): this // MigrationStrategy = "auto" | "manual" | "none" ``` Default is `"auto"`. Only `"auto"` runs migrations during `buildModule()`. A migration failure throws `` `Database migration failed: ${error.message}` ``. For `"manual"` or `"none"`, run migrations yourself with the exported helpers: ```typescript const result = await runMigrations(db, REACTOR_SCHEMA); if (!result.success && result.error) { throw result.error; } ``` `runMigrations` returns `{ success, migrationsExecuted, error? }` and never throws on a migration error — it reports the error in the result. Use `getMigrationStatus(db, REACTOR_SCHEMA)` to inspect applied versus pending migrations without running them. ## Scaling with a worker pool The executor worker pool moves job execution out of the main thread into N `node:worker_threads` workers. Each worker opens its own Postgres pool and runs document models in isolation. Jobs route to a worker stickily by document id, so all work for one document lands on the same worker. Enable it with `withWorkerPool`, register document models as **specs** (not modules), and supply connection info and a signature-verifier spec: ```typescript const reactor = await new ReactorBuilder() .withDocumentModelSpecs([ { packageName: "@my-org/account-document-model", version: "1.0.0" }, ]) .withWorkerPool({ enabled: true, numWorkers: 4, workerType: "thread", }) .withWorkerDbConfig({ host: "localhost", port: 5432, database: "reactor", user: "reactor", password: process.env.PGPASSWORD!, }) .withWorkerSignatureVerifierSpec({ module: { packageName: "@my-org/signing", exportName: "createSignatureVerifier", }, }) .build(); ``` ### Config shapes `WorkerPoolConfig`: ```typescript type WorkerPoolConfig = { enabled: boolean; // when false, the executor runs in-process numWorkers: number; // number of worker instances to spawn workerType: "thread" | "process"; // worker isolation mode heartbeatMs?: number; // optional heartbeat interval (ms) workerPgPoolSize?: number; // optional per-worker pg pool size override }; ``` `enabled` gates everything; when `false` the executor stays in-process. `numWorkers` becomes the number of workers the manager spawns at `start()` and the modulus used for sticky routing. `DbConfig`: ```typescript type DbConfig = { host: string; port: number; database: string; user: string; password: string; ssl?: boolean; applicationName?: string; poolSize?: number; connectionTimeoutMillis?: number; // pg defaults to 0 (unlimited wait) if omitted idleTimeoutMillis?: number; // pg defaults to 10000 if omitted }; ``` `DbConfig` is sent across worker IPC, so it must be JSON-clonable. `ssl: true` maps to `{ rejectUnauthorized: false }`; `poolSize` maps to pg's `max`; `applicationName` maps to `application_name`. The signature-verifier spec is a `FactorySpec`: a `ModuleRef` (one of `{ packageName, exportName }` or `{ filePath, exportName }`) plus optional JSON-clonable `initArgs`. The worker imports the named export and invokes it to construct its signature verifier. ### Build-time constraints that throw When `workerPool.enabled` is `true`, `buildModule()` enforces the wiring up front. Each of these throws: - Calling `withDocumentModels()` in worker-pool mode: `"workerPool.enabled requires withDocumentModelSpecs; remove withDocumentModels() in worker-pool mode."` Models cross a thread boundary, so they are referenced by spec, not by live module. - No specs registered: `"workerPool.enabled requires at least one spec registered via withDocumentModelSpecs."` - No worker DB config (and no custom factory or executor): `"workerPool.enabled requires withWorkerDbConfig (or a custom withWorkerFactory / withExecutor)."` - No signature-verifier spec (and no custom factory or executor): `"workerPool.enabled requires withWorkerSignatureVerifierSpec (or a custom withWorkerFactory / withExecutor)."` The DB-config and verifier-spec checks only apply when the builder needs to build the default thread transport — that is, when you have not supplied a custom `withWorkerFactory` or `withExecutor`. The worker pool requires a real Postgres server. PGlite cannot be shared across threads, so the parent and the workers must point at the same Postgres instance. This is why `withWorkerDbConfig` is mandatory: the in-memory default does not work here. When the pool is enabled and a worker DB config is set, the builder builds the parent's database from that same config. ### Custom transports `withWorkerFactory` injects a custom `WorkerFactory`, skipping the default thread-transport wiring: ```typescript type WorkerFactory = (index: number) => IExecutorWorker; ``` Use this for tests or an alternative transport. When you supply one, the DB-config and verifier-spec validations above no longer apply (the builder is not building the default transport). **WARNING:** `workerType: "process"` is declared in `WorkerPoolConfig`, but the built-in factory only ever spawns a `node:worker_threads` worker. To run workers as separate processes today you must supply your own `withWorkerFactory`. `heartbeatMs` and the heartbeat message are scaffolding for a future phase and are not yet active. ## Projection shards Projection shards move read-model indexing out of the main thread. Instead of the in-process read-model coordinator, the builder installs a shard manager that fans `JOB_WRITE_READY` events to N projection workers, sharded by document id. Each worker materializes the built-in read models against its own Postgres pool and re-emits `JOB_READ_READY` and read-model events back to the host bus, so [synchronization](/academy/Reference/Reactor/Synchronization), awaiters, and observers see them exactly once per job. Configure shards with `withProjectionShards`. This path reuses the same `DbConfig` you set with `withWorkerDbConfig`, so that call is mandatory. ```typescript const reactor = await new ReactorBuilder() .withDocumentModelSpecs([ { packageName: "@my-org/account-document-model", version: "1.0.0" }, ]) .withWorkerDbConfig({ host: "localhost", port: 5432, database: "reactor", user: "reactor", password: process.env.PGPASSWORD!, }) .withProjectionShards({ shardCount: 4, preReadyKinds: ["document-view"], postReadyKinds: ["document-indexer"], }) .build(); ``` ### Config shape `ProjectionShardBuilderConfig`: ```typescript type ProjectionShardBuilderConfig = { shardCount: number; preReadyKinds: BuiltInReadModelKind[]; postReadyKinds: BuiltInReadModelKind[]; poolSize?: number; initTimeoutMs?: number; shutdownGraceMs?: number; drainTimeoutMs?: number; chainDepthReportIntervalMs?: number; }; // BuiltInReadModelKind = "document-view" | "document-indexer" ``` `preReadyKinds` run before a job reaches `READ_READY`; `postReadyKinds` run after. `poolSize` overrides the reused worker DB pool size for the shard pools only; the builder forces their `application_name` to `"reactor-projection-shard"`. Defaults applied when the optional fields are omitted: `initTimeoutMs` 30000, `shutdownGraceMs` 5000, `drainTimeoutMs` 30000, `chainDepthReportIntervalMs` 250. ### Build-time constraints that throw - `withProjectionShards` without `withWorkerDbConfig`: `"withProjectionShards requires withWorkerDbConfig; projection workers need connection info to open their own pools."` - `shardCount < 1`: `` `ProjectionShardManager: shardCount must be >= 1 (got ${shardCount})` ``. Shards can run on their own or alongside the worker pool. They replace the read-model coordinator; the executor side is independent. As with the worker pool, projection shards require real Postgres — the workers open their own pools and PGlite cannot be shared across threads. `withProjectionWorkerFactory` injects a custom `ProjectionWorkerFactory` and skips the default thread-transport wiring, mirroring `withWorkerFactory` on the pool: ```typescript type ProjectionWorkerFactory = (shardIndex: number, shardId: string) => IProjectionTransport; ``` **WARNING:** Projection shards are a recent, design-doc-tracked feature. The shard-manager class itself is internal; you configure it through `withProjectionShards` and the public `ProjectionShardBuilderConfig`, `BuiltInReadModelKind`, `ProjectionWorkerFactory`, and `IProjectionTransport` types. ## Decision guide - **In-memory PGlite (default).** Dev and tests. Zero setup, ephemeral, single process. Use it unless you need one of the below. - **Postgres (`withKysely` or `withWorkerDbConfig`).** When state must survive a restart or be shared across processes. - **Worker pool (`withWorkerPool`).** When job execution is CPU-bound and one thread is the bottleneck. Requires Postgres and document-model specs. - **Projection shards (`withProjectionShards`).** When read-model indexing is the bottleneck. Requires Postgres. Combine with the worker pool when both write and read paths need to scale. Both scaling paths require real Postgres and trade simplicity for throughput. Start in-memory, move to Postgres for persistence, and reach for the worker pool or shards only when a single thread is the proven bottleneck. For the full list of builder methods, see the builder table on [Advanced Reactor Usage](/academy/Reference/Reactor/AdvancedReactorUsage). For the read-model and processor side of indexing, see [Processors](/academy/Reference/Reactor/Processors) and [Document model registry](/academy/Reference/Reactor/DocumentModelRegistry). For the client surface that talks to a built reactor, see [IReactorClient](/academy/Reference/Reactor/ReactorClient). --- ## Error handling > Source: https://academy.vetra.io/academy/Reference/Reactor/ErrorHandling Errors reach your code from the reactor through three channels: - **Mutations throw a plain `Error`.** When a job fails, [`IReactorClient`](/academy/Reference/Reactor/ReactorClient) methods like `execute`, `create`, and `deleteDocument` reject with `new Error(job.error?.message)`. The typed error class, stack, and retry history are not preserved at this boundary. - **Aborts throw an `AbortError`.** Any call that takes an `AbortSignal` rejects with an error whose `name` is `"AbortError"` when the signal fires. - **Subsystems export typed errors.** The registry, sync, and attachment layers throw named error classes you can discriminate with `instanceof` or a `name` check. This page is the consolidated error reference for the reactor. For attachment errors see [Attachment service](/academy/Reference/Reactor/AttachmentService); for sync-channel behavior see [Synchronization](/academy/Reference/Reactor/Synchronization). **INFO:** Importable error values come from `@powerhousedao/reactor`: `EventBusAggregateError`, `ModuleNotFoundError`, `DuplicateModuleError`, `InvalidModuleError`, `DuplicateManifestError`, `ChannelError`, `ChannelErrorSource`, `SyncOperationAggregateError`, `PollingChannelError`, `isDriveAuthError`, and `DRIVE_AUTH_ERROR_MESSAGES`. `@powerhousedao/reactor-browser` re-exports only `isDriveAuthError`. Attachment errors come from `@powerhousedao/reactor-attachments`. Several errors are internal and cannot be imported; this page marks each one. ## Job failures A job moves through `PENDING -> RUNNING -> WRITE_READY -> READ_READY`, or transitions to `FAILED`. Only `READ_READY` and `FAILED` are terminal. The failing error rides on the job's `JobInfo`. ### `JobInfo.error` and `errorHistory` ```typescript type ErrorInfo = { message: string; stack: string; }; type JobInfo = { id: string; documentId: string; // empty string when the job is unknown status: JobStatus; createdAtUtcIso: string; completedAtUtcIso?: string; error?: ErrorInfo; // the failing error errorHistory?: ErrorInfo[]; // one entry per attempt, ordered result?: any; consistencyToken: ConsistencyToken; meta: JobMeta; job?: Job; // full job object, populated on failure for debugging }; ``` `JobInfo` and `JobStatus` are exported from `@powerhousedao/reactor`. The `ErrorInfo` shape above is not exported under that name. The barrel re-exports a different `ErrorInfo` (the worker protocol's) aliased as `WorkerErrorInfo`. Treat the `{ message, stack }` on `JobInfo.error` as a structural type you match against, not one you import. `errorHistory` holds one `ErrorInfo` per attempt, oldest first. A job that the queue retried carries every failure; `error` is the most recent. On failure the reactor also populates `job` with the full job object for debugging. ### What `execute()` and `executeBatch()` throw The [`IReactorClient`](/academy/Reference/Reactor/ReactorClient) mutation methods do not surface the typed error. On a `FAILED` job they throw a bare `Error` carrying only the message string: ```typescript // inside ReactorClient, after the job reaches a terminal status if (job.status === JobStatus.FAILED) { throw new Error(job.error?.message); } ``` The same pattern runs in `execute`, `executeBatch`, `create`, `deleteDocument`, `deleteDocuments`, `addRelationship`, and `removeRelationship`. Two consequences: - The thrown `Error.message` equals `job.error?.message`, which can be `undefined` if `error` was never set. Guard for that when you display it. - The original error class, stack, and `errorHistory` are lost at the client boundary. To inspect them, drop to the lower-level `IReactor.getJobStatus(jobId)` and read `JobInfo.error`, `JobInfo.errorHistory`, and `JobInfo.job`. See [Advanced Reactor Usage](/academy/Reference/Reactor/AdvancedReactorUsage). ```typescript try { await client.execute(documentId, "main", actions); } catch (err) { // err is a plain Error; err.message came from job.error?.message console.error("mutation failed:", err instanceof Error ? err.message : err); } ``` Several internal write-path errors surface only as the `.message` string here and lose their typed identity at this edge: `DocumentDeletedError`, `DocumentNotFoundError`, `CreateDocumentRequiredError`, `InvalidSignatureError`, and `UpgradeManifestNotFoundError`. None are exported. Match on `err.message` if you need to branch on them, and expect that to be brittle. ## Cancellation Every `IReactor` method that accepts an `AbortSignal` rejects when the signal is already aborted or aborts mid-flight. The reactor throws `AbortError`: ```typescript export class AbortError extends Error { constructor(message?: string) { super(message || "Aborted"); this.name = "AbortError"; } } export const isAbortError = (error: unknown): boolean => { return error instanceof AbortError; }; ``` `AbortError` and `isAbortError` live in `core/types.ts` but are **not exported** from the package barrel. You cannot import either one. Because the class is unreachable, `isAbortError` (and any `instanceof AbortError` you write against the imported class) is not available to you. Match on the `name` instead, which the DOM `AbortController` also uses: ```typescript const controller = new AbortController(); try { const doc = await client.get(documentId, undefined, controller.signal); } catch (err) { if (err instanceof Error && err.name === "AbortError") { // the read was cancelled return; } throw err; } ``` `isAbortError` relies on `instanceof`, so even where it is reachable it does not survive a worker or realm boundary. The `name` check survives both and is the reliable test. Note also that `ReactorClient.deleteDocument` throws a plain `new Error("Operation aborted")` (not `AbortError`) when its signal fires during cascade traversal, so prefer `name`-agnostic handling around that call. ## Event bus `IEventBus.emit()` runs subscribers sequentially with `await` over a snapshot, collects any thrown errors, and rejects with one aggregate at the end. ```typescript export class EventBusAggregateError extends Error { public readonly errors: any[]; // message: "EventBus emit failed with N error(s): ; ; ..." } ``` `EventBusAggregateError.errors` holds the individual subscriber errors. Discriminate it, then iterate: ```typescript try { await eventBus.emit(eventType, payload); } catch (err) { if (err instanceof EventBusAggregateError) { for (const subscriberError of err.errors) { console.error(subscriberError); } } } ``` `EventBusAggregateError` is exported from `@powerhousedao/reactor`. It is not re-exported from `@powerhousedao/reactor-browser`. ## Subsystem errors Each subsystem defines its own error classes. Classes with a `static isError` helper are name-based and safe across worker and realm boundaries; the rest must be matched with `instanceof` or a manual `err.name` check. ### Registry and manifest errors Thrown when registering, resolving, or upgrading document model modules. Four are importable from `@powerhousedao/reactor`; the rest are internal. | Error | Thrown when | `static isError`? | Importable | | --- | --- | --- | --- | | `ModuleNotFoundError` | `getModule` / resolve finds no module for a type (and optional version) | Yes | `@powerhousedao/reactor` | | `DuplicateModuleError` | registering a module that already exists | Yes | `@powerhousedao/reactor` | | `InvalidModuleError` | a module is malformed | No | `@powerhousedao/reactor` | | `DuplicateManifestError` | re-registering an upgrade manifest | Yes | `@powerhousedao/reactor` | | `ManifestNotFoundError` | upgrade manifest lookup misses | No | internal | | `MissingUpgradeTransitionError` | a gap in the upgrade chain | No | internal | | `InvalidUpgradeStepError` | `getUpgradeReducer` called with a non-single-step increment | No | internal | | `DowngradeNotSupportedError` | a downgrade is requested | (external) | internal | `ModuleNotFoundError` carries `documentType: string` and `requestedVersion: number | undefined`: ```typescript try { // ...register or resolve a document model module } catch (err) { if (ModuleNotFoundError.isError(err)) { console.error(`no module for ${err.documentType}`, err.requestedVersion); } } ``` `static isError` is the ES2024 pattern `Error.isError(err) && err.name === ""`. Use it for the four classes that have it. For `InvalidModuleError` and the internal upgrade errors, match on `err.name`. The four internal errors are reachable only from `@powerhousedao/reactor/.../src/registry/index.js`, not the package root; treat them as internal. See [Document model registry](/academy/Reference/Reactor/DocumentModelRegistry). ### Sync channel errors Thrown by the sync manager and channels. See [Synchronization](/academy/Reference/Reactor/Synchronization) for how these land on `SyncOperation.error` and dead-letter events. ```typescript enum ChannelErrorSource { None = "none", Channel = "channel", Inbox = "inbox", Outbox = "outbox", } class ChannelError extends Error { source: ChannelErrorSource; error: Error; // the wrapped underlying error // message: "ChannelError[]: " } ``` `ChannelError` wraps an underlying `Error` and tags it with a `source`. Discriminate with `instanceof`, then read `source` and `error`: ```typescript if (err instanceof ChannelError) { console.error(`sync ${err.source} failed:`, err.error.message); } ``` `SyncOperationAggregateError` collects the per-callback errors when a sync operation's status callbacks throw. Its `errors: Error[]` field holds them: ```typescript class SyncOperationAggregateError extends Error { errors: Error[]; // message: "SyncOperation callback failed with N error(s): ..." } ``` `ChannelError`, `ChannelErrorSource`, and `SyncOperationAggregateError` are all exported from `@powerhousedao/reactor`. `PollingChannelError` is exported from `@powerhousedao/reactor` but is never thrown anywhere in source. Treat it as dormant; do not write `catch` logic against it. #### Drive auth: `isDriveAuthError` Use `isDriveAuthError` to detect that a remote rejected the caller as unauthenticated or unauthorized. It returns `true` for an HTTP 401/403 or a Forbidden/Unauthorized GraphQL response, and `false` for everything else. ```typescript // also re-exported from "@powerhousedao/reactor-browser" try { await reactor.addRemoteDrive(url, options); } catch (err) { if (isDriveAuthError(err)) { // prompt the user to sign in / re-authenticate } } ``` `isDriveAuthError` is gated on the internal `GraphQLRequestError` class: it returns `false` for any error that isn't an instance of it. You cannot import or construct `GraphQLRequestError`, so the helper is only meaningful on errors that originated inside the reactor's GraphQL channel and propagated out unchanged. Inside the reactor it drives `ConnectionStateSnapshot.requiresAuth`. The exported message constant `DRIVE_AUTH_ERROR_MESSAGES` (`{ forbidden, authenticationRequired }`) is shared with `reactor-api` so server throw strings and the client check stay in sync. ### Attachment errors `@powerhousedao/reactor-attachments` exports eight error classes: `AttachmentNotFound`, `ReservationNotFound`, `InvalidAttachmentRef`, `UploadTooLarge` (maps to HTTP 413), `AttachmentAlreadyExists`, `HashMismatch`, `SizeMismatch`, and `AttachmentPending`. None have a `static isError`; discriminate with `instanceof` or `err.name`. `AttachmentPending` is deliberately not a subclass of `AttachmentNotFound`, so callers can distinguish "retry later" from "unknown attachment". For the full table of fields and when each is thrown, see [Attachment service](/academy/Reference/Reactor/AttachmentService). ## Detecting errors | Mechanism | Applies to | Cross-boundary safe | | --- | --- | --- | | `err.name === "AbortError"` | aborted reactor calls (DOM-compatible name) | Yes | | `X.isError(err)` (static) | `ModuleNotFoundError`, `DuplicateModuleError`, `DuplicateManifestError` | Yes (name-based) | | `err instanceof X` | `EventBusAggregateError`, `ChannelError`, `SyncOperationAggregateError`, attachment errors | No | | `err.name === "X"` | any class above (all set `this.name`) | Yes | | `isDriveAuthError(err)` | un-rewrapped GraphQL-channel errors only | only in-channel | Prefer a `name` check over `instanceof` when the error may cross a worker or realm boundary, since `instanceof` fails when the class identity differs between contexts. Every reactor error sets `this.name`, so the `name` check is always available. For building on these APIs, see [Working with the Reactor](/academy/Reference/Reactor/WorkingWithTheReactor), [IReactorClient](/academy/Reference/Reactor/ReactorClient), and [Processors](/academy/Reference/Reactor/Processors). --- ## Attachment service > Source: https://academy.vetra.io/academy/Reference/Reactor/AttachmentService The `@powerhousedao/reactor-attachments` package decouples large binaries (images, files, avatars) from the action and operation pipeline. Instead of carrying base64-encoded `data` strings inside actions, document state holds opaque refs of the form `attachment://v1:`, and the bytes flow through a dedicated `IAttachmentService`. Storage is content-addressed, so identical uploads dedupe to the same ref. ```typescript type IAttachmentService, createRemoteAttachmentService, } from "@powerhousedao/reactor-attachments"; ``` `AttachmentRef` and `AttachmentHash` are defined in `@powerhousedao/reactor`; reactor-attachments re-exports neither. Of the ref-related symbols, only the `InvalidAttachmentRef` error class lives in reactor-attachments. The service and client symbols come from `@powerhousedao/reactor-attachments` and `@powerhousedao/reactor-attachments/client`. The package exposes two layers. `IAttachmentService` is the low-level, transport-facing interface — reserve a slot, stream the bytes, read them back by ref. `IAttachmentClient` wraps a service with convenience helpers; most notably `preprocess()`, which hashes a file up front so its ref is known before the bytes are uploaded. Build a client with `createAttachmentClient(service)`, and import it from the `/client` entrypoint: ```typescript createAttachmentClient, type IAttachmentClient, type PreprocessResult, } from "@powerhousedao/reactor-attachments/client"; ``` The React hooks in `@powerhousedao/reactor-browser` are built on the client. For an architectural overview see [Working with the Reactor](/academy/Reference/Reactor/WorkingWithTheReactor). For the full design — storage layout, eviction, transports, the hash-first/pending protocol, and the planned S3 backend — see the deep-dive docs `packages/reactor/docs/attachments.md` and `packages/reactor/docs/attachments-hash-first.md` in the monorepo. ## When to use it Reach for the attachment service whenever a field would otherwise be a base64 `data` string or a long data URI. Typical cases: - File or image uploads from an editor (chat input bars, document attachments, exports). - Agent or user avatars carried alongside document state. - Any binary that must round-trip through sync or GraphQL, where inlining the bytes would bloat operations and sync channels. If the field is small, fixed-length, and not really binary (a short string, a number, a JSON blob), keep it inline — attachments are designed for arbitrary-sized binary content. ## Getting an `IAttachmentService` instance The recommended client today is the switchboard-backed remote service. It targets a running switchboard's REST endpoints for reservations, uploads, and downloads: ```typescript const attachments = createRemoteAttachmentService({ remoteUrl: "https://switchboard.example.com", // Optional: provide a JWT handler if the switchboard requires auth. // jwtHandler, // Optional: inject a custom fetch (defaults to globalThis.fetch). // fetchFn, }); ``` `JwtHandler` is `(url: string) => Promise`, defined in `@powerhousedao/reactor`. **TIP:** The switchboard remote service is the supported client implementation right now. Other transports (S3, peer-to-peer) are designed but not yet stable — prefer `createRemoteAttachmentService` until these docs call out a replacement. On the server side (inside a subgraph, processor, or trigger), an `IAttachmentClient` is already wired into the host context by `@powerhousedao/reactor-api` and is available as `context.attachments`. There is no need to construct one yourself — the server builds the service and wraps it with `createAttachmentClient(...)`; see `packages/reactor-api/src/server.ts` for the wiring. The package root also exports the pieces for a local, embedded service: `AttachmentBuilder` (fluent), `KyselyAttachmentStore`, `KyselyReservationStore`, `runAttachmentMigrations`, `ATTACHMENT_SCHEMA`, `DEFAULT_RESERVATION_TTL_MS`, `DirectAttachmentUpload`/`DirectAttachmentUploadFactory`, and `NullAttachmentTransport`. These are on the root entrypoint only, not `/client`. Assemble one with `AttachmentBuilder` if you need an in-process store; the switchboard remote service remains the supported client today. ## The general flow Every interaction with the package comes down to three operations: reserve a slot, send the bytes, then later read them back by ref. There are two reservation modes. They are equivalent in capability — neither is preferred, so pick whichever fits the caller: - **Upload-first** — reserve with just `{ mimeType, fileName }`. The content hash, and therefore the final ref, is only known _after_ `send()` completes. Simplest when you can stream the bytes straight through and do not need the ref until the upload finishes. - **Hash-first** — hash the content up front and reserve with `{ clientHash, sizeBytes, ... }`. The ref is known at reservation time, so it can be written into document state before (or in parallel with) the upload, and dedup can short-circuit before any bytes are sent. The trade-off is that the whole file must be read to hash it. `IAttachmentClient.preprocess()` does that hashing for you. The walkthrough below uses the low-level service in upload-first mode. The [attachment client](#the-attachment-client) section shows the hash-first flow. ### 1. Reserve an upload slot `reserve()` returns an `IAttachmentUpload` handle. The handle hides the transport — the caller never sees URLs, headers, or auth tokens. ```typescript const upload = await attachments.reserve({ mimeType: "image/png", fileName: "avatar.png", }); ``` The handle is valid until its reservation expires (default 24h). Aborted uploads are cleaned up by a periodic sweep on the server; clients do not need to release reservations manually. ### 2. Send the bytes `upload.send()` takes a `ReadableStream` and resolves to `{ hash, ref, header }`. Identical bytes always produce the same hash and ref — dedup is automatic. Browser upload: ```typescript const resp = await fetch(file.url); // blob: or data: URL staged by the input if (!resp.body) throw new Error("Could not read staged file"); const upload = await attachments.reserve({ mimeType: file.mediaType, fileName: file.filename ?? "attachment", }); const { ref } = await upload.send(resp.body); ``` Server upload from a data URI or remote URL: ```typescript async function resolveImageSource(image: string) { const dataUriMatch = image.match(/^data:([^;]+);base64,/); if (dataUriMatch) { const mimeType = dataUriMatch[1]; const bytes = Buffer.from(image.slice(dataUriMatch[0].length), "base64"); return { mimeType, stream: new Blob([bytes]).stream() }; } const res = await fetch(image); if (!res.ok || !res.body) throw new Error(`Failed to fetch ${image}`); return { mimeType: res.headers.get("content-type") ?? "application/octet-stream", stream: res.body, }; } const { mimeType, stream } = await resolveImageSource(agent.image); const upload = await attachments.reserve({ mimeType, fileName: `${agent.id}-avatar`, }); const { ref } = await upload.send(stream); ``` ### 3. Use and read the ref Store `result.ref` in document state through a normal action — there are no special "attach" actions. The reducer treats the ref like any other string field. ```typescript await reactor.client.execute(documentId, "main", [ setAgentImage({ attachment: ref }), ]); ``` Later, anywhere the bytes are needed, call `service.get(ref)` and stream the body. In the browser, drain the stream into a `Blob` and hand it to `URL.createObjectURL` for an `` or ``: ```typescript const response = await attachments.get(ref); const chunks: Uint8Array[] = []; const reader = response.body.getReader(); for (;;) { const { done, value } = await reader.read(); if (done) break; chunks.push(value); } const blob = new Blob(chunks as BlobPart[], { type: response.header.mimeType }); const objectUrl = URL.createObjectURL(blob); // ...later: URL.revokeObjectURL(objectUrl); ``` `get()` succeeds for any ref whose bytes are available. If the bytes were evicted from local storage, the service transparently re-fetches them through the transport. A hash-first ref can also be _pending_ — reserved, with state already referencing it, but the bytes not yet uploaded. During that window `get()` throws `AttachmentPending`, while `stat()` succeeds and returns a header with `status: "pending"`, the declared `sizeBytes`, and `expiresAtUtc` set to the reservation expiry. ## The attachment client `IAttachmentClient` wraps an `IAttachmentService` with the hash-first flow. Build one with `createAttachmentClient(service)` (server code already receives one as `context.attachments`). `preprocess(file)` reads the whole file, computes its SHA-256, and returns everything you need to both reference and upload it: ```typescript const attachments = createAttachmentClient(service); const results = await attachments.preprocess(file); // results: { ref, hash, sizeBytes, options, data, stream } ``` Because it has to read the entire file to hash it, `preprocess` is async and buffers the bytes in memory — `file` is a `Blob`, not a stream. With the ref in hand you can write it into document state through a normal action, then upload the bytes: ```typescript await client.execute(documentId, "main", [ attachInvoice({ scan: results.ref, vendorName: "Acme" }), ]); await attachments.reserve(results.options, (handle) => handle.send(results.stream()), ); ``` `client.reserve(options, send)` reserves the slot and hands the upload handle to your `send` callback. If an attachment with the same hash already exists it short-circuits and returns the existing ref without uploading. Pass `results.stream()` — which returns a fresh `ReadableStream` on each call — rather than the single-use `results.data` if the upload might be retried. `send()` accepts any `ReadableStream`, so on the server you can stream from the original source instead of the buffered copy. Execute and reserve are awaited separately so each failure is handled on its own — a failed upload does not roll back the action, and a failed action does not strand an upload. If you do not need that separation, run them concurrently: ```typescript await Promise.all([ client.execute(documentId, "main", [ attachInvoice({ scan: results.ref, vendorName: "Acme" }), ]), attachments.reserve(results.options, (handle) => handle.send(results.stream()), ), ]); ``` ### React `@powerhousedao/reactor-browser` exposes hooks built on the client. `useAttachments()` returns an `IAttachmentClient` for the current service (or `undefined` if none is configured). `useAttachmentUpload()` drives the full preprocess + upload lifecycle and tracks its status: ```tsx const client = useReactorClient(); const { preprocess, upload, status, progress, error } = useAttachmentUpload(); const submit = useCallback(async () => { // Buffers the file in memory and hands back the ref. Async because it has to // read the whole file to hash it. const results = await preprocess(file); // Execute with the generated ref. `scan` is just a string here; the action // and codegen never see the file or the attachments package. await client.execute(documentId, "main", [ attachInvoice({ scan: results.ref, vendorName: "Acme" }), ]); // Upload the bytes. Awaited separately from execute() so each failure is // handled on its own. await upload(results); }, [client, preprocess, upload, documentId, file]); ``` In render, read the lifecycle straight off the hook: - `status` — `UploadStatus`: `None | Hashing | Uploading | Done | Error` - `progress` — coarse/stage-based; the remote transport buffers then issues a single PUT, so byte-level progress is not available yet - `error` — the upload failure, if any `preprocess` and `upload` are stable callbacks. `upload(results)` wraps `client.reserve(results.options, (handle) => handle.send(results.stream()))` and updates `status`/`progress`/`error`. Because React runs in the browser, this mirrors the buffered flow above; the ref still only exists after `preprocess` resolves, so submission is async — you cannot produce a ref inside the synchronous action input. ## Declaring attachment fields in a document model The integration surface between document models and the attachment system is a single GraphQL scalar: `AttachmentRef`. Declare attachment-bearing fields with it, and codegen will emit a branded TypeScript string (`` `attachment://v${number}:${string}` ``) plus a Zod validator that enforces the ref protocol. ```graphql scalar AttachmentRef input SetAgentImageInput { attachment: AttachmentRef! } type AgentInfo { attachment: AttachmentRef } ``` The reducer stores the value verbatim — no special handling needed: ```typescript setAgentImageOperation(state, action) { state.agent.attachment = action.input.attachment; // AttachmentRef } ``` ## API reference ### `IAttachmentService` | Method | Returns | Description | | ------------------- | ----------------------------- | -------------------------------------------------------------------------------------------------------- | | `reserve(options)` | `Promise` | Reserve a new attachment slot and return an upload handle. | | `stat(ref)` | `Promise` | Look up metadata for an existing ref. Throws `AttachmentNotFound` if the ref is unknown. | | `get(ref, signal?)` | `Promise` | Retrieve the bytes. Re-fetches transparently if the data was evicted. Accepts an optional `AbortSignal`. | ### `IAttachmentUpload` | Member | Type | Description | | --------------- | ----------------------------------------------------------------- | ----------------------------------------------------------------------------------------------------------------- | | `reservationId` | `string` | Unique identifier for this reservation. | | `ref` | `AttachmentRef \| null` | The ref this upload will produce. Set immediately in hash-first mode; `null` in upload-first until `send()` resolves. | | `expiresAtUtc` | `string` | ISO 8601 UTC reservation expiry (readonly). Use it to bound retry windows. | | `send(data)` | `(ReadableStream) => Promise` | Stream the bytes through the handle. Returns `{ hash, ref, header }`. Dedup against existing hashes is automatic. | ### `IAttachmentClient` | Method | Returns | Description | | ------------------------- | --------------------------------- | --------------------------------------------------------------------------------------------------------------------------------------------------------------------------------------------------------------------------------------------- | | `preprocess(file, opts?)` | `Promise` | Read and hash a `Blob` up front. Returns the ref, hash, declared size, hash-first reserve options, and the buffered bytes (as a single-use `data` stream and a re-readable `stream()` factory). `opts` may override `{ fileName, mimeType }`. | | `reserve(options, send)` | `Promise` | Reserve a hash-first slot and run `send(handle)`. Short-circuits to the existing ref if the hash is already stored (`AttachmentAlreadyExists` is handled internally). | ### Key types | Type | Shape | | ------------------------------------- | ----------------------------------------------------------------------------------------------------------------------------------------------------------------------------------------- | | `AttachmentRef` | `` `attachment://v${number}:${string}` `` — opaque ref string used in document state. | | `ReserveAttachmentOptions` | `UploadFirstReserveAttachmentOptions \| HashFirstReserveAttachmentOptions` — discriminated on `clientHash`. | | `UploadFirstReserveAttachmentOptions` | `{ mimeType: string; fileName: string; extension?: string \| null }` — no `clientHash`; ref known only after `send()`. | | `HashFirstReserveAttachmentOptions` | `{ mimeType: string; fileName: string; extension?: string \| null; clientHash: AttachmentHash; sizeBytes: number }` — ref known at reserve time. | | `PreprocessResult` | `{ ref: AttachmentRef; hash: AttachmentHash; sizeBytes: number; options: HashFirstReserveAttachmentOptions; data: ReadableStream; stream: () => ReadableStream }` | | `AttachmentUploadResult` | `{ hash: AttachmentHash; ref: AttachmentRef; header: AttachmentHeader }` | | `AttachmentStatus` | `"available" \| "evicted" \| "pending"` — `pending` is synthesized at query time from a live hash-first reservation; the bytes are not uploaded yet. | | `AttachmentHeader` | `{ hash; mimeType; fileName; sizeBytes; extension; status: AttachmentStatus; source; createdAtUtc; lastAccessedAtUtc; expiresAtUtc: string \| null }` — `expiresAtUtc` is `null` for committed attachments and carries the reservation expiry while `pending`. | | `AttachmentResponse` | `{ header: AttachmentHeader; body: ReadableStream }` | ### Errors | Class | When it is thrown | | ------------------------- | --------------------------------------------------------------------------------------------------------------------------------------------------------- | | `AttachmentNotFound` | `stat(ref)` or `get(ref)` called with a ref the store does not know. | | `InvalidAttachmentRef` | A string passed where a ref is expected does not match `attachment://v:`. | | `UploadTooLarge` | `upload.send()` exceeded the server's configured byte cap. Maps to HTTP 413. | | `ReservationNotFound` | `upload.send()` after the reservation expired or was deleted. | | `AttachmentAlreadyExists` | Hash-first `reserve()` for content whose hash is already stored. The client's `reserve()` catches this and returns the existing ref instead of uploading. | | `AttachmentPending` | `get(ref)` for a hash that is reserved but whose bytes have not finished uploading. Carries `readonly hash`, `readonly expiresAtUtc: string`, and `readonly metadata?: { mimeType; fileName; sizeBytes }` so the caller can show the declared size and retry timing. Intentionally not a subclass of `AttachmentNotFound` — pending is "retry later", not "unknown". | | `HashMismatch` | Hash-first `send()` whose uploaded bytes do not match the claimed `clientHash`. | | `SizeMismatch` | Hash-first `send()` whose actual byte count differs from the declared `sizeBytes`. | ### Helpers `parseRef(ref)` and `createRef(hash, version?)` are exported from the package, but refs should be treated as opaque outside the service itself. Reach for them only if you genuinely need to inspect or reconstruct a ref (for example, in tests or debugging tooling). ## Migrating from inline `data` fields If a document model previously inlined binary content, the migration is small and mechanical: - **Schema** — replace `data: String` (or composite fields like `{ image, imageMediaType, imageUrl }`) with a single `attachment: AttachmentRef` field on the input and the state type. - **Write path** — replace the base64-encoding step with a reservation and upload. Either reserve on the service directly (`attachments.reserve({ mimeType, fileName })` then `upload.send(stream)`, dispatching with `result.ref`), or use the client (`attachments.preprocess(file)` then `client.execute(...)` with `results.ref` and `attachments.reserve(results.options, ...)`). In the browser, `useAttachmentUpload()` wraps the client flow. - **Read path** — replace data-URI assembly with `attachments.get(ref)`. In a browser, drain the stream into a `Blob` and use `URL.createObjectURL` (remember to `revokeObjectURL` on cleanup). - **Graceful degradation** — code paths that may run without an attachment service (mock environments, tests, off-line previews) should branch on `if (!attachments)`. Writers should surface a clear error to the user; readers should skip the attachment and render a placeholder. ## Deep dive See `packages/reactor/docs/attachments.md` in the monorepo for the full design: storage internals, the LRU eviction policy, the `IAttachmentStore` and `IAttachmentTransport` interfaces, the switchboard upload protocol, and the planned S3 backend. For the hash-first reservation mode, hash/size verification on ingest, and the pending-upload lifecycle, see `packages/reactor/docs/attachments-hash-first.md`. --- ## Recipes > Source: https://academy.vetra.io/academy/Reference/Reactor/Recipes The [Powerhouse Recipes](https://github.com/powerhouse-inc/recipes) repository is a collection of small, standalone, runnable projects. Each one isolates a single Reactor pattern — a processor, a read model, a sync channel, an auth scheme, a schema migration — so you can read it end to end, run it locally, and lift the parts you need into your own package. This page is a map. For each recipe it gives the core idea, the Reactor primitives it exercises, and links straight to the source on GitHub. Click through to the repo for full setup instructions, demos, and expected output. For the same recipes rendered inline behind expandable toggles, see the [Cookbook](/academy/Lookup/Cookbook#reactor-recipes). **INFO:** Recipes are reference implementations, not published libraries. Clone the repo, read the recipe, and adapt the code — don't depend on the `@powerhousedao/example-*` packages in production. ## Running a recipe Every recipe is a workspace package with a runnable demo. From the repo root: ```sh pnpm install pnpm build # then run a single recipe's demo, e.g. pnpm --filter @powerhousedao/saga start ``` Each recipe's README lists its exact `pnpm --filter … start` command. The in-memory recipes run against PGlite with no external services; the ones that need PostgreSQL document their connection setup in their own README. --- ## Processors & read models The most common Reactor extension point. A [processor](/academy/Reference/Reactor/Processors) reacts to operations **post-ready** (after a chain is readable) to perform side effects; a read model indexes **pre-ready** to build a derived view that readers can trust the instant they see it. These recipes cover both ends. ### [Analytics Processor](https://github.com/powerhouse-inc/recipes/tree/main/analytics-processor) An `IProcessor` that projects expense-report operations into the Powerhouse analytics-engine time-series store, then answers rollups by category, month, and currency. - Maps each `OperationWithContext` to `AnalyticsSeriesInput` rows via `IAnalyticsStore.addSeriesValues`, registered through a `ProcessorFactory` with a filter and `startFrom: "beginning"`. - Models corrections as append-only compensating deltas (`ADD` writes `+amount`; `UPDATE` writes `-old` then `+new`; `DELETE` writes `-old`), so the financial series stays auditable. - Idempotent replay: an `operation.index === 0` for an already-seen document triggers `clearSeriesBySource` and a rebuild, so re-delivery always converges to identical totals. **Source** · [`src/processor.ts`](https://github.com/powerhouse-inc/recipes/blob/main/analytics-processor/src/processor.ts) · [`src/query.ts`](https://github.com/powerhouse-inc/recipes/blob/main/analytics-processor/src/query.ts) **Concepts** · `IProcessor.onOperations` · `ProcessorFactory` · `IAnalyticsStore` · `AnalyticsPath` · `AnalyticsQueryEngine` — see [Processors](/academy/Reference/Reactor/Processors) ### [Audit Trail](https://github.com/powerhouse-inc/recipes/tree/main/audit-trail) A processor that reads `ActionSigner` context off every operation and writes an immutable audit log to PostgreSQL, fronted by a GraphQL subgraph. - Mines signer identity from `operation.action.context.signer` (`user.address`, `networkId`, `chainId`, app credentials) and batch-inserts one Kysely statement per operation batch. - Pairs with `ReactorClientBuilder.withSigner` so client writes automatically populate the signer context the processor reads. - Exposes a graphql-yoga subgraph to query entries by user, document, or time range. **Source** · [`src/processor.ts`](https://github.com/powerhouse-inc/recipes/blob/main/audit-trail/src/processor.ts) · [`src/subgraph.ts`](https://github.com/powerhouse-inc/recipes/blob/main/audit-trail/src/subgraph.ts) **Concepts** · `IProcessor.onOperations` · `ActionSigner` · `ProcessorFactory` · `ReactorClientBuilder.withSigner` — see [Processors](/academy/Reference/Reactor/Processors), [Reactor Client](/academy/Reference/Reactor/ReactorClient) ### [Custom Read Model](https://github.com/powerhouse-inc/recipes/tree/main/custom-read-model) Implements `IReadModel` directly and registers it with `ReactorBuilder.withReadModel()` to maintain a document-count-per-type materialized view. - Implements the `IReadModel` contract directly (just `indexOperations` plus query getters) instead of extending `BaseReadModel` — the right choice when you don't need catch-up/rewind plumbing. - Registered read models index **pre-ready**: their work completes *before* `JOB_READ_READY` fires, so the view is consistent the instant downstream subscribers see the event. This is the key contrast with post-ready processors. **Source** · [`src/document-count-read-model.ts`](https://github.com/powerhouse-inc/recipes/blob/main/custom-read-model/src/document-count-read-model.ts) · [`src/index.ts`](https://github.com/powerhouse-inc/recipes/blob/main/custom-read-model/src/index.ts) **Concepts** · `IReadModel.indexOperations` · `ReactorBuilder.withReadModel` · pre-ready vs post-ready · `JOB_READ_READY` — see [Processors](/academy/Reference/Reactor/Processors), [Working with the Reactor](/academy/Reference/Reactor/WorkingWithTheReactor) ### [Full-Text Search Processor](https://github.com/powerhouse-inc/recipes/tree/main/full-text-search) A processor that flattens each document's resulting state into searchable text and maintains a PostgreSQL `tsvector` index for ranked keyword search. - Indexes from `context.resultingState` rather than individual action inputs, so it stays agnostic to any document model's action set; dedupes to the last operation per `documentId` within a batch. - Recursively flattens arbitrary JSON state into one string and maintains the row with an idempotent `INSERT … ON CONFLICT` upsert; reacts to the `DELETE_DOCUMENT` action by removing the row. - `startFrom: "beginning"` back-indexes existing history; queries use `plainto_tsquery` and `ts_rank` over a GIN index. **Source** · [`processor.ts`](https://github.com/powerhouse-inc/recipes/blob/main/full-text-search/processor.ts) · [`query.ts`](https://github.com/powerhouse-inc/recipes/blob/main/full-text-search/query.ts) **Concepts** · `IProcessor.onOperations` · `context.resultingState` · `processorManager.registerFactory` · `tsvector` — see [Processors](/academy/Reference/Reactor/Processors), [Storage and Scaling](/academy/Reference/Reactor/StorageAndScaling) ### [Relational DB Subgraph](https://github.com/powerhouse-inc/recipes/tree/main/relational-db-subgraph) A document-type-agnostic `RelationalDbProcessor` that projects every document into denormalized, Kysely-managed Postgres tables and serves them through a GraphQL subgraph. - Subclass `RelationalDbProcessor` and maintain the relational read model in `onOperations` — parse `context.resultingState`, handle `DELETE_DOCUMENT` by clearing rows. - Owns its schema through an `initAndUpgrade()` override that runs an idempotent (`ifNotExists`) Kysely migration, so registration is safe to repeat; uses the typed query builder, dropping to raw `sql` only for an `ON CONFLICT` upsert. - A separate query layer feeds a graphql-yoga subgraph that can compose into a supergraph. **Source** · [`src/processor.ts`](https://github.com/powerhouse-inc/recipes/blob/main/relational-db-subgraph/src/processor.ts) · [`src/subgraph.ts`](https://github.com/powerhouse-inc/recipes/blob/main/relational-db-subgraph/src/subgraph.ts) **Concepts** · `RelationalDbProcessor` · `IRelationalDb` · `initAndUpgrade` · GraphQL subgraph — see [Processors](/academy/Reference/Reactor/Processors), [Storage and Scaling](/academy/Reference/Reactor/StorageAndScaling) ### [Semantic Search Processor](https://github.com/powerhouse-inc/recipes/tree/main/semantic-search) A processor read model that embeds document state in-process with Transformers.js (MiniLM) into PGlite + pgvector and answers cosine-similarity queries — no external API. - In-process embeddings (ONNX-quantized `all-MiniLM-L6-v2`, 384-dim) stored and queried in PGlite's pgvector extension — no embedding service, no separate vector database. - Skips the expensive embed step when a SHA-256 `content_hash` matches the stored row; bakes the dimension into the `vector(384)` column and asserts the length before insert so a mismatched model fails loudly. - Injects the embedder as a dependency, so tests run against a deterministic offline fake. **Source** · [`processor.ts`](https://github.com/powerhouse-inc/recipes/blob/main/semantic-search/processor.ts) · [`embedder.ts`](https://github.com/powerhouse-inc/recipes/blob/main/semantic-search/embedder.ts) · [`query.ts`](https://github.com/powerhouse-inc/recipes/blob/main/semantic-search/query.ts) **Concepts** · `IProcessor.onOperations` · `context.resultingState` · pgvector · Transformers.js — see [Processors](/academy/Reference/Reactor/Processors), [Storage and Scaling](/academy/Reference/Reactor/StorageAndScaling) ## Cross-document automation & orchestration Treating the Reactor as an automation engine: one operation triggers work on other documents, or a single call provisions many documents at once. ### [Batch Progress](https://github.com/powerhouse-inc/recipes/tree/main/batch-progress) Creates a dependency-ordered set of documents in a single `IReactor.executeBatch` call and tracks each job's lifecycle live via the EventBus. - One `executeBatch` submits a graph of jobs; each job's `dependsOn` (referencing other jobs by key) lets the Reactor resolve ordering and parallelism across both document and drive scopes. - Subscribe to `JOB_PENDING` / `JOB_RUNNING` / `JOB_WRITE_READY` / `JOB_READ_READY` / `JOB_FAILED` on the EventBus, mapping `result.jobs[key].id` back to each job for a live progress view. - `JobAwaiter` reconciles events that arrived after `executeBatch` returned, so awaiting a terminal status is race-free. **Source** · [`src/create-project.ts`](https://github.com/powerhouse-inc/recipes/blob/main/batch-progress/src/create-project.ts) · [`src/index.ts`](https://github.com/powerhouse-inc/recipes/blob/main/batch-progress/src/index.ts) **Concepts** · `IReactor.executeBatch` · `dependsOn` · `IEventBus.subscribe` · `JobAwaiter.waitForJob` — see [Advanced Reactor Usage](/academy/Reference/Reactor/AdvancedReactorUsage), [Error Handling](/academy/Reference/Reactor/ErrorHandling) ### [Cross-Document Reactor](https://github.com/powerhouse-inc/recipes/tree/main/cross-document-reactor) Drives event-driven automation by subscribing to all document changes through an `IReactorClient` and dispatching actions on related documents from inside the handler. - `client.subscribe({}, cb)` with an empty filter delivers every `DocumentChangeEvent`; the handler branches on `DocumentChangeType.Updated`. - Resolves relationships at runtime with `client.find({ parentId })` plus a naming convention, then acts via `client.rename`. - A local re-entrancy guard (a `reacting` flag) stops the handler's own write — which fires another change event — from re-triggering the rule. **Source** · [`src/index.ts`](https://github.com/powerhouse-inc/recipes/blob/main/cross-document-reactor/src/index.ts) **Concepts** · `IReactorClient.subscribe` · `DocumentChangeEvent` · `client.find` · re-entrancy guard — see [Reactor Client](/academy/Reference/Reactor/ReactorClient) ### [Saga Coordination Processor](https://github.com/powerhouse-inc/recipes/tree/main/saga) A processor implements the saga pattern: operations on one document dispatch follow-up actions to others, all correlated by a shared `saga_id`. - Declarative step definitions (trigger match, target resolver, action builder) drive which incoming operation fires which follow-up; the processor calls `IReactor.execute` on a *different* document. - A re-entrancy flag prevents the processor from reacting to the operations it itself dispatched, so the saga can't loop forever. - Correlation lives entirely in the processor's own `saga_log` table keyed by `saga_id` — no changes to any document model or interface. **Source** · [`src/processor.ts`](https://github.com/powerhouse-inc/recipes/blob/main/saga/src/processor.ts) · [`src/demo.ts`](https://github.com/powerhouse-inc/recipes/blob/main/saga/src/demo.ts) **Concepts** · `IProcessor.onOperations` · `IReactor.execute` · re-entrancy guard · saga correlation — see [Processors](/academy/Reference/Reactor/Processors) ## External integration & ingestion Bridging the Reactor to the outside world — pulling external events in, and pushing operations out — without losing idempotency or authenticity. ### [Inbound Webhook Bridge](https://github.com/powerhouse-inc/recipes/tree/main/inbound-webhook-bridge) A standalone `node:http` endpoint that HMAC-verifies signed external webhooks against the raw request bytes and dispatches each verified event as a typed document action. - Verifies the HMAC over the **exact raw bytes before `JSON.parse`** — a GraphQL/JSON resolver would parse too early, and a `JSON.parse` → `JSON.stringify` round-trip changes the bytes and breaks the MAC. - Stripe-style scheme: HMAC over the `timestamp` joined to the `rawBody` with `crypto.timingSafeEqual` plus a replay window, so folding the timestamp into the MAC makes the freshness check tamper-proof. - Idempotency survives restarts by storing processed event ids in **document state** (`processedEventIds`), not processor memory; the reducer independently throws `DuplicateEvent` as a second line of defense. **Source** · [`src/webhook-bridge.ts`](https://github.com/powerhouse-inc/recipes/blob/main/inbound-webhook-bridge/src/webhook-bridge.ts) · [`src/signature.ts`](https://github.com/powerhouse-inc/recipes/blob/main/inbound-webhook-bridge/src/signature.ts) **Concepts** · `IReactor.execute` · `JobAwaiter.waitForJob` · action creators · reducer dedup guards — see [Error Handling](/academy/Reference/Reactor/ErrorHandling), [Working with the Reactor](/academy/Reference/Reactor/WorkingWithTheReactor) ### [External Feed Ingest](https://github.com/powerhouse-inc/recipes/tree/main/external-feed-ingest) A long-running polling worker that idempotently ingests an external feed into an event-sourced ledger document, seeding its dedup set and watermark from document state so a restart never double-ingests. - The document *is* the checkpoint store: `seedFromState()` rebuilds the in-memory dedup set and high-watermark from `reactor.get().state`, so a crashed poller resumes with no side database. - Dedupes on the stable `externalId` checked against state, **not** the delivery cursor — at-least-once feeds redeliver the same id past any watermark; the watermark is only a fetch optimization. - Corrections are explicit append-only operations: a restatement marks the old entry `SUPERSEDED` and appends a new `RECORDED` entry — the original payload is never mutated. **Source** · [`src/poller.ts`](https://github.com/powerhouse-inc/recipes/blob/main/external-feed-ingest/src/poller.ts) · [`document-models/feed-ledger/v1/src/reducers/ingest.ts`](https://github.com/powerhouse-inc/recipes/blob/main/external-feed-ingest/document-models/feed-ledger/v1/src/reducers/ingest.ts) **Concepts** · `IReactor.get` / `execute` · `JobAwaiter` · typed reducer errors · append-only corrections — see [Error Handling](/academy/Reference/Reactor/ErrorHandling), [Reactor Client](/academy/Reference/Reactor/ReactorClient) ### [Discord Webhook Processor](https://github.com/powerhouse-inc/recipes/tree/main/discord-webhook-processor) A processor that forwards filtered document operations to a Discord webhook as rich embeds, HMAC-signing every request. - A `ProcessorFilter` on the record (rather than branching inside `onOperations`) scopes which operations reach the processor. - Chunks the operations array to respect a downstream system's batch limit (Discord's 10-embed cap) across multiple `fetch` POSTs. - Signs each outbound request with an HMAC-SHA256 `X-Reactor-Signature` over the exact JSON body. **Source** · [`discord-webhook-processor.ts`](https://github.com/powerhouse-inc/recipes/blob/main/discord-webhook-processor/discord-webhook-processor.ts) · [`demo.ts`](https://github.com/powerhouse-inc/recipes/blob/main/discord-webhook-processor/demo.ts) **Concepts** · `IProcessor.onOperations` · `ProcessorFilter` · `startFrom: "current"` · HMAC signing — see [Processors](/academy/Reference/Reactor/Processors) ## Auth, signing & security Where identity comes from (`action.context.signer`), how it's verified, and how access decisions are made — inside the reducer, at a gate, or after the fact. ### [Role-Based Auth](https://github.com/powerhouse-inc/recipes/tree/main/role-based-auth) A custom document model that embeds RBAC in document state and enforces it inside reducer operations by reading the caller from `action.context.signer.user.address`. - Authorization lives in the reducer, not a server gate — so access control replicates with the document; each operation throws if the caller is missing or lacks the required role. - Roles are *state*, not config: `creator` / `admins` / `members` are fields, and the first `bootstrap` caller auto-promotes to permanent root admin, protected by `CannotRevokeCreator` / `LastAdmin` invariants. - Rejections surface as a typed error taxonomy (`NotAuthorized`, `NotAdmin`, …) captured onto `operation.error` in the document's log. **Source** · [`document-models/role-based-auth/v1/src/reducers/access.ts`](https://github.com/powerhouse-inc/recipes/blob/main/role-based-auth/document-models/role-based-auth/v1/src/reducers/access.ts) · [`src/demo.ts`](https://github.com/powerhouse-inc/recipes/blob/main/role-based-auth/src/demo.ts) **Concepts** · document-model reducer · `action.context.signer` · generated error taxonomy — see [Working with the Reactor](/academy/Reference/Reactor/WorkingWithTheReactor) ### [Rate Limiter](https://github.com/powerhouse-inc/recipes/tree/main/rate-limiter) A read-only processor that counts operations per signer address over a sliding window and trips a shared `AuthService` cooldown, which a request gate consults to throttle abusive users. - Decouples observation from enforcement: the processor only signals (`authService.cooldown`) and never blocks, while the request gate (resolver/middleware) reads `authService.isAllowed` before forwarding mutations. - Derives the per-user key from `signer.user.address`; sliding-window counting in a plain `Map`, reset in `onDisconnect`. **Source** · [`src/rate-limiter-processor.ts`](https://github.com/powerhouse-inc/recipes/blob/main/rate-limiter/src/rate-limiter-processor.ts) · [`src/auth-service.ts`](https://github.com/powerhouse-inc/recipes/blob/main/rate-limiter/src/auth-service.ts) **Concepts** · `IProcessor.onOperations` · `signer.user.address` · `AuthService` gate · `startFrom: "current"` — see [Processors](/academy/Reference/Reactor/Processors) ### [Signed Operations Verifier](https://github.com/powerhouse-inc/recipes/tree/main/signed-operations-verifier) A standalone script that builds cryptographically signed operations with an `ISigner` and verifies each one per-signature, detecting tampered and unsigned operations. - Builds a self-contained ECDSA P-256 `ISigner` with `RenownCryptoBuilder` plus in-memory key storage — no filesystem or network. - `buildSignedAction` advances the document through the reducer between actions, so each signature captures the correct previous-state hash; `verifyOperationSignature` checks each signature tuple. - Tamper and unsigned detection: corrupting a signature element or removing `action.context` flips verification to invalid / unsigned respectively. **Source** · [`src/verify-operations.ts`](https://github.com/powerhouse-inc/recipes/blob/main/signed-operations-verifier/src/verify-operations.ts) · [`src/verify-operations.test.ts`](https://github.com/powerhouse-inc/recipes/blob/main/signed-operations-verifier/src/verify-operations.test.ts) **Concepts** · `ISigner` · `RenownCryptoSigner` · `buildSignedAction` · `verifyOperationSignature` — see [Advanced Reactor Usage](/academy/Reference/Reactor/AdvancedReactorUsage) ## Document-model patterns Patterns that live in the document model itself — how schemas evolve over time, and how to model a container without paying for it. ### [Document Versioning](https://github.com/powerhouse-inc/recipes/tree/main/document-versioning) Migrates a document model's schema from v1 to v2 with an `UpgradeManifest` and a pure `upgradeReducer`, so operation logs recorded under the old schema still replay into the new state shape. - Declares every schema version in one codegen spec so `ph generate` emits a versioned `v1` / `v2` / `upgrades` tree plus a wired `UpgradeManifest`. - The upgrade reducer must patch **both** `state` and `initialState`: replay folds domain operations from the stored `initialState` and never re-runs the `UPGRADE_DOCUMENT` op, so a state-only migration passes live but fails replay with `HashMismatchError`. - The latest reducer owns the entire history — retired operations are kept and their reducer maps old fields onto new ones, so cross-version replay converges. **Source** · [`document-models/todo/upgrades/v2.ts`](https://github.com/powerhouse-inc/recipes/blob/main/document-versioning/document-models/todo/upgrades/v2.ts) · [`src/upgrade.ts`](https://github.com/powerhouse-inc/recipes/blob/main/document-versioning/src/upgrade.ts) **Concepts** · `UpgradeManifest` · `upgradeReducer` · `computeUpgradePath` · `replayDocument` · `HashMismatchError` — see [Document Model Registry](/academy/Reference/Reactor/DocumentModelRegistry) ### [Drive Override](https://github.com/powerhouse-inc/recipes/tree/main/drive-override) A custom container document that tracks its children through the reactor's built-in `ADD_RELATIONSHIP` action instead of `document-drive`'s `ADD_FILE`, keeping container state O(1). - The container is an ordinary `DocumentModelModule` holding only metadata (`name` / `description`, one `SET_METADATA` op) — no embedded `nodes[]`, so its state and operation log stay flat as children scale past 10,000. - Children are linked with `addRelationshipAction(...)` dispatched through `reactor.execute`; the indexer writes one row to the `DocumentRelationship` table and the container's reducer never sees them. - Enumerate with `IDocumentIndexer.getOutgoing` / `getIncoming` and cursor paging — DB-native indexed queries, also exposed over GraphQL. **Source** · [`src/index.ts`](https://github.com/powerhouse-inc/recipes/blob/main/drive-override/src/index.ts) · [`document-models/custom-container/v1/src/reducers/metadata.ts`](https://github.com/powerhouse-inc/recipes/blob/main/drive-override/document-models/custom-container/v1/src/reducers/metadata.ts) **Concepts** · `addRelationshipAction` · `IDocumentIndexer` · `ConsistencyToken` · `DocumentModelModule` — see [Working with the Reactor](/academy/Reference/Reactor/WorkingWithTheReactor) ## Tooling & operations Operating a Reactor from the outside: exporting state, watching the live event stream, monitoring sync health, and moving the underlying database. ### [Document Snapshot Exporter](https://github.com/powerhouse-inc/recipes/tree/main/document-snapshot-exporter) A CLI that exports document state and operation history to JSON using `IReactor` consistency tokens for read-after-write, contrasted side-by-side with the auto-managed `IReactorClient`. - Threads the `ConsistencyToken` from a completed write into `reactor.get()` / `getOperations()`, so a read reflects the just-finished write even while background indexing lags. - Side-by-side comparison via a `--mode` flag: low-level `IReactor` (returns `JobInfo`, manual awaiting + tokens) versus `IReactorClient` (awaits and manages consistency internally, returns the document directly). - Handles the differing `getOperations` shapes — a per-scope `Record` for `IReactor` versus a flat `PagedResults` for the client. **Source** · [`src/export-reactor.ts`](https://github.com/powerhouse-inc/recipes/blob/main/document-snapshot-exporter/src/export-reactor.ts) · [`src/export-client.ts`](https://github.com/powerhouse-inc/recipes/blob/main/document-snapshot-exporter/src/export-client.ts) **Concepts** · `ConsistencyToken` · `IReactor` vs `IReactorClient` · `JobAwaiter` · `getOperations` — see [Working with the Reactor](/academy/Reference/Reactor/WorkingWithTheReactor), [Reactor Client](/academy/Reference/Reactor/ReactorClient) ### [Subscription CLI](https://github.com/powerhouse-inc/recipes/tree/main/subscription-cli) A Node CLI that connects to a Reactor's GraphQL subscriptions endpoint over WebSocket and prints `documentChanges` (and optional `jobChanges`) events live. - Consumes real-time subscriptions from *outside* the reactor process via the `graphql-ws` protocol, rather than from an in-process processor. - Server-side filters the change stream with a `SearchFilterInput` (by document type and/or parent drive); passes bearer-token auth through `connectionParams`. - Optionally watches a single job's lifecycle via `jobChanges(jobId)`, and cleans up per-stream subscriptions on `SIGINT` / `SIGTERM`. **Source** · [`src/index.ts`](https://github.com/powerhouse-inc/recipes/blob/main/subscription-cli/src/index.ts) **Concepts** · `documentChanges` · `jobChanges` · `SearchFilterInput` · `graphql-ws` — see [Synchronization](/academy/Reference/Reactor/Synchronization), [Reactor Client](/academy/Reference/Reactor/ReactorClient) ### [Sync Health Monitor](https://github.com/powerhouse-inc/recipes/tree/main/sync-health-monitor) Subscribes to the Reactor EventBus sync lifecycle events to maintain live replication-health counters and exposes them through a GraphQL subgraph. - Folds all five `SyncEventTypes` (pending / succeeded / failed / dead-letter / connection-state) into health counters and derives a healthy / degraded / unhealthy status. - Implements `IChannelFactory` and `IChannel` to bridge two reactors entirely in-process, calling the success/failure lifecycle hooks on each `SyncOperation` item (`transported` / `executed` / `failed`) and routing failed sends to a dead-letter mailbox. - Registers peers via `syncModule.syncManager.add(...)` and serves a `syncHealth` query over a graphql-yoga subgraph. **Source** · [`src/health-monitor.ts`](https://github.com/powerhouse-inc/recipes/blob/main/sync-health-monitor/src/health-monitor.ts) · [`src/internal-channel.ts`](https://github.com/powerhouse-inc/recipes/blob/main/sync-health-monitor/src/internal-channel.ts) **Concepts** · `IEventBus.subscribe` · `SyncEventTypes` · `IChannel` / `IChannelFactory` · `syncManager.add` — see [Synchronization](/academy/Reference/Reactor/Synchronization) ### [DB Migrate](https://github.com/powerhouse-inc/recipes/tree/main/db-migrate) Three Bash scripts that export, import, and migrate a PostgreSQL database by running `pg_dump` / `pg_restore` / `psql` inside the `postgres:17` Docker image — no local Postgres tools needed. - Runs the Postgres client tools from the official Docker image, so Docker is the only prerequisite for backing up or moving a Reactor relational store. - `migrate.sh` streams `pg_dump` straight into `pg_restore` (or `psql`) over a shell pipe, copying one database into another in a single pass with no intermediate dump file. - A code-free operations recipe — no document models, processors, or subgraphs. **Source** · [`migrate.sh`](https://github.com/powerhouse-inc/recipes/blob/main/db-migrate/migrate.sh) · [`export.sh`](https://github.com/powerhouse-inc/recipes/blob/main/db-migrate/export.sh) **Concepts** · `pg_dump` · `pg_restore` · Docker — see [Storage and Scaling](/academy/Reference/Reactor/StorageAndScaling) --- ## PHDocument Migration Guide > Source: https://academy.vetra.io/academy/Reference/DocumentModels/PHDocumentMigrationGuide **TIP:** This guide covers the **breaking changes** introduced in Powerhouse v4.0.0 related to PHDocument structure changes. If you're upgrading from v3.2.0 or earlier, **this migration is required** and document models must be regenerated. ## Overview Version 4.0.0 introduced a significant refactor of the `PHDocument` structure that consolidates document metadata into a `header` field. This change enables signed and unsigned documents with cryptographic verification capabilities, but requires updating all code that accesses document properties. ## What Changed ### Document Structure Refactor The most significant change is the consolidation of document metadata into a `header` field. Previously, document properties were scattered at the root level of the document object. **Before (v3.2.0 and earlier):** ```javascript const document = { id: "doc-123", created: "2023-01-01T00:00:00.000Z", lastModified: "2023-01-01T12:00:00.000Z", revision: 5, documentType: "powerhouse/todo-list", name: "My Todo List", slug: "my-todo-list", // ... other properties }; ``` **After (v4.0.0):** ```javascript const document = { header: { id: "doc-123", createdAtUtcIso: "2023-01-01T00:00:00.000Z", lastModifiedAtUtcIso: "2023-01-01T12:00:00.000Z", revision: { global: 5, local: 0 }, documentType: "powerhouse/todo-list", name: "My Todo List", slug: "my-todo-list", branch: "main", sig: { nonce: "", publicKey: {} }, meta: {}, }, // ... other properties }; ``` ## Complete Property Migration Map | **Old Property** | **New Property** | **Additional Changes** | | ----------------------- | -------------------------------------- | ------------------------------------------------------------------- | | `document.id` | `document.header.id` | Now an Ed25519 signature for signed documents | | `document.created` | `document.header.createdAtUtcIso` | **Renamed** to include UTC ISO specification | | `document.lastModified` | `document.header.lastModifiedAtUtcIso` | **Renamed** to include UTC ISO specification | | `document.revision` | `document.header.revision` | Now an **object** with scope keys (e.g., `{ global: 5, local: 0 }`) | | `document.documentType` | `document.header.documentType` | No additional changes | | `document.name` | `document.header.name` | No additional changes | | `document.slug` | `document.header.slug` | No additional changes | | `document.branch` | `document.header.branch` | Now explicitly included | | `document.meta` | `document.header.meta` | Now explicitly included | | N/A | `document.header.sig` | **New** - Signature information for document verification | ## Step-by-Step Migration Guide ### Step 1: Update Document Property Access Replace all instances of direct property access with header-based access:
**Common Property Access Patterns** **Document ID Access:** ```javascript // Before const documentId = document.id; // After const documentId = document.header.id; ``` **Document Name Access:** ```javascript // Before const documentName = document.name; // After const documentName = document.header.name; ``` **Document Type Access:** ```javascript // Before const docType = document.documentType; // After const docType = document.header.documentType; ``` **Timestamp Access:** ```javascript // Before const created = document.created; const lastModified = document.lastModified; // After const created = document.header.createdAtUtcIso; const lastModified = document.header.lastModifiedAtUtcIso; ``` **Revision Access:** ```javascript // Before const revision = document.revision; // Was a number // After const globalRevision = document.header.revision.global; // Now an object const localRevision = document.header.revision.local; // Or get all revisions const allRevisions = document.header.revision; // { global: 5, local: 0, ... } ```
### Step 2: Update Component Code **React Components:**
**Example: Document List Component** ```jsx // Before function DocumentList({ documents }) { return (
{documents.map((doc) => (

{doc.name}

Type: {doc.documentType}

Last modified: {new Date(doc.lastModified).toLocaleDateString()}

Revision: {doc.revision}

))}
); } // After function DocumentList({ documents }) { return (
{documents.map((doc) => (

{doc.header.name}

Type: {doc.header.documentType}

Last modified:{" "} {new Date(doc.header.lastModifiedAtUtcIso).toLocaleDateString()}

Global Revision: {doc.header.revision.global}

))}
); } ```
### Step 3: Update Type Definitions If you're using TypeScript, update your type definitions:
**TypeScript Interface Updates** ```typescript // Before interface MyDocument { id: string; name: string; documentType: string; created: string; lastModified: string; revision: number; // ... other properties } // After interface MyDocument { header: { id: string; name: string; documentType: string; createdAtUtcIso: string; lastModifiedAtUtcIso: string; revision: { [scope: string]: number; }; slug: string; branch: string; sig: { nonce: string; publicKey: any; }; meta?: { preferredEditor?: string; }; }; // ... other properties } ```
### Step 4: Database Queries and APIs Compatibility
**GraphQL Query Compatibility** **GraphQL Queries:** ```graphql # Your existing queries continue to work unchanged query GetDocument($id: ID!) { document(id: $id) { id # Still works due to response transformation name # Still works due to response transformation documentType # Still works due to response transformation created # Still works due to response transformation lastModified # Still works due to response transformation revision # Still works due to response transformation } } ``` **TIP:** **GraphQL Backward Compatibility:** The GraphQL API maintains backward compatibility through response transformation. Your existing queries will continue to work without changes. However, when working with the raw document objects in your application code, you'll need to use the new header structure.
## Common Migration Issues and Solutions ### Issue 1: Undefined Property Errors **Problem:** Getting `undefined` when accessing document properties. **Solution:** Update property access to use the header structure: ```javascript // This will be undefined after migration const name = document.name; // Use this instead const name = document.header.name; ``` ### Issue 2: Revision Type Mismatch **Problem:** Code expecting revision to be a number but getting an object. **Solution:** Update revision access to specify the scope: ```javascript // Before - revision was a number if (document.revision > 5) { ... } // After - revision is an object with scope keys if (document.header.revision.global > 5) { ... } ``` ### Issue 3: Date Format Changes **Problem:** Date parsing issues due to property name changes. **Solution:** Update timestamp property names: ```javascript // Before const createdDate = new Date(document.created); const modifiedDate = new Date(document.lastModified); // After const createdDate = new Date(document.header.createdAtUtcIso); const modifiedDate = new Date(document.header.lastModifiedAtUtcIso); ``` ## Testing Your Migration ### Automated Testing Create tests to verify your migration:
**Migration Test Examples** ```javascript // Test document property access describe("Document Migration", () => { it("should access document properties correctly", () => { const mockDocument = { header: { id: "test-id", name: "Test Document", documentType: "powerhouse/test", createdAtUtcIso: "2023-01-01T00:00:00.000Z", lastModifiedAtUtcIso: "2023-01-01T12:00:00.000Z", revision: { global: 5, local: 0 }, // ... other header properties }, // ... other document properties }; // Test property access expect(mockDocument.header.id).toBe("test-id"); expect(mockDocument.header.name).toBe("Test Document"); expect(mockDocument.header.revision.global).toBe(5); }); }); ```
## Related Documentation - [PHDocument Architecture](/academy/Reference/Architecture/PowerhouseArchitecture) - [Document Model Creation](/academy/Build/DocumentModelCreation/WhatIsADocumentModel) - [Document Model Versioning](/academy/Build/DocumentModelCreation/DocumentModelVersioning) - For evolving document schemas over time - [React Hooks](/academy/Reference/EditorsUI/ReactHooks) --- _This migration guide covers the major changes in v4.0.0. For additional technical details, refer to the [RELEASE-NOTES.md](https://github.com/powerhouse-dao/powerhouse/blob/main/RELEASE-NOTES.md) in the main repository._ --- ## Relational Database > Source: https://academy.vetra.io/academy/Reference/GraphQLData/RelationalDatabase This page covers the relational database tools available in Powerhouse applications, providing type-safe database operations with real-time updates through PGlite integration.
Introduction for New Developers ### What is the Relational Database API? This API helps you build applications that need to store, query, and analyze data from Powerhouse documents using traditional database tools. If you're familiar with SQL databases like PostgreSQL or MySQL, this will feel familiar while adding powerful real-time capabilities. ### When Should You Use This API? **Perfect for:** - Building dashboards that show live data - Creating reports and analytics - Integrating with existing business tools - Applications needing complex data queries - Systems requiring audit trails of document changes **Not needed for:** - Simple document viewing or editing - Basic CRUD operations on individual documents - Applications with minimal data analysis needs ### Learning Path **New to relational database processors?** Start with our step-by-step tutorial: [Building a Relational Database Processor](/academy/Build/WorkWithData/RelationalDbProcessor) - it walks you through creating a complete todo-list processor from scratch. **Ready to implement?** Use this API reference for detailed function signatures, parameters, and advanced patterns. ### Quick Overview: How It Works 1. **Define your data structure** - Describe what information you want to track 2. **Set up processing** - Configure automatic data extraction from document changes 3. **Query your data** - Use familiar database operations with real-time updates 4. **Build your UI** - Connect to any frontend framework or reporting tool ### Key Concepts (Simplified) - **Processors**: Background workers that automatically organize document data - **Live Queries**: Database queries that update automatically when data changes - **Type Safety**: Built-in error prevention that catches mistakes before they happen - **Hooks**: Ready-to-use functions for common data access patterns
## Overview The relational database layer gives you powerful tools to work with data in your Powerhouse applications. You get type-safe queries, real-time updates, and a simple API that feels familiar to React developers. **Key Benefits:** - **Type-safe queries** with full TypeScript support - **Live query capabilities** with real-time updates - **Automatic optimization** to prevent infinite re-renders - **Simple API** that abstracts away complexity - **Smart memorization** for parameters and queries ## Quick Start
Setting up your first relational database query ### Step 1: Define your database schema ```typescript type MyDatabase = { users: { id: number; name: string; email: string; }; posts: { id: number; title: string; content: string; author_id: number; }; }; ``` ### Step 2: Create a typed query hook ```typescript // Create a typed query hook for your processor const useTypedQuery = createProcessorQuery(MyProcessor); ``` ### Step 3: Use it in your component ```typescript // Simple query - no parameters needed export function useUserList(driveId: string) { return useTypedQuery(driveId, (db) => { return db.selectFrom("users").selectAll().compile(); }); } // Query with parameters export function useUserById(driveId: string, userId: number) { return useTypedQuery( driveId, (db, params) => { return db .selectFrom("users") .selectAll() .where("id", "=", params.userId) .compile(); }, { userId }, ); } ``` ### Step 4: Use in your React component ```typescript function UserList({ driveId }: { driveId: string }) { const { isLoading, error, result } = useUserList(driveId); if (isLoading) return
Loading...
; if (error) return
Error: {error.message}
; if (!result) return
No data
; return (
    {result.rows.map(user => (
  • {user.name} - {user.email}
  • ))}
); } ```
## Core Hooks ### 1. createProcessorQuery()
`createProcessorQuery(ProcessorClass)`: Creates a typed query hook factory for your processor ### Function Name and Signature ```typescript function createProcessorQuery( ProcessorClass: RelationalDbProcessorClass, ): TypedQueryHook; ``` ### Description Creates a typed query hook factory for a specific processor class. This is the main function you'll use to create hooks for querying your relational database. ### Usage Example ```typescript // Create a typed query hook for your processor const useTypedQuery = createProcessorQuery(MyProcessor); // Use it to create specific query hooks export const useUsers = (driveId: string) => { return useTypedQuery(driveId, (db) => { return db.selectFrom("users").selectAll().compile(); }); }; // With parameters export const useUsersByStatus = (driveId: string, status: string) => { return useTypedQuery( driveId, (db, params) => { return db .selectFrom("users") .selectAll() .where("status", "=", params.status) .compile(); }, { status }, ); }; ``` ### Parameters The returned hook accepts: - `driveId`: The ID of the drive - `queryCallback`: Function that receives the database instance and optional parameters - `parameters`: Optional parameters for the query ### Return Value ```typescript { isLoading: boolean; // True while loading or retrying error: Error | null; // Any error that occurred result: LiveQueryResults | null; // Query results with live updates } ``` ### Notes / Caveats - Create one `useTypedQuery` hook per processor - The hook includes automatic retry logic for common errors - Parameters are automatically memoized - Queries are live and will update automatically when data changes
### 2. useRelationalDb()
`useRelationalDb()`: Access the enhanced database instance directly ### Hook Name and Signature ```typescript function useRelationalDb(): IRelationalDbState; ``` ### Description Provides direct access to the enhanced Kysely database instance with live query capabilities. Use this when you need to perform relational database operations outside of the typical query patterns. ### Usage Example ```typescript function DatabaseOperations() { const { db, isLoading, error } = useRelationalDb(); const createUser = async (name: string, email: string) => { if (!db) return; // Direct database operations await db .insertInto('users') .values({ name, email }) .execute(); }; if (isLoading) return
Database initializing...
; if (error) return
Database error: {error.message}
; return ( ); } ``` ### Parameters - `Schema` - TypeScript type defining your database schema ### Return Value ```typescript { db: RelationalDbWithLive | null; // Enhanced Kysely instance with live capabilities isLoading: boolean; // True while database is initializing error: Error | null; // Any initialization error } ``` ### Notes / Caveats - Always check if `db` is not null before using it - The database instance includes both Kysely methods and live query capabilities - Use this for direct database operations like inserts, updates, and deletes - For queries, prefer `createProcessorQuery()` which provides better optimization ### Related Hooks - [`createProcessorQuery`](#1-createprocessorquery) - For optimized queries - [`useRelationalQuery`](#3-userelationalquery) - For manual query control
### 3. useRelationalQuery()
`useRelationalQuery()`: Lower-level hook for manual query control ### Hook Name and Signature ```typescript function useRelationalQuery( ProcessorClass: RelationalDbProcessorClass, driveId: string, queryCallback: ( db: IRelationalQueryBuilder, parameters?: TParams, ) => QueryCallbackReturnType, parameters?: TParams, options?: useRelationalQueryOptions, ): { isLoading: boolean; error: Error | undefined; result: LiveQueryResults | null; }; ``` ### Description Lower-level hook for creating live queries with manual control over the query callback and parameters. Most developers should use `createProcessorQuery()` instead, but this hook is useful for advanced use cases. ### Usage Example ```typescript function UserCount() { const { result, isLoading, error } = useRelationalQuery( MyProcessorClass, driveId, (db) => { return db .selectFrom('users') .select(db.fn.count('id').as('count')) .compile(); } ); if (isLoading) return
Loading...
; if (error) return
Error: {error.message}
; return
User count: {result?.rows[0]?.count ?? 0}
; } ``` ### Parameters - `ProcessorClass` - The processor class with the relational DB schema - `driveId` - The drive ID to scope the query - `queryCallback` - Function that receives the database instance and optional parameters - `parameters` - Optional parameters for the query - `options` - Optional `useRelationalQueryOptions` (e.g. `hashNamespace`) ### Return Value ```typescript { result: LiveQueryResults | null; // Live query results isLoading: boolean; // Combined loading state error: Error | null; // Any error that occurred } ``` ### Notes / Caveats - This hook doesn't include automatic parameter memoization - Use `createProcessorQuery()` for better developer experience and optimization - Useful for cases where you need manual control over the query lifecycle ### Related Hooks - [`createProcessorQuery`](#1-createprocessorquery) - Recommended higher-level API - [`useRelationalDb`](#2-usedelationaldb) - For direct database access
### 4. useRelationalQueryOptions ```typescript export type useRelationalQueryOptions = { hashNamespace?: boolean }; ``` _Description pending — see source._ ## Advanced Patterns ### Working with Dynamic Parameters
How to handle parameters that change over time ### Problem You need to create queries that update automatically when search terms, filters, or other parameters change. ### Solution The `createProcessorQuery` hook automatically handles parameter changes and memoizes them using deep comparison: ```typescript function useSearchResults(driveId: string) { const [searchTerm, setSearchTerm] = useState(""); const [category, setCategory] = useState("all"); // Query automatically updates when searchTerm or category changes const result = useTypedQuery( driveId, (db, params) => { let query = db.selectFrom("products").selectAll(); if (params.searchTerm) { query = query.where("name", "like", `%${params.searchTerm}%`); } if (params.category !== "all") { query = query.where("category", "=", params.category); } return query.compile(); }, { searchTerm, category }, ); return { result, setSearchTerm, setCategory }; } ``` ### Key Points - Parameters are automatically memoized using deep comparison - No need to wrap parameters in `useMemo` - Query re-runs only when parameter values actually change - Works with complex nested objects
### Custom SQL Queries
Using raw SQL instead of Kysely query builder ### Problem You need to write complex SQL queries that are easier to express in raw SQL than using the Kysely query builder. ### Solution You can return raw SQL queries from your callback: ```typescript function useCustomUserStats(driveId: string) { return useTypedQuery(driveId, () => { return { sql: ` SELECT u.name, COUNT(p.id) as post_count, MAX(p.created_at) as last_post_date FROM users u LEFT JOIN posts p ON u.id = p.author_id GROUP BY u.id, u.name ORDER BY post_count DESC `, }; }); } // With parameters function useUserPostsByDateRange( driveId: string, startDate: string, endDate: string, ) { return useTypedQuery( driveId, (db, params) => { return { sql: ` SELECT p.*, u.name as author_name FROM posts p JOIN users u ON p.author_id = u.id WHERE p.created_at BETWEEN $1 AND $2 ORDER BY p.created_at DESC `, parameters: [params.startDate, params.endDate], }; }, { startDate, endDate }, ); } ``` ### Key Points - Return an object with `sql` and optional `parameters` properties - Use parameterized queries ($1, $2, etc.) for dynamic values - You can mix Kysely and raw SQL approaches in the same application
### Complex Joins and Relationships
Working with related data across multiple tables ### Problem You need to fetch related data from multiple tables with complex relationships. ### Solution Use Kysely's join capabilities within your query callbacks: ```typescript function useUsersWithPosts(driveId: string) { return useTypedQuery(driveId, (db) => { return db .selectFrom("users") .leftJoin("posts", "users.id", "posts.author_id") .select([ "users.id", "users.name", "users.email", "posts.title as post_title", "posts.content as post_content", ]) .compile(); }); } // More complex example with multiple joins and aggregations function useUserDashboardData(driveId: string, userId: number) { return useTypedQuery( driveId, (db, params) => { return db .selectFrom("users") .leftJoin("posts", "users.id", "posts.author_id") .leftJoin("comments", "posts.id", "comments.post_id") .select([ "users.id", "users.name", "users.email", db.fn.count("posts.id").as("post_count"), db.fn.count("comments.id").as("comment_count"), ]) .where("users.id", "=", params.userId) .groupBy(["users.id", "users.name", "users.email"]) .compile(); }, { userId }, ); } ``` ### Key Points - Use Kysely's join methods for related data - Leverage aggregation functions for counts and calculations - Type safety is maintained throughout complex queries
## Best Practices ### 1. Schema Definition
How to properly define your database schema types Always define clear TypeScript interfaces for your database schema: ```typescript // ✅ Good - Clear, typed schema type AppDatabase = { users: { id: number; name: string; email: string; created_at: Date; updated_at: Date; }; posts: { id: number; title: string; content: string; author_id: number; published: boolean; created_at: Date; }; }; // ❌ Avoid - Vague or missing types type BadDatabase = { users: any; posts: Record; }; ```
### 2. Hook Organization
How to organize your database hooks Create focused, reusable hooks for different data access patterns: ```typescript // ✅ Good - Focused, reusable hooks export function useUsers(driveId: string) { return useTypedQuery(driveId, (db) => db.selectFrom("users").selectAll().compile(), ); } export function useUserById(driveId: string, id: number) { return useTypedQuery( driveId, (db, params) => db.selectFrom("users").selectAll().where("id", "=", params.id).compile(), { id }, ); } export function useActiveUsers(driveId: string) { return useTypedQuery(driveId, (db) => db.selectFrom("users").selectAll().where("active", "=", true).compile(), ); } // ❌ Avoid - Too generic or complex export function useEverything(driveId: string) { return useTypedQuery(driveId, (db) => db .selectFrom("users") .leftJoin("posts", "users.id", "posts.author_id") .leftJoin("comments", "posts.id", "comments.post_id") .selectAll() // Too much data .compile(), ); } ```
### 3. Error Handling
How to handle loading states and errors Always handle loading and error states in your components: ```typescript function UserList() { const { isLoading, error, result } = useUsers(); // ✅ Good - Handle all states if (isLoading) return ; if (error) return ; if (!result) return ; return (
    {result.rows.map(user => (
  • {user.name}
  • ))}
); } // ❌ Avoid - Missing error handling function BadUserList() { const { result } = useUsers(); return (
    {result?.rows.map(user => (
  • {user.name}
  • ))}
); } ```
### 4. Performance Optimization
Tips for optimal query performance - **Keep queries focused**: Don't select unnecessary columns or join too many tables - **Use parameters wisely**: The automatic memoization handles most cases, but avoid creating new objects unnecessarily - **Consider query frequency**: For data that changes rarely, consider caching strategies ```typescript // ✅ Good - Focused query function useUserNames(driveId: string) { return useTypedQuery(driveId, (db) => db .selectFrom("users") .select(["id", "name"]) // Only what you need .compile(), ); } // ✅ Good - Stable parameters function useUsersByStatus(driveId: string, status: string) { return useTypedQuery( driveId, (db, params) => db .selectFrom("users") .selectAll() .where("status", "=", params.status) .compile(), { status }, // Simple, stable parameter ); } // ❌ Avoid - Unnecessary data function useEverythingAboutUsers(driveId: string) { return useTypedQuery(driveId, (db) => db .selectFrom("users") .leftJoin("posts", "users.id", "posts.author_id") .selectAll() // Too much data .compile(), ); } ```
## Common Issues and Solutions ### Query Not Updating
My query results aren't updating when I expect them to ### Problem Your query results don't update when you expect them to, even though you've changed parameters. ### Solution Check that your parameters are actually changing in content, not just reference: ```typescript // ✅ Good - Parameters change in content const [userId, setUserId] = useState(1); const result = useUserById(driveId, userId); // Updates when userId changes // ❌ Common mistake - Same content, different objects const result = useTypedQuery( driveId, (db, params) => /* query */, { userId: user.id } // New object every render, but same content ); // ✅ Better - Extract stable values const userId = user.id; const result = useTypedQuery( driveId, (db, params) => /* query */, { userId } // Stable parameter ); ``` ### Debugging Tips - Log your parameters to see if they're actually changing - Check the `isLoading` state to see if queries are re-running - Use React DevTools to inspect hook state changes
### Type Errors
Getting TypeScript errors with my queries ### Problem TypeScript is showing errors about query return types or database schema. ### Solution Make sure your callback returns the correct type: ```typescript // ✅ Good - Returns QueryCallbackReturnType const result = useTypedQuery(driveId, (db) => { return db.selectFrom("users").selectAll().compile(); // Has sql property }); // ❌ Error - Missing .compile() const result = useTypedQuery(driveId, (db) => { return db.selectFrom("users").selectAll(); // No sql property }); // ✅ Good - Raw SQL format const result = useTypedQuery(driveId, () => { return { sql: "SELECT * FROM users", parameters: [], }; }); ```
### Performance Issues
My queries are running too frequently or causing lag ### Problem Your queries are running more often than expected, causing performance issues. ### Solution Check for unstable parameters or overly complex queries: ```typescript // ❌ Problem - New object every render function BadComponent({ driveId, user }) { const result = useTypedQuery( driveId, (db, params) => /* query */, { filter: { status: 'active', dept: user.department } // New object each render } ); } // ✅ Solution - Stable parameters function GoodComponent({ driveId, user }) { const filter = useMemo(() => ({ status: 'active', dept: user.department }), [user.department]); const result = useTypedQuery( driveId, (db, params) => /* query */, { filter } ); } // ✅ Even better - Direct values function BetterComponent({ driveId, user }) { const result = useTypedQuery( driveId, (db, params) => /* query */, { status: 'active', dept: user.department } ); } ```
## Further Reading - [Kysely Documentation](https://kysely.dev/) - Learn more about the query builder - [PGlite Documentation](https://pglite.dev/) - Understanding the underlying database - [React Hooks](/academy/Reference/EditorsUI/ReactHooks) - Other available hooks in Powerhouse - [Component Library](/academy/Reference/EditorsUI/DocumentEngineering) - Building UI components ## Related Hooks - [`useDocuments`](/academy/Reference/EditorsUI/ReactHooks#usedocuments) - Working with Powerhouse documents - [`useDrives`](/academy/Reference/EditorsUI/ReactHooks#usedrives) - Managing document drives - [`useSelectedDocument`](/academy/Reference/EditorsUI/ReactHooks#useselecteddocument) - Document selection state --- ## Subgraph Migration Guide (v6) > Source: https://academy.vetra.io/academy/Reference/GraphQLData/SubgraphMigrationGuide **TIP:** This guide covers the **breaking changes** to the GraphQL subgraph API introduced in the v6 Reactor. If you were querying the old `/graphql/document-drive` or `/graphql/system` endpoints, or building custom subgraphs, **this migration is required**. ## Overview The v6 Reactor replaced the legacy hardcoded subgraphs (`document-drive`, `system`) with a new architecture: - **Reactor subgraph** (`/graphql/r`) — manages drives, documents, sync, and subscriptions - **Document-model subgraphs** (`/graphql/`) — auto-generated per document model, with namespaced queries and mutations - **Custom subgraphs** — user-defined subgraphs now extend `BaseSubgraph` with `reactorClient` ## Endpoint changes | Legacy endpoint | v6 endpoint | Notes | | ------------------------- | ----------------------- | --------------------------------------- | | `/graphql/document-drive` | `/graphql/r` | Drive and document management | | `/graphql/system` | `/graphql/r` | Sync operations moved to reactor | | `/graphql/` | `/graphql/` | Custom subgraphs still user-defined | | N/A | `/graphql/` | New: auto-generated per document model | | `/graphql` | `/graphql` | Supergraph still combines all subgraphs | ## Querying and mutating documents In v6, every operation can be done through the **reactor subgraph** (`/graphql/r`) — which is generic and works with any document type — or through a **document-model subgraph** (`/graphql/`) — which is namespaced and type-specific. Both are shown below for each operation. Document-model subgraphs are auto-generated for each registered document model and provide: - `document(identifier)` — get a single document - `documents(paging)` — list all documents of this type - `findDocuments(search, view, paging)` — search within this type - `documentOutgoingRelationships(sourceIdentifier, relationshipType)` — filtered to this type - `documentIncomingRelationships(targetIdentifier, relationshipType)` - `createDocument(name, parentIdentifier)` mutation - Per-operation mutations (e.g. `addTodoItem(docId, input)`) - Async variants of each mutation (e.g. `addTodoItemAsync(docId, input)`) ### Getting a drive and its contents **Legacy:** ```graphql # Legacy — /graphql/document-drive query { drive { id name nodes { ... on FileNode { id name documentType } ... on FolderNode { id name } } } } ``` **v6 (reactor subgraph):** ```graphql # v6 — /graphql/r query { document(identifier: "my-drive-slug") { document { id name documentType state } childIds } } ``` **v6 (document-model subgraph):** ```graphql # v6 — /graphql/document-drive (or via supergraph) query { DocumentDrive { document(identifier: "my-drive-slug") { document { id name state { global { nodes { ... } } } } } } } ``` ### Listing children of a drive **Legacy:** Children were returned inline via the `drive.nodes` field (see above). **v6 (reactor subgraph):** ```graphql # v6 — /graphql/r query { documentOutgoingRelationships( sourceIdentifier: "my-drive-slug" relationshipType: "child" ) { items { id name documentType state } totalCount hasNextPage } } ``` **v6 (document-model subgraph):** To get only children of a specific type (e.g. todo lists): ```graphql # v6 — /graphql/to-do-list (or via supergraph) query { ToDoList { documentOutgoingRelationships( sourceIdentifier: "my-drive-slug" relationshipType: "child" ) { items { id name state { global { items { id text checked } } } } totalCount } } } ``` ### Finding documents by type **Legacy:** Not directly available — required iterating `drive.nodes` and filtering by `documentType`. **v6 (reactor subgraph):** ```graphql # v6 — /graphql/r query { findDocuments(search: { type: "powerhouse/todo-list" }) { items { id name state } totalCount } } ``` **v6 (document-model subgraph):** The type filter is built in: ```graphql # v6 — /graphql/to-do-list (or via supergraph) query { ToDoList { documents { items { id name state { global { items { id text checked } } } } totalCount } } } ``` ### Getting a single document **Legacy:** ```graphql # Legacy — /graphql/document-drive query { document(id: "abc123") { id name # ... limited to drive-level fields } } ``` **v6 (reactor subgraph):** ```graphql # v6 — /graphql/r query { document(identifier: "abc123") { document { id name documentType state } childIds } } ``` **v6 (document-model subgraph):** ```graphql # v6 — /graphql/to-do-list (or via supergraph) query { ToDoList { document(identifier: "abc123") { document { id name state { global { items { id text checked } } } } } } } ``` ### Creating a drive **Legacy:** ```graphql # Legacy — /graphql/document-drive mutation { addDrive(name: "tutorial") { id name } } ``` **v6 (reactor subgraph):** ```graphql # v6 — /graphql/r mutation { createDocument( document: { documentType: "powerhouse/document-drive", name: "tutorial" } ) { id name } } ``` **v6 (document-model subgraph):** ```graphql # v6 — /graphql/document-drive (or via supergraph) mutation { DocumentDrive { createDocument(name: "tutorial") { id name } } } ``` ### Creating a document In the legacy system, documents were created indirectly through drive operations or via Connect's internal APIs. In v6, documents are created directly. **v6 (reactor subgraph):** ```graphql # v6 — /graphql/r mutation { createDocument( document: { documentType: "powerhouse/todo-list", name: "My List" } parentIdentifier: "my-drive-slug" ) { id name } } ``` **v6 (document-model subgraph):** ```graphql # v6 — /graphql/to-do-list (or via supergraph) mutation { ToDoList { createDocument(name: "My List", parentIdentifier: "my-drive-slug") { id name } } } ``` ### Applying operations to a document In the legacy system, document operations were applied through strand-based push/pull via the `system` subgraph. In v6, operations are applied directly. **v6 (reactor subgraph):** ```graphql # v6 — /graphql/r mutation { mutateDocument( documentIdentifier: "abc123" actions: [ { type: "ADD_TODO_ITEM" input: { text: "Buy milk" } scope: "global" id: "op-1" timestampUtcMs: "1711900000000" } ] ) { id name state } } ``` **v6 (document-model subgraph):** ```graphql # v6 — /graphql/to-do-list (or via supergraph) mutation { ToDoList { addTodoItem(docId: "abc123", input: { text: "Buy milk" }) { id state { global { items { id text checked } } } } } } ``` ## Sync API changes ### Legacy: system subgraph (strand-based sync) The old `system` subgraph provided strand-based synchronization via pull-responder listeners: ```graphql # Legacy — /graphql/system mutation { registerPullResponderListener(filter: { documentType: ["powerhouse/todo-list"] branch: ["main"] }) { # returned a Listener object } } query { system { sync { strands(listenerId: "listener-123") { driveId documentId scope branch operations { type input index hash timestamp } } } } } ``` ### v6: Channel-based sync The v6 reactor replaces the strand/listener model with channel-based sync and real-time subscriptions: ```graphql # v6 — /graphql/r mutation { touchChannel( input: { id: "channel-1" name: "my-sync" collectionId: "drive-id" filter: { documentId: ["*"], scope: ["global"], branch: "main" } sinceTimestampUtcMs: "0" } ) { success ackOrdinal } } query { pollSyncEnvelopes(channelId: "channel-1", outboxAck: 0, outboxLatest: 100) { envelopes { type operations { operation { index hash action { type input scope } } context { documentId documentType scope branch ordinal } } } ackOrdinal } } ``` Real-time updates are available via GraphQL subscriptions: ```graphql subscription { documentChanges(search: { type: "powerhouse/todo-list" }) { type # CREATED, UPDATED, DELETED, etc. documents { id name state } } } ``` ## Query mapping reference | Legacy query/mutation | v6 equivalent | Subgraph | | ------------------------------- | ------------------------------------------------------------------------------ | ---------------------- | | `drive` | `document(identifier: driveSlug)` | reactor (`/graphql/r`) | | `drives` | `findDocuments(search: { type: "powerhouse/document-drive" })` | reactor | | `document(id)` | `document(identifier)` | reactor | | `documents` | `findDocuments()` | reactor | | `addDrive(name)` | `createDocument(document: { documentType: "powerhouse/document-drive", ... })` | reactor | | `system { sync { strands } }` | `pollSyncEnvelopes(channelId, ...)` | reactor | | `registerPullResponderListener` | `touchChannel(input: {...})` | reactor | | `pushUpdates` | `pushSyncEnvelopes(envelopes: [...])` | reactor | | N/A (new) | ` { document(...) }` | document-model | | N/A (new) | ` { createDocument(...) }` | document-model | | N/A (new) | ` { (docId, input) }` | document-model | ## Migrating custom subgraphs ### Legacy pattern Custom subgraphs exported a `resolvers` object and a `typeDefs` string, using `ctx.driveServer` for data access: ```typescript // Legacy custom subgraph export const typeDefs = ` type Query { myCustomQuery(driveId: String!): [String!]! } `; export const resolvers: GraphQLResolverMap = { Query: { myCustomQuery: async (_parent, args, ctx: Context) => { const drive = await ctx.driveServer.getDrive(args.driveId); // ... process drive data return results; }, }, }; ``` ### v6 pattern Custom subgraphs now use `getResolvers(subgraph: BaseSubgraph)` and access data through `subgraph.reactorClient`: ```typescript // v6 custom subgraph — subgraphs/my-custom/resolvers.ts export const getResolvers = (subgraph: BaseSubgraph) => { const reactorClient = subgraph.reactorClient; return { Query: { myCustomQuery: async (_parent: unknown, args: { driveId: string }) => { const children = await reactorClient.getOutgoingRelationships( args.driveId, "child", ); // ... process documents return results; }, }, }; }; ``` ```typescript // v6 custom subgraph — subgraphs/my-custom/schema.ts export const schema: DocumentNode = gql` type Query { myCustomQuery(driveId: String!): [String!]! } `; ``` Generate the scaffolding with: ```bash ph generate --subgraph my-custom ``` ### Key differences | Aspect | Legacy | v6 | | -------------------- | ------------------------------- | ----------------------------------------------- | | Data access | `ctx.driveServer` | `subgraph.reactorClient` | | Schema format | Template literal string | `gql` tagged template (`DocumentNode`) | | Resolver export | `export const resolvers` | `export const getResolvers = (subgraph) => ...` | | Relational DB access | Not available | `subgraph.relationalDb` | | File structure | `resolvers.ts` + `type-defs.ts` | `resolvers.ts` + `schema.ts` + `index.ts` | | Registration | Manual | Automatic via `ph generate` | ## Migration checklist - [ ] Update all GraphQL client queries that target `/graphql/document-drive` to use `/graphql/r` or the appropriate document-model subgraph - [ ] Replace `drive` queries with `document(identifier)` or `findDocuments` - [ ] Replace strand-based sync (`registerPullResponderListener`, `system.sync.strands`) with `touchChannel` + `pollSyncEnvelopes` - [ ] For real-time updates, use `documentChanges` subscription instead of polling strands - [ ] Migrate custom subgraphs to `getResolvers(subgraph: BaseSubgraph)` pattern - [ ] Replace `ctx.driveServer` calls with `subgraph.reactorClient` methods - [ ] Update schema files from plain strings to `gql` tagged templates - [ ] Regenerate custom subgraph scaffolding with `ph generate --subgraph ` --- ## Processor Migration Guide (v6) > Source: https://academy.vetra.io/academy/Reference/Processors/ProcessorMigrationGuide **TIP:** This guide covers the **breaking changes** to the processor interface introduced in the v6 Reactor. If you have existing processors built on the legacy strand-based API, **this migration is required**. ## Overview The v6 Reactor replaced the strand-based processor model with a flat operation-based model: - **Old**: Processors received `InternalTransmitterUpdate[]` strands via `onStrands()`, grouped by document - **New**: Processors receive a flat `OperationWithContext[]` list via `onOperations()`, with per-operation context This change simplifies the processor interface, improves cross-document ordering via the `ordinal` field, and unifies all processor types under a single `IProcessor` interface. ## Import path changes | Legacy import | v6 import | | ------------------------------------------------------------------------ | ---------------------------------------------------------------------------------------- | | `import { InternalTransmitterUpdate, IProcessor } from "document-drive"` | `import type { IProcessor, OperationWithContext } from "@powerhousedao/reactor-browser"` | | `import type { ReactorContext } from "document-drive"` | Removed — no longer needed | | `import type { OperationWithContext } from "@powerhousedao/reactor"` | Same (server-side alternative to reactor-browser) | **INFO:** `@powerhousedao/reactor-browser` re-exports all reactor types for convenience in browser environments (editors, drive-apps). If you are working outside the browser (Node.js, CLI tools, server-side code), import directly from `@powerhousedao/reactor` or `@powerhousedao/shared`. ## Interface changes ### Legacy: IProcessor with onStrands ```typescript // Legacy processor interface export class MyProcessor implements IProcessor { // Received grouped strands — one per (driveId, documentId, scope, branch) async onStrands(strands: InternalTransmitterUpdate[]): Promise { for (const strand of strands) { const { driveId, documentId, scope, branch } = strand; for (const operation of strand.operations) { // operation.type, operation.input, operation.index, ... } } } // Also required but often unused onOperations(operations: any[]): Promise { return Promise.resolve(); } onDisconnect(): Promise { return Promise.resolve(); } } ``` ### v6: IProcessor with onOperations ```typescript // v6 processor interface export class MyProcessor implements IProcessor { // Receives a flat list of operations with full context async onOperations(operations: OperationWithContext[]): Promise { for (const { operation, context } of operations) { // context: documentId, documentType, scope, branch, ordinal, resultingState // operation: action (type, input), index, timestampUtcMs, hash } } async onDisconnect(): Promise { // cleanup } } ``` ### Key differences | Aspect | Legacy | v6 | | ----------------------- | ------------------------------------------- | ------------------------------------------------- | | Entry method | `onStrands(strands)` | `onOperations(operations)` | | Data shape | Grouped by document (`strand.operations[]`) | Flat list (`OperationWithContext[]`) | | Document context | `strand.driveId`, `strand.documentId` | `context.documentId`, `context.documentType` | | Operation access | `operation.type`, `operation.input` | `operation.action.type`, `operation.action.input` | | Cross-document ordering | Not available | `context.ordinal` (global monotonic counter) | | Document state | Not provided | `context.resultingState` (JSON string, optional) | | Drive ID | `strand.driveId` | Available via factory's `driveHeader.id` | ## Factory changes ### Legacy factory ```typescript // Legacy processor factory export const myProcessorFactory = (analyticsStore: IAnalyticsStore) => (driveId: string): ProcessorRecord[] => { return [ { processor: new MyProcessor(analyticsStore), filter: { branch: ["main"], documentId: ["*"], scope: ["*"], documentType: ["*"], }, }, ]; }; ``` ### v6 factory ```typescript // v6 processor factory ProcessorRecord, IProcessorHostModule, } from "@powerhousedao/reactor-browser"; export const myProcessorFactory = (module: IProcessorHostModule) => ( driveHeader: PHDocumentHeader, processorApp?: ProcessorApp, ): ProcessorRecord[] => { return [ { processor: new MyProcessor(module.analyticsStore), filter: { branch: ["main"], documentId: ["*"], scope: ["*"], documentType: ["*"], }, }, ]; }; ``` ### Factory differences | Aspect | Legacy | v6 | | ------------------ | ------------------------------------------- | ------------------------------------------------------------------------------------------- | | Outer parameter | Direct dependencies (e.g. `analyticsStore`) | `IProcessorHostModule` (bundles `analyticsStore`, `relationalDb`, `processorApp`, `config`) | | Inner parameter | `driveId: string` | `driveHeader: PHDocumentHeader` (full header with `id`, `name`, `documentType`, etc.) | | Optional parameter | None | `processorApp?: ProcessorApp` | ## Migrating an analytics processor ### Legacy analytics processor ```typescript // Legacy AnalyticsSeriesInput, IAnalyticsStore, } from "@powerhousedao/analytics-engine-core"; export class MyAnalyticsProcessor implements IProcessor { private readonly inputs: AnalyticsSeriesInput[] = []; constructor(private readonly analyticsStore: IAnalyticsStore) {} onOperations(): Promise { return Promise.resolve(); } onDisconnect(): Promise { return Promise.resolve(); } async onStrands(strands: InternalTransmitterUpdate[]): Promise { for (const strand of strands) { if (strand.operations.length === 0) continue; const source = AnalyticsPath.fromString( `/MyAnalytics/${strand.driveId}/${strand.documentId}/${strand.branch}/${strand.scope}`, ); if (strand.operations[0].index === 0) { await this.clearSource(source); } for (const operation of strand.operations) { this.inputs.push({ source, metric: "MyMetric", start: DateTime.fromISO(operation.timestamp), value: 1, dimensions: { /* ... */ }, }); } } if (this.inputs.length > 0) { await this.analyticsStore.addSeriesValues(this.inputs); this.inputs.length = 0; } } private async clearSource(source: AnalyticsPath) { try { await this.analyticsStore.clearSeriesBySource(source, true); } catch (e) { console.error(e); } } } ``` ### v6 analytics processor ```typescript // v6 AnalyticsSeriesInput, IAnalyticsStore, } from "@powerhousedao/analytics-engine-core"; OperationWithContext, IProcessor, } from "@powerhousedao/reactor-browser"; export class MyAnalyticsProcessor implements IProcessor { constructor(private readonly analyticsStore: IAnalyticsStore) {} async onOperations(operations: OperationWithContext[]): Promise { if (operations.length === 0) return; const CHUNK_SIZE = 50; const buffer: AnalyticsSeriesInput[] = []; for (const { operation, context } of operations) { const { documentId, branch, scope } = context; const source = AnalyticsPath.fromString( `ph/my-analytics/${documentId}/${branch}/${scope}`, ); buffer.push({ source, metric: "MyMetric", start: DateTime.fromISO(operation.action.timestampUtcMs), value: 1, dimensions: { /* ... */ }, }); while (buffer.length >= CHUNK_SIZE) { const batch = buffer.splice(0, CHUNK_SIZE); await this.analyticsStore.addSeriesValues(batch); } } if (buffer.length > 0) { await this.analyticsStore.addSeriesValues(buffer); } } async onDisconnect(): Promise {} } ``` ### What changed - `onStrands()` is removed entirely — all logic moves to `onOperations()` - **`clearSource` is no longer needed.** The v6 processor manager guarantees each operation is delivered exactly once — there is no replay. You can remove all `clearSource` / `clearSeriesBySource` logic and the `index === 0` guard. - Strand fields like `strand.driveId`, `strand.documentId` become `context.documentId`, `context.documentType`, etc. - `operation.type` becomes `operation.action.type` - `operation.input` becomes `operation.action.input` - `operation.timestamp` becomes `operation.action.timestampUtcMs` - Chunked batch insert is now the recommended pattern (see example above) ## Migrating a relational database processor ### Legacy relational processor Legacy relational processors (previously called "operational processors") were plain `IProcessor` implementations that managed their own database connection: ```typescript // Legacy export class MyRelationalProcessor implements IProcessor { constructor(private db: any) {} async onStrands(strands: InternalTransmitterUpdate[]): Promise { for (const strand of strands) { for (const operation of strand.operations) { await this.db .insertInto("my_table") .values({ doc_id: strand.documentId, action: operation.type, }) .execute(); } } } onOperations(): Promise { return Promise.resolve(); } onDisconnect(): Promise { return Promise.resolve(); } } ``` ### v6 relational database processor The v6 Reactor provides a `RelationalDbProcessor` base class with built-in database lifecycle management: ```typescript // v6 export class MyRelationalProcessor extends RelationalDbProcessor { // Unique namespace per drive — prevents data collisions static override getNamespace(driveId: string): string { return super.getNamespace(driveId); } // Run migrations on startup override async initAndUpgrade(): Promise { await up(this.relationalDb); } override async onOperations( operations: OperationWithContext[], ): Promise { if (operations.length === 0) return; for (const { operation, context } of operations) { await this.relationalDb .insertInto("my_table") .values({ doc_id: context.documentId, action: operation.action.type, }) .onConflict((oc) => oc.column("doc_id").doNothing()) .execute(); } } async onDisconnect(): Promise {} } ``` ### v6 relational factory ```typescript ProcessorRecord, IProcessorHostModule, ProcessorFilter, } from "@powerhousedao/reactor-browser"; export const myRelationalProcessorFactory = (module: IProcessorHostModule) => async (driveHeader: PHDocumentHeader): Promise => { const namespace = MyRelationalProcessor.getNamespace(driveHeader.id); const store = await module.relationalDb.createNamespace( namespace, ); const filter: ProcessorFilter = { branch: ["main"], documentId: ["*"], documentType: ["powerhouse/my-doc-type"], scope: ["global"], }; const processor = new MyRelationalProcessor(namespace, filter, store); return [{ processor, filter }]; }; ``` Generate the scaffolding with: ```bash ph generate --processor my-processor --processor-type relationalDb --document-types powerhouse/my-doc-type ``` ### Key additions in RelationalDbProcessor | Feature | Description | | ------------------------------ | ------------------------------------------------------------------------ | | `RelationalDbProcessor` | Type-safe base class with `this.relationalDb` | | `getNamespace(driveId)` | Static method for per-drive database isolation | | `initAndUpgrade()` | Lifecycle hook for running migrations on startup | | `query(driveId, relationalDb)` | Static method for querying from subgraphs | | Type generation | `ph generate --migration-file migrations.ts` generates `schema.ts` types | ## Migrating a plain processor ### Legacy ```typescript export class LoggerProcessor implements IProcessor { async onStrands(strands: InternalTransmitterUpdate[]): Promise { for (const strand of strands) { for (const op of strand.operations) { console.log(`[${strand.driveId}] ${strand.documentId}: ${op.type}`); } } } onOperations(): Promise { return Promise.resolve(); } onDisconnect(): Promise { return Promise.resolve(); } } ``` ### v6 ```typescript export class LoggerProcessor implements IProcessor { constructor(private driveId: string) {} async onOperations(operations: OperationWithContext[]): Promise { for (const { operation, context } of operations) { console.log( `[${this.driveId}] ${context.documentId}: ${operation.action.type}`, ); } } async onDisconnect(): Promise {} } ``` ## OperationWithContext reference Each item in the `onOperations` list destructures as `{ operation, context }`: **`context`** — where the operation happened: | Field | Type | Description | | ---------------- | --------- | ------------------------------------------------------------------- | | `documentId` | `string` | The document that was modified | | `documentType` | `string` | e.g. `"powerhouse/todo-list"` | | `scope` | `string` | The scope (e.g. `"global"`, `"local"`) | | `branch` | `string` | The branch (e.g. `"main"`) | | `ordinal` | `number` | Global monotonically increasing ordinal for cross-document ordering | | `resultingState` | `string?` | JSON string of the document state after the operation | **`operation`** — what happened: | Field | Type | Description | | ---------------- | -------- | ---------------------------------------------------------------------------------- | | `action` | `Action` | Contains `type` (e.g. `"ADD_TODO_ITEM"`), `input`, `timestampUtcMs`, `id`, `scope` | | `index` | `number` | Position in the operation history | | `timestampUtcMs` | `string` | When the operation was created | | `hash` | `string` | Hash of the resulting document state | ## Migration checklist - [ ] Replace all `onStrands(strands: InternalTransmitterUpdate[])` with `onOperations(operations: OperationWithContext[])` - [ ] Remove the `onStrands` method entirely - [ ] Update imports from `document-drive` to `@powerhousedao/reactor-browser` (or `@powerhousedao/reactor` for server-side) - [ ] Replace `strand.driveId` / `strand.documentId` with `context.documentId` / `context.documentType` - [ ] Replace `operation.type` with `operation.action.type` - [ ] Replace `operation.input` with `operation.action.input` - [ ] Replace `operation.timestamp` with `operation.action.timestampUtcMs` - [ ] Update factory signature to accept `IProcessorHostModule` and `PHDocumentHeader` - [ ] For relational processors: extend `RelationalDbProcessor` and implement `initAndUpgrade()` - [ ] Regenerate processor scaffolding with `ph generate --processor ` --- ## Document-Engineering > Source: https://academy.vetra.io/academy/Reference/EditorsUI/DocumentEngineering The reusable components in the Document-Engineering system are a set of of front-end components based on graphQL scalars. Powerhouse also has a set of custom scalars that are not part of the graphQL standard but are specific to the web3 ecosystem. These components are offered through the **Powerhouse Document-Engineering system** with the help of storybook & the Academy documentation. It provides a collection of pre-built, reusable UI components designed for consistency and efficiency across Powerhouse applications and editors. Think of it as a toolkit of standard UI elements like buttons, inputs, and checkboxes with many of these components based on GraphQL scalars. **INFO:** A GraphQL scalar is essentially a primitive, indivisible value in the GraphQL type system. Here are the key points to understand: - **Basic Building Blocks:** Scalars are the basic data types—like String, Int, Float, Boolean, and ID—that represent atomic values. - **Leaf Nodes:** Scalars are the "leaves" of a GraphQL query. They can't have any sub-fields, meaning once you hit a scalar in a query, that's the final value. - **Custom Scalars:** Besides the built-in scalars, you can define custom scalars (e.g., a Date type) if you need to handle more specific formats or validations. Powerhouse does this specific for the web3 ecosystem. ::: ## What are Components? In the context of Powerhouse Builder platform, components can be thought of as reusable elements, or ready-to-use building blocks that help builders implement **document editors & viewers** with little to no effort. An important utility aspect of a component is that it serves its users as a **data input field**, providing structured ways to enter and manipulate information within your document models. ## Document Editors vs Document Viewers Understanding the relationship between document editors and viewers is crucial for component usage: **Document Editor**: A specific document type that is used by one or more users to make data entries and update its state. Key utility is the ability to enter data in a structured format, making it a great tool for collaboration within a group of authorized users. **Document Viewer**: Does not allow modifications. It's a great way to inform about the state of the document type, making it a great tool for providing a broader group or public with transparent insights. Document viewers do not have to match the view of the editor one-to-one - the data presented could be framed as a specific selection, or filtered to provide desired insights. **TIP:** The same component that will be used in a document viewer will have a **disabled state** (not allowed to edit documents). Document editors precede document viewers - you would start by creating a document editor and then, if needed, decide which viewer format is useful. ## Scalars vs. General UI Components ### Scalar Components Scalars are here to help you define custom fields in your document model schema and speed up the development process. There are two applications of scalar components in the document model workflow: 1. At the **schema definition** level where you build your schema and write your GraphQL state schema. 2. At the **frontend / react** level where you import it and place it in your UI to represent the scalar field These are specialized form components, each corresponding to a GraphQL scalar type (e.g., String, Number, Boolean, Currency, PHID). They are built on top of react-hook-form, offering out-of-the-box validation but must be wrapped with a Form component in order to work properly. **Location:** @powerhousedao/document-engineering/scalars https://github.com/powerhouse-inc/document-engineering **Key Feature**: Must be used within a Form component provided by this library. ### General-Purpose UI Components This category includes a broader range of UI elements such as simplified versions of the Scalar components (which don't require a Form wrapper but lack built-in validation), as well as other versatile components like Dropdown, Tooltip, Sidebar, ObjectSetTable and more. These are designed for crafting diverse and complex user interfaces. **Location:** @powerhousedao/document-engineering/ui https://github.com/powerhouse-inc/document-engineering ## Component Types Classification Inspired by atomic design methodology, Powerhouse classifies components into the following categories: ### Fragment The smallest element that combined together makes up a scalar or other simple component. **Examples:** Character counter, Checkbox field, Label ### Scalar (Simple Component) The simplest component that contains the basic input field for one-dimensional data type (single value). **Examples:** Integer, Boolean, String, Powerhouse ID (PHID) ### Complex Component Compound component that has an object/array value. It's made up of multiple scalars combined to serve a specific function. **Examples:** Sidebar (tree structure navigation component with content-style navigation for hierarchical data) ### Layout Component Purpose-specific container for other components like lists of other components, color layouts, sections, etc. **Examples:** Homepage section layout **INFO:** The Powerhouse team is building a Component library with a wide range of components embedding best UX practices & key functionality. This library establishes standards and best practices for building documents while fast-tracking the building process through facilitation of the most basic & useful component types. ## Component Behavior & UX Principles Besides the ability to input data, components have another crucial utility: they describe the mechanism of user interaction through implementing a defined set of behavior rules. **Best Practices for Component Behavior:** - Implementing behaviors at a component level is much more efficient than at the document level - Good component behavior feels natural to the user and is easily understood - Components should be intuitive and not require additional tutorials or explanations - Start with the most simple/basic behaviors first, then layer additional behaviors on top - Keep behaviors as simple as needed - less is more ## Exploring Components with Storybook We use Storybook as an interactive catalog for our design system components. It allows you to visually explore each component, interact with different states, and understand how to integrate them into your projects. [https://storybook.powerhouse.academy](https://storybook.powerhouse.academy) **Understanding the Storybook Interface:** 1. **Visual Demo:** The main panel shows the rendered component (e.g., a `Checkbox`). You can interact with it directly to see different states (checked, unchecked, disabled). 2. **Usage Snippet:** Below the demo, you'll typically find a basic code example demonstrating how to include the component in your code (e.g., ``). This provides a starting point for implementation. 3. **Props Table:** Further down, a table lists the properties (`props`) the component accepts. Props are like settings or configuration options. For the `Checkbox`, this table would show props like `label`, `defaultValue`, `value`, `onChange`, etc., often with descriptions of what they control. ## **Storybook vs. Source Code:** Storybook serves as essential documentation and a usage guide. Our developers write Storybook "stories" to demonstrate components and document their common props. However, the **ultimate source of truth** for a component's capabilities is its actual source code (e.g., the `.tsx` file within the `@powerhousedao/document-engineering/scalars` package). While Storybook aims for accuracy, there might occasionally be discrepancies or undocumented props. ## Implementing a Component Let's walk through the typical workflow for using a component from the document-engineering system, using `BooleanField` for a checkbox in the [TodoList editor](/academy/Build/BuildingUserExperiences/BuildingDocumentEditors). 1. **Identify the Need:** While building your feature (e.g., the TodoList editor), you determine the need for a standard UI element, like a checkbox to mark items as complete. 2. **Consult the Document Engineering Components in Storybook:** - Open the Powerhouse Storybook instance. [https://storybook.powerhouse.academy](https://storybook.powerhouse.academy) - Navigate or search to find the `BooleanField` component (used for checkboxes). - Review the visual examples and interactive demo. - Examine the "Usage" snippet and the **Props table** to understand the basic implementation and available configuration options (`name`, `value`, `onChange`, etc.). 3. **Import the Component:** In your code editor, open the relevant file (e.g., `editors/todo-list-editor/components/Checkbox.tsx`). Add an import statement at the top to bring the component into your file's scope: ```typescript import { Form, BooleanField, } from "@powerhousedao/document-engineering/scalars"; ``` This line instructs the build process to locate the `Form` and `BooleanField` components within the installed `@powerhousedao/document-engineering/scalars` package and make them available for use. :::info[Form Wrapper Required] Scalar components like `BooleanField` must be wrapped in a `Form` component from the same package. This provides built-in validation and form state management. ::: 4. **Use and Configure the Component:** Place the component tag in your JSX where needed. Use the information from Storybook (usage snippet and props table) as a guide, but adapt the props to your specific requirements: **Step 4a: Create a reusable Checkbox component** ```typescript // editors/todo-list-editor/components/Checkbox.tsx import { Form, BooleanField } from "@powerhousedao/document-engineering/scalars"; interface CheckboxProps { value: boolean; onChange: (value: boolean) => void; } export const Checkbox = ({ value, onChange }: CheckboxProps) => { return (
{}}> ); }; ``` **Step 4b: Use it in your Todo component with the document model hook** ```typescript // editors/todo-list-editor/components/Todo.tsx import { useSelectedTodoListDocument, updateTodoItem } from "todo-tutorial/document-models/todo-list"; import type { TodoItem } from "todo-tutorial/document-models/todo-list"; import { Checkbox } from "./Checkbox.js"; type Props = { todo: TodoItem }; export function Todo({ todo }: Props) { // Use the hook to get dispatch function const [todoList, dispatch] = useSelectedTodoListDocument(); if (!todoList) return null; return (
{ dispatch(updateTodoItem({ id: todo.id, checked: !todo.checked, })); }} /> {todo.text}
); } ``` You configure the component's appearance and behavior by passing the appropriate values to its props. Note the use of the `useSelectedTodoListDocument` hook to access the dispatch function. 5. **Test and Refine:** Run your application (e.g., using `ph connect`) to see the component in context. Verify its appearance and functionality. ## Usage The Document Engineering package provides several entry points for different use cases in your powerhouse project: ### Main Package ```typescript ``` ### UI Components ```typescript ``` ### Scalars For data manipulation and transformation utilities: ```typescript ``` ### GraphQL For GraphQL related utilities and schema definitions: ```typescript ``` ### Styles To include the package's styles: ```typescript ``` ## Import Maps Within the project, the following import maps are available: - `#assets` - Assets utilities and components - `#scalars` - Scalar transformations and utilities - `#ui` - UI components - `#graphql` - GraphQL related utilities Please don't hesitate to reach out in our discord channels with any questions. Happy designing! ### Up next: Create Custom Scalars You can learn how to do so in our guide on [Creating Custom Scalars](/academy/Reference/EditorsUI/CreateCustomScalars). --- ## React Hooks > Source: https://academy.vetra.io/academy/Reference/EditorsUI/ReactHooks This page provides a reference for the hooks available in `@powerhousedao/reactor-browser`. These hooks are intended to be used by editors (including drive editors) which will be rendered inside Powerhouse host-applications such as Connect, Switchboard, Fusion or a Vetra Studio Drive. - Learn more about [Editors](/academy/Build/BuildingUserExperiences/BuildingDocumentEditors) - Learn more about [Drive-apps](/academy/Build/BuildingUserExperiences/BuildingADriveExplorer)
Need a refresher on React Hooks? React Hooks allow you to use various React features directly within your functional components. You can use built-in Hooks or combine them to create your own custom Hooks. **What are Custom Hooks?** A custom hook is a JavaScript function whose name starts with "use" and that calls other Hooks. They are used to: - Reuse stateful logic between components. - Abstract complex logic into a simpler interface. - Isolate side effects, particularly those managed by `useEffect`. **Key Built-in Hooks Examples:** - `useState`: Lets a component "remember" information (state). - `useEffect`: Lets a component perform side effects (e.g., data fetching, subscriptions, manually changing the DOM). - `useContext`: Lets a component receive information from distant parent components without explicitly passing props through every level of the component tree. **Naming Convention:** Hook names must always start with `use` followed by a capital letter (e.g., `useState`, `useOnlineStatus`). **Rules of Hooks:** 1. **Only Call Hooks at the Top Level**: Don't call Hooks inside loops, conditions, or nested functions. 2. **Only Call Hooks from React Functions**: Call Hooks from React functional components or from custom Hooks. It's important to note that a function should only be named and treated as a hook if it actually utilizes one or more built-in React hooks. If a function (even if named `useSomething`) doesn't call any built-in hooks, it behaves like a regular JavaScript function, and making it a "hook" offers no specific React advantages.
## Key Concepts ### Reactor All of the data used by these hooks is ultimately derived from the `Reactor`, which manages the asynchronous eventually consistent state of drives and documents. Learn more about the [Reactor](/academy/Reference/Reactor/WorkingWithTheReactor). ### Dispatch Function Many hooks return a `dispatch` function for modifying documents. The dispatch function has this signature: ```typescript function dispatch( actionOrActions: Action | Action[] | undefined, onErrors?: (errors: Error[]) => void, ): void; ``` **Parameters:** - `actionOrActions` — The action or array of actions to dispatch to the document - `onErrors` — Optional callback invoked with any errors that occurred during action execution --- ## Quick Reference | Category | Hooks | | --------------------- | ---------------------------------------------------------------------------------------------------------------------------- | | **Selected Document** | `useSelectedDocument`, `useSelectedDocumentSafe`, `useSelectedDocumentId`, `useSelectedDocumentOfType` | | **Document by ID** | `useDocumentById`, `useDocumentsByIds`, `useDocumentOfType` | | **Document Cache** | `useDocumentCache`, `useDocument`, `useDocuments`, `useGetDocument`, `useGetDocuments`, `useGetDocumentAsync` | | **Drives** | `useDrives`, `useSelectedDrive`, `useSelectedDriveSafe`, `useSelectedDriveId` | | **Nodes & Folders** | `useSelectedNode`, `useSelectedFolder`, `useNodeById`, `useNodePathById` | | **Items in Drive** | `useNodesInSelectedDrive`, `useFileNodesInSelectedDrive`, `useFolderNodesInSelectedDrive`, `useDocumentsInSelectedDrive` | | **Items in Folder** | `useNodesInSelectedFolder`, `useFileNodesInSelectedFolder`, `useFolderNodesInSelectedFolder`, `useDocumentsInSelectedFolder` | | **Node Actions** | `useNodeActions` | | **Modals** | `usePHModal`, `showPHModal`, `closePHModal`, `showCreateDocumentModal`, `showDeleteNodeModal` | | **Revision History** | `useRevisionHistoryVisible`, `showRevisionHistory`, `hideRevisionHistory` | | **Timeline** | `useSelectedTimelineItem`, `useSelectedTimelineRevision` | | **Config** | `useAllowedDocumentTypes`, `useIsDragAndDropEnabled`, `useIsExternalControlsEnabled` | --- ## Selected Document ### `useSelectedDocumentId` Returns the ID of the currently selected document. ```typescript check function useSelectedDocumentId(): string | undefined; ``` **Returns:** The selected document's ID, or `undefined` if no file node is selected. --- ### `useSelectedDocument` Returns the selected document along with a dispatch function. Throws error if no document selected. ```typescript function useSelectedDocument(): readonly [ PHDocument, ( actionOrActions: Action | Action[] | undefined, onErrors?: (errors: Error[]) => void, ) => void, ]; ``` **Returns:** A tuple `[document, dispatch]` where: - `document` — The selected document - `dispatch` — A function to dispatch actions to the document **Example:** ```tsx function DocumentViewer() { const [document, dispatch] = useSelectedDocument(); if (!document) { return

No document selected

; } return (

{document.name}

Type: {document.header.documentType}

); } ``` **See also:** [`useSelectedDocumentSafe`](#useselecteddocumentsafe), [`useSelectedDocumentOfType`](#useselecteddocumentoftype), [`useDocumentById`](#usedocumentbyid) --- ### `useSelectedDocumentSafe` Returns the selected document along with a dispatch function or undefined is no document is selected. ```typescript function useSelectedDocumentSafe(): readonly [ PHDocument | undefined, ( actionOrActions: Action | Action[] | undefined, onErrors?: (errors: Error[]) => void, ) => void, ]; ``` **Returns:** A tuple `[document, dispatch]` where: - `document` — The selected document, or `undefined` if none selected - `dispatch` — A function to dispatch actions to the document **Throws:** - `NoSelectedDocumentError` — When no document is selected **Example:** ```tsx function DocumentViewer() { const [document, dispatch] = useSelectedDocument(); if (!document) { return

No document selected

; } return (

{document.name}

Type: {document.header.documentType}

); } ``` **See also:** [`useSelectedDocumentOfType`](#useselecteddocumentoftype), [`useDocumentById`](#usedocumentbyid) --- ### `useSelectedDocumentOfType` Returns the selected document of a specific type along with a dispatch function. Throws an error if the found document has a different type. ```typescript function useSelectedDocumentOfType< TDocument extends PHDocument, TAction extends Action, >(documentType: string): [TDocument, DocumentDispatch]; function useSelectedDocumentOfType(documentType: null | undefined): never[]; ``` **Parameters:** - `documentType` — The expected document type string (e.g., `"powerhouse/budget-statement"`) **Returns:** A tuple `[document, dispatch]` with the document typed as `TDocument`. **Throws:** - `NoSelectedDocumentError` — When no document is selected - `DocumentTypeMismatchError` - When selected document has different document type than the one provided **Example:** ```tsx function BudgetEditor() { const [document, dispatch] = useSelectedDocumentOfType< BudgetStatementDocument, BudgetStatementAction >("powerhouse/budget-statement"); const handleUpdate = () => { dispatch({ type: "UPDATE_BUDGET", input: { amount: 1000 } }, (errors) => console.error("Failed:", errors), ); }; return
{/* editor UI */}
; } ``` --- ## Document by ID ### `useDocumentById` Returns a document by ID along with a dispatch function. ```typescript function useDocumentById( id: string | null | undefined, ): readonly [ PHDocument | undefined, ( actionOrActions: Action | Action[] | undefined, onErrors?: (errors: Error[]) => void, ) => void, ]; ``` **Parameters:** - `id` — The document ID to retrieve, or `null`/`undefined` to skip retrieval **Returns:** A tuple `[document, dispatch]` where: - `document` — The document if found, or `undefined` - `dispatch` — A function to dispatch actions to the document **Example:** ```tsx function DocumentCard({ documentId }: { documentId: string }) { const [document, dispatch] = useDocumentById(documentId); if (!document) { return

Loading...

; } return
{document.name}
; } ``` --- ### `useDocumentsByIds` Returns multiple documents by their IDs. ```typescript function useDocumentsByIds(ids: string[] | null | undefined): PHDocument[]; ``` **Parameters:** - `ids` — Array of document IDs to retrieve, or `null`/`undefined` to skip **Returns:** An array of documents. Returns an empty array if `ids` is `null`/`undefined`. --- ### `useDocumentOfType` Returns a document of a specific type. Throws an error if the document has a different type. ```typescript function useDocumentOfType< TDocument extends PHDocument, TAction extends Action, >( documentId: string | null | undefined, documentType: string | null | undefined, ): [TDocument, DocumentDispatch] | never[]; ``` **Parameters:** - `documentId` — The document ID to retrieve - `documentType` — The expected document type **Throws:** - `DocumentNotFoundError` — When the document doesn't exist - `DocumentModelNotFoundError` — When the document model isn't registered - `DocumentTypeMismatchError` — When the document type doesn't match --- ## Document Cache ### `useDocumentCache` Returns the document cache containing all documents in the reactor. ```typescript function useDocumentCache(): IDocumentCache | undefined; ``` --- ### `useDocument` Retrieves a document from the reactor and subscribes to changes using React Suspense. This hook will suspend rendering while the document is loading. ```typescript function useDocument(id: string | null | undefined): PHDocument | undefined; ``` **Parameters:** - `id` — The document ID to retrieve, or `null`/`undefined` to skip retrieval **Returns:** The document if found, or `undefined` if `id` is `null`/`undefined`. --- ### `useDocuments` Retrieves multiple documents from the reactor using React Suspense. This hook will suspend rendering while any of the documents are loading. ```typescript function useDocuments(ids: string[] | null | undefined): PHDocument[]; ``` **Parameters:** - `ids` — Array of document IDs to retrieve, or `null`/`undefined` to skip retrieval **Returns:** An array of documents. Returns an empty array if `ids` is `null`/`undefined`. --- ### `useGetDocument` Returns a function to retrieve a document from the cache. The returned function fetches and returns a document by ID. ```typescript function useGetDocument(): (id: string) => Promise; ``` **Returns:** A function that takes a document ID and returns a Promise of the document. **Example:** ```tsx function DocumentFetcher() { const getDocument = useGetDocument(); const handleFetch = async (id: string) => { const document = await getDocument(id); console.log("Fetched document:", document.name); }; return ; } ``` --- ### `useGetDocuments` Returns a function to retrieve multiple documents from the cache. The returned function fetches and returns documents by their IDs. ```typescript function useGetDocuments(): (ids: string[]) => Promise; ``` **Returns:** A function that takes an array of document IDs and returns a Promise of the documents. --- ### `useGetDocumentAsync` Retrieves a document from the reactor without suspending rendering. Returns the current state of the document loading operation. ```typescript function useGetDocumentAsync(id: string | null | undefined): { status: "initial" | "pending" | "success" | "error"; data: PHDocument | undefined; isPending: boolean; error: Error | undefined; reload: (() => Promise) | undefined; }; ``` **Parameters:** - `id` — The document ID to retrieve, or `null`/`undefined` to skip retrieval **Returns:** An object containing: - `status` — `"initial"` | `"pending"` | `"success"` | `"error"` - `data` — The document if successfully loaded - `isPending` — Boolean indicating if the document is currently loading - `error` — Any error that occurred during loading - `reload` — Function to force reload the document from cache **Example:** ```tsx function AsyncDocumentLoader({ id }: { id: string }) { const { status, data, isPending, error, reload } = useGetDocumentAsync(id); if (status === "initial" || isPending) { return

Loading...

; } if (status === "error") { return (

Error: {error?.message}

); } return
{data?.name}
; } ``` --- ## Drives ### `useDrives` Returns all drives in the reactor. ```typescript function useDrives(): DocumentDriveDocument[] | undefined; ``` **Example:** ```tsx function DriveList() { const drives = useDrives(); return (
    {drives?.map((drive) => (
  • {drive.header.slug}
  • ))}
); } ``` --- ### `useSelectedDriveId` Returns the ID of the currently selected drive. ```typescript function useSelectedDriveId(): string | undefined; ``` --- ### `useSelectedDrive` Returns the selected drive along with a dispatch function. **Throws an error if no drive is selected.** ```typescript function useSelectedDrive(): [ DocumentDriveDocument, DocumentDispatch, ]; ``` **Returns:** A tuple `[drive, dispatch]`. **Throws:** `Error` with message `"There is no drive selected. Did you mean to call 'useSelectedDriveSafe'?"` **See also:** [`useSelectedDriveSafe`](#useselecteddrivesafe) --- ### `useSelectedDriveSafe` Returns the selected drive, or `undefined` if no drive is selected. Use this when you need to handle the "no drive selected" case gracefully. ```typescript function useSelectedDriveSafe(): | [DocumentDriveDocument, DocumentDispatch] | readonly [undefined, undefined]; ``` **Returns:** A tuple `[drive, dispatch]` or `[undefined, undefined]` if no drive is selected. **Example:** ```tsx function DriveHeader() { const [drive, dispatch] = useSelectedDriveSafe(); if (!drive) { return

Select a drive to get started

; } return

{drive.header.slug}

; } ``` --- ### `setSelectedDrive` Sets the selected drive and updates the URL. ```typescript function setSelectedDrive( driveOrDriveSlug: string | DocumentDriveDocument | undefined, ): void; ``` **Parameters:** - `driveOrDriveSlug` — The drive object, drive slug string, or `undefined` to deselect --- ## Selected Node & Folder ### `useSelectedNode` Returns the currently selected node (file or folder). ```typescript function useSelectedNode(): Node | undefined; ``` --- ### `setSelectedNode` Sets the selected node and updates the URL. ```typescript function setSelectedNode(nodeOrNodeSlug: Node | string | undefined): void; ``` **Parameters:** - `nodeOrNodeSlug` — The node object, node slug string, or `undefined` to deselect --- ### `useSelectedFolder` Returns the selected folder. Returns `undefined` if the selected node is not a folder. ```typescript function useSelectedFolder(): FolderNode | undefined; ``` --- ### `useNodeById` Returns a node in the selected drive by ID. ```typescript function useNodeById(id: string | null | undefined): Node | undefined; ``` **Parameters:** - `id` — The node ID to find --- ### `useNodePathById` Returns the path (array of ancestor nodes) to a node in the selected drive. ```typescript function useNodePathById(id: string | null | undefined): Node[]; ``` **Parameters:** - `id` — The node ID to get the path for **Returns:** An array of nodes from root to the target node. Returns an empty array if the node is not found. --- ### `useSelectedNodePath` Returns the path to the currently selected node. ```typescript function useSelectedNodePath(): Node[]; ``` --- ## Items in Selected Drive ### `useNodesInSelectedDrive` Returns all nodes (files and folders) in the selected drive. ```typescript function useNodesInSelectedDrive(): Node[] | undefined; ``` --- ### `useFileNodesInSelectedDrive` Returns only the file nodes in the selected drive. ```typescript function useFileNodesInSelectedDrive(): FileNode[] | undefined; ``` --- ### `useFolderNodesInSelectedDrive` Returns only the folder nodes in the selected drive. ```typescript function useFolderNodesInSelectedDrive(): FolderNode[] | undefined; ``` --- ### `useDocumentsInSelectedDrive` Returns all documents in the selected drive. ```typescript function useDocumentsInSelectedDrive(): PHDocument[] | undefined; ``` --- ### `useDocumentTypesInSelectedDrive` Returns the document types supported by the selected drive, as defined by the document model documents present in the drive. ```typescript function useDocumentTypesInSelectedDrive(): string[] | undefined; ``` --- ### `useNodesInSelectedDriveOrFolder` Returns the child nodes for the selected drive or folder. If a folder is selected, returns its children. Otherwise, returns the root-level nodes of the drive. ```typescript function useNodesInSelectedDriveOrFolder(): Node[]; ``` **Returns:** An array of nodes, sorted by name. Returns an empty array if no drive is selected. --- ## Items in Selected Folder ### `useNodesInSelectedFolder` Returns all nodes in the selected folder. ```typescript function useNodesInSelectedFolder(): Node[] | undefined; ``` --- ### `useFileNodesInSelectedFolder` Returns only the file nodes in the selected folder. ```typescript function useFileNodesInSelectedFolder(): FileNode[] | undefined; ``` --- ### `useFolderNodesInSelectedFolder` Returns only the folder nodes in the selected folder. ```typescript function useFolderNodesInSelectedFolder(): FolderNode[] | undefined; ``` --- ### `useDocumentsInSelectedFolder` Returns the documents in the selected folder. ```typescript function useDocumentsInSelectedFolder(): PHDocument[] | undefined; ``` --- ## Node Actions ### `useNodeActions` Returns a set of functions for performing file and folder operations in the selected drive. ```typescript function useNodeActions(): { onAddFile: ( file: File, parent: Node | undefined, ) => Promise; onAddFolder: ( name: string, parent: Node | undefined, ) => Promise; onRenameNode: (newName: string, node: Node) => Promise; onCopyNode: (src: Node, target: Node | undefined) => Promise; onMoveNode: (src: Node, target: Node | undefined) => Promise; onDuplicateNode: (src: Node) => Promise; onAddAndSelectNewFolder: (name: string) => Promise; }; ``` **Returned Functions:** | Function | Description | | ------------------------------- | ---------------------------------------------------------- | | `onAddFile(file, parent)` | Adds a file to the drive under the specified parent folder | | `onAddFolder(name, parent)` | Creates a new folder under the specified parent | | `onRenameNode(newName, node)` | Renames a node | | `onCopyNode(src, target)` | Copies a node to a target folder | | `onMoveNode(src, target)` | Moves a node to a target folder | | `onDuplicateNode(src)` | Duplicates a node in the current folder | | `onAddAndSelectNewFolder(name)` | Creates a new folder and selects it | **Example:** ```tsx useNodeActions, useSelectedFolder, } from "@powerhousedao/reactor-browser"; function FileUploader() { const { onAddFile, onAddFolder } = useNodeActions(); const selectedFolder = useSelectedFolder(); const handleFileUpload = async ( event: React.ChangeEvent, ) => { const file = event.target.files?.[0]; if (file) { await onAddFile(file, selectedFolder); } }; const handleCreateFolder = async () => { await onAddFolder("New Folder", selectedFolder); }; return (
); } ``` --- ## Modals ### `usePHModal` Returns the currently displayed modal. ```typescript function usePHModal(): PHModal | undefined; ``` **Modal Types:** ```typescript type PHModal = | { type: "createDocument"; documentType: string } | { type: "deleteItem"; id: string } | { type: "addDrive" } | { type: "upgradeDrive"; driveId: string } | { type: "deleteDrive"; driveId: string } | { type: "driveSettings"; driveId: string } | { type: "settings" } | { type: "clearStorage" } | { type: "debugSettings" } | { type: "disclaimer" } | { type: "cookiesPolicy" } | { type: "exportDocumentWithErrors"; documentId: string } | { type: "inspector" }; ``` --- ### `showPHModal` Shows a modal. ```typescript function showPHModal(modal: PHModal): void; ``` --- ### `closePHModal` Closes the currently displayed modal. ```typescript function closePHModal(): void; ``` --- ### `showCreateDocumentModal` Shows the create document modal for a specific document type. ```typescript function showCreateDocumentModal(documentType: string): void; ``` **Example:** ```tsx function CreateButton() { return ( ); } ``` --- ### `showDeleteNodeModal` Shows the delete confirmation modal for a node. ```typescript function showDeleteNodeModal(nodeOrId: Node | string): void; ``` **Parameters:** - `nodeOrId` — The node object or node ID to delete --- ## Revision History ### `useRevisionHistoryVisible` Returns whether the revision history panel is visible. ```typescript check function useRevisionHistoryVisible(): boolean | undefined; ``` --- ### `showRevisionHistory` Shows the revision history panel. ```typescript function showRevisionHistory(): void; ``` --- ### `hideRevisionHistory` Hides the revision history panel. ```typescript function hideRevisionHistory(): void; ``` --- ## Timeline ### `useSelectedTimelineItem` Returns the selected timeline item. ```typescript function useSelectedTimelineItem(): TimelineItem | null | undefined; ``` **Timeline Item Types:** ```typescript type TimelineBarItem = { id: string; type: "bar"; addSize?: 0 | 1 | 2 | 3 | 4; delSize?: 0 | 1 | 2 | 3 | 4; timestampUtcMs?: string; additions?: number; deletions?: number; revision?: number; startDate?: Date; endDate?: Date; }; type TimelineDividerItem = { id: string; type: "divider"; timestampUtcMs?: string; title?: string; subtitle?: string; revision?: number; startDate?: Date; endDate?: Date; }; type TimelineItem = TimelineBarItem | TimelineDividerItem; ``` --- ### `setSelectedTimelineItem` Sets the selected timeline item. ```typescript function setSelectedTimelineItem(item: TimelineItem | null | undefined): void; ``` --- ### `useSelectedTimelineRevision` Returns the selected timeline revision. ```typescript function useSelectedTimelineRevision(): string | number | null | undefined; ``` --- ### `setSelectedTimelineRevision` Sets the selected timeline revision. ```typescript function setSelectedTimelineRevision( revision: string | number | null | undefined, ): void; ``` --- ## Document Types ### `useDocumentTypes` Returns the document types a drive editor supports. Uses `allowedDocumentTypes` config if set, otherwise falls back to all supported document types from the reactor. ```typescript function useDocumentTypes(): string[] | undefined; ``` --- ### `useSupportedDocumentTypesInReactor` Returns the supported document types for the reactor, derived from the registered document model modules. ```typescript function useSupportedDocumentTypesInReactor(): string[] | undefined; ``` --- ## Vetra Packages ### `useVetraPackages` Returns all Vetra packages loaded by the Connect instance. ```typescript function useVetraPackages(): VetraPackage[] | undefined; ``` **VetraPackage Type:** ```typescript type VetraPackage = { id: string; name: string; description: string; category: string; author: Author; modules: { documentModelModules?: VetraDocumentModelModule[]; editorModules?: VetraEditorModule[]; subgraphModules?: SubgraphModule[]; importScriptModules?: ImportScriptModule[]; processorModules?: VetraProcessorModule[]; }; }; ``` --- ### `setVetraPackages` Sets the Vetra packages for the Connect instance. ```typescript function setVetraPackages(vetraPackages: VetraPackage[] | undefined): void; ``` --- ## Switchboard Link ### `useGetSwitchboardLink` Hook that returns a function to generate a document's switchboard URL. Only returns a function for documents in remote drives. Returns `null` for local drives or when the document/drive cannot be determined. The returned function generates a fresh bearer token and builds the switchboard URL with authentication when called. ```typescript function useGetSwitchboardLink( document: PHDocument | undefined, ): (() => Promise) | null; ``` **Parameters:** - `document` — The document to create a switchboard URL generator for **Returns:** An async function that returns the switchboard URL, or `null` if not applicable. **Example:** ```tsx useGetSwitchboardLink, useSelectedDocument, } from "@powerhousedao/reactor-browser"; function SwitchboardButton() { const [document] = useSelectedDocument(); const getSwitchboardLink = useGetSwitchboardLink(document); if (!getSwitchboardLink) { return null; // Not available for local drives } const handleClick = async () => { const url = await getSwitchboardLink(); window.open(url, "_blank"); }; return ; } ``` --- ## Editor Configuration ### `useIsExternalControlsEnabled` Gets whether external controls are enabled for a given editor. ```typescript function useIsExternalControlsEnabled(): boolean | undefined; ``` --- ### `setIsExternalControlsEnabled` Sets whether external controls are enabled for a given editor. ```typescript function setIsExternalControlsEnabled(enabled: boolean | undefined): void; ``` --- ### `useIsDragAndDropEnabled` Gets whether drag and drop is enabled for a given drive editor. ```typescript check function useIsDragAndDropEnabled(): boolean | undefined; ``` --- ### `setIsDragAndDropEnabled` Sets whether drag and drop is enabled for a given drive editor. ```typescript function setIsDragAndDropEnabled(enabled: boolean | undefined): void; ``` --- ### `useAllowedDocumentTypes` Defines the document types a drive supports. Defaults to all document types registered in the reactor. ```typescript function useAllowedDocumentTypes(): string[] | undefined; ``` --- ### `setAllowedDocumentTypes` Sets the allowed document types for a given drive editor. ```typescript function setAllowedDocumentTypes(types: string[] | undefined): void; ``` --- ## Config: Set by Object ### `setPHDriveEditorConfig` Sets the global drive editor config. Pass in a partial object of the config to set. ```typescript function setPHDriveEditorConfig(config: Partial): void; ``` **Config Options:** - `allowedDocumentTypes` — Array of allowed document type strings - `isDragAndDropEnabled` — Whether drag and drop is enabled --- ### `setPHDocumentEditorConfig` Sets the global document editor config. Pass in a partial object of the config to set. ```typescript function setPHDocumentEditorConfig( config: Partial, ): void; ``` **Config Options:** - `isExternalControlsEnabled` — Whether external controls are enabled --- ### `useSetPHDriveEditorConfig` Wrapper hook that automatically sets the global drive editor config when the component mounts. ```typescript function useSetPHDriveEditorConfig(config: Partial): void; ``` **Example:** ```tsx function MyDriveEditor() { useSetPHDriveEditorConfig({ isDragAndDropEnabled: true, allowedDocumentTypes: ["powerhouse/budget-statement", "powerhouse/invoice"], }); return
{/* editor content */}
; } ``` --- ### `useSetPHDocumentEditorConfig` Wrapper hook that automatically sets the global document editor config when the component mounts. ```typescript function useSetPHDocumentEditorConfig( config: Partial, ): void; ``` --- ## Config: Get by Key ### `usePHDriveEditorConfigByKey` Gets the value of an item in the global drive config for a given key. Strongly typed, inferred from type definition for the key. ```typescript function usePHDriveEditorConfigByKey( key: TKey, ): PHDriveEditorConfig[TKey]; ``` --- ### `usePHDocumentEditorConfigByKey` Gets the value of an item in the global document config for a given key. Strongly typed, inferred from type definition for the key. ```typescript function usePHDocumentEditorConfigByKey( key: TKey, ): PHDocumentEditorConfig[TKey]; ``` --- ## Step 1: Create Custom Scalars > Source: https://academy.vetra.io/academy/Reference/EditorsUI/CreateCustomScalars This tutorial provides step-by-step instructions for creating custom scalars & components, and to contributing to the document-engineering project. The github repo for the Document-Engineering can be found [here](https://github.com/powerhouse-inc/document-engineering/tree/main) ### Creating New GraphQL Scalars GraphQL scalars are custom data types that define how data is validated, serialized, and parsed. This guide will walk you through creating a new scalar in the `src/scalars/graphql/` directory. ## Step 1: Create the Scalar File Create a new TypeScript file in `src/scalars/graphql/` for your scalar. Use `EmailAddress.ts` as a reference. **Example: Creating a `PhoneNumber.ts` scalar** ```typescript GraphQLError, GraphQLScalarType, type GraphQLScalarTypeConfig, Kind, } from "graphql"; export interface ScalarType { input: string; output: string; } export const type = "string"; // TS type in string form export const typedef = "scalar PhoneNumber"; export const schema = z .string() .regex(/^\+?[1-9]\d{1,14}$/, "Invalid phone number format"); export const stringSchema = 'z.string().regex(/^\\+?[1-9]\\d{1,14}$/, "Invalid phone number format")'; const phoneValidation = (value: unknown): string => { if (typeof value !== "string") { throw new GraphQLError(`Value is not string: ${JSON.stringify(value)}`); } const result = schema.safeParse(value); if (result.success) return result.data; throw new GraphQLError(result.error.message); }; export const config: GraphQLScalarTypeConfig = { name: "PhoneNumber", description: "A field whose value conforms to international phone number format.", serialize: phoneValidation, parseValue: phoneValidation, parseLiteral: (value) => { if (value.kind !== Kind.STRING) { throw new GraphQLError( `Can only validate strings as phone numbers but got a: ${value.kind}`, { nodes: value }, ); } return phoneValidation(value.value); }, }; export const scalar = new GraphQLScalarType(config); ``` ### Key Components to Update: 1. **`type`**: The TypeScript type (usually `'string'` for text-based scalars) 2. **`typedef`**: The GraphQL type definition (e.g., `'scalar PhoneNumber'`) 3. **`schema`**: Zod validation schema for your data type 4. **`stringSchema`**: String representation of the zod schema (used for code generation) 5. **Validation function**: Custom validation logic for your scalar 6. **`config.name`**: The name of your scalar (must match the typedef) 7. **`config.description`**: Human-readable description of the scalar ## Step 2: Register the Scalar in `scalars.ts` After creating your scalar file, you need to register it in `src/scalars/graphql/scalars.ts`. This involves updating multiple sections of the file. The github repo for the Document-Engineering can be found [here](https://github.com/powerhouse-inc/document-engineering/tree/main) ### 2.1 Add Namespace Import Add your scalar to the namespace imports section (around line 2): ```typescript // namespace imports -- DO NOT REMOVE OR EDIT THIS COMMENT // ... other imports ... ``` ### 2.2 Add Type Export Add the type export (around line 22): ```typescript // export types -- DO NOT REMOVE OR EDIT THIS COMMENT export type { ScalarType as AmountScalarType } from "./Amount.js"; // ... other type exports ... export type { ScalarType as PhoneNumberScalarType } from "./PhoneNumber.js"; // ADD THIS LINE export type { ScalarType as URLScalarType } from "./URL.js"; ``` ### 2.3 Add to Export Object Add your scalar to the main export object (around line 40): ```typescript export { Amount, AmountCrypto, // ... other exports ... PhoneNumber, // ADD THIS LINE URLScalar, }; ``` ### 2.4 Add to Custom Scalars Add your scalar to the `customScalars` object (around line 54): ```typescript export const customScalars: Record> = { // ... other scalars ... PhoneNumber, // ADD THIS LINE URLScalar, } as const; ``` #### 2.5 Add to Resolvers Add your scalar to the `resolvers` object (around line 74): ```typescript export const resolvers = { // export resolvers -- DO NOT REMOVE OR EDIT THIS COMMENT AmountTokens: AmountTokens.scalar, // ... other resolvers ... PhoneNumber: PhoneNumber.scalar, // ADD THIS LINE Amount: Amount.scalar, }; ``` ### 2.6 Add to Type Definitions Add your typedef to the `typeDefs` array (around line 90): ```typescript export const typeDefs = [ // export typedefs -- DO NOT REMOVE OR EDIT THIS COMMENT AmountTokens.typedef, // ... other typedefs ... PhoneNumber.typedef, // ADD THIS LINE Amount.typedef, ]; ``` ### 2.7 Add to Generator Type Definitions Add your scalar to the `generatorTypeDefs` object (around line 105): ```typescript export const generatorTypeDefs = { // export generator typedefs -- DO NOT REMOVE OR EDIT THIS COMMENT [AmountTokens.config.name]: AmountTokens.type, // ... other entries ... [PhoneNumber.config.name]: PhoneNumber.type, // ADD THIS LINE [Amount.config.name]: Amount.type, }; ``` ### 2.8 Add to Validation Schema Add your scalar to the `validationSchema` object (around line 120): ```typescript export const validationSchema = { // export validation schema -- DO NOT REMOVE OR EDIT THIS COMMENT [AmountTokens.config.name]: AmountTokens.stringSchema, // ... other entries ... [PhoneNumber.config.name]: PhoneNumber.stringSchema, // ADD THIS LINE [Amount.config.name]: Amount.stringSchema, }; ``` ## Step 3: Create Tests for Your Scalar Every scalar must have comprehensive tests to ensure it works correctly. Create a test file in `src/scalars/graphql/test/` following the naming convention `YourScalar.test.ts`. **Example: Creating `PhoneNumber.test.ts`** ```typescript describe("PhoneNumber Scalar", () => { it("should serialize a phone number", () => { const phoneNumber = "+1234567890"; expect(scalar.serialize(phoneNumber)).toBe(phoneNumber); }); it("should throw an error if the value is not a string", () => { const phoneNumber = 123; expect(() => scalar.serialize(phoneNumber)).toThrow(); }); it("should throw an error if the value is not a valid phone number", () => { const phoneNumber = "invalid-phone"; expect(() => scalar.serialize(phoneNumber)).toThrow(); }); it("should parse a valid phone number", () => { const phoneNumber = "+1234567890"; expect(scalar.parseValue(phoneNumber)).toBe(phoneNumber); }); it("should throw an error if parse a value that is not a valid phone number", () => { const phoneNumber = "invalid-phone"; expect(() => scalar.parseValue(phoneNumber)).toThrow(); }); it("should throw an error if parse a value that is not a string", () => { const phoneNumber = 123; expect(() => scalar.parseValue(phoneNumber)).toThrow(); }); it("should parse a valid phone number from a literal", () => { const phoneNumber = "+1234567890"; expect( scalar.parseLiteral({ kind: Kind.STRING, value: phoneNumber, }), ).toBe(phoneNumber); }); it("should throw an error if parse a literal that is not a valid phone number", () => { const phoneNumber = "invalid-phone"; expect(() => scalar.parseLiteral({ kind: Kind.STRING, value: phoneNumber, }), ).toThrow(); }); it("should throw an error if parse a literal that is not a string", () => { const phoneNumber = "+1234567890"; expect(() => scalar.parseLiteral({ kind: Kind.INT, value: phoneNumber, }), ).toThrow(); }); }); ``` #### Required Test Cases Your scalar tests should cover these essential scenarios: ##### Serialization Tests - ✅ **Valid values**: Test that valid inputs are serialized correctly - ❌ **Invalid types**: Test that non-string inputs throw errors - ❌ **Invalid format**: Test that strings not matching your validation throw errors ##### Parse Value Tests - ✅ **Valid values**: Test that valid inputs are parsed correctly - ❌ **Invalid format**: Test that invalid strings throw errors - ❌ **Invalid types**: Test that non-string inputs throw errors ##### Parse Literal Tests - ✅ **Valid STRING literals**: Test that valid string literals are parsed correctly - ❌ **Invalid STRING literals**: Test that invalid string literals throw errors - ❌ **Non-STRING literals**: Test that non-string literal kinds (INT, FLOAT, etc.) throw errors #### Testing Best Practices 1. **Test edge cases**: Include boundary values and common invalid inputs 2. **Test multiple valid formats**: If your scalar accepts different valid formats, test them all 3. **Use descriptive test names**: Make it clear what each test is validating 4. **Follow the naming convention**: `YourScalar.test.ts` in the `test/` directory #### Example Edge Cases for Different Scalar Types **String-based scalars (like PhoneNumber):** ```typescript // Test empty string expect(() => scalar.parseValue("")).toThrow(); // Test too long/short values expect(() => scalar.parseValue("123")).toThrow(); expect(() => scalar.parseValue("+" + "1".repeat(20))).toThrow(); // Test special characters expect(() => scalar.parseValue("+1-234-567-890")).not.toThrow(); ``` **Number-based scalars:** ```typescript // Test zero expect(scalar.parseValue(0)).toBe(0); // Test negative numbers expect(() => scalar.parseValue(-1)).toThrow(); // Test decimal numbers expect(scalar.parseValue(123.45)).toBe(123.45); ``` **Date-based scalars:** ```typescript // Test valid ISO date expect(scalar.parseValue("2023-12-25T00:00:00Z")).toBe("2023-12-25T00:00:00Z"); // Test invalid date format expect(() => scalar.parseValue("25/12/2023")).toThrow(); ``` ## Step 4: Validate Your Implementation After implementing your scalar and tests, make sure to: 1. **Run the tests** to ensure they all pass 2. **Build the project** to ensure there are no TypeScript errors 3. **Test GraphQL queries** that use your new scalar 4. **Verify code generation** works with your new scalar ### Common Scalar Types Here are some common patterns for different types of scalars: #### String-based Scalars ```typescript export const type = "string"; export const schema = z.string().min(1).max(100); ``` #### Number-based Scalars ```typescript export const type = "number"; export const schema = z.number().positive(); ``` #### Date-based Scalars ```typescript export const type = "string"; export const schema = z.string().datetime(); ``` **INFO:** **Contributing and UI for Scalars** - **Open Source**: Please submit contributions as a pull request to the Powerhouse team. - **UI is Optional but Helpful**: A design or UI for your scalar isn't required, but it helps reviewers understand its purpose. - **Semantic Scalars**: Some scalars don't need a unique UI. For instance, `Title` and `Description` might both use a simple text input but serve a semantic role by adding specific meaning and validation to the schema. ::: ### Tips - Always follow the naming convention: use PascalCase for scalar names - Include meaningful validation in your Zod schema - Write clear, descriptive error messages - Keep the `stringSchema` in sync with your `schema` definition - Test edge cases in your validation function - Update all required sections in `scalars.ts` --- ## Renown SDK > Source: https://academy.vetra.io/academy/Reference/Authorization/renown-sdk/Overview A comprehensive SDK for integrating Renown authentication and user profile management into your React applications. ## Features - 🔐 **Authentication** - Complete authentication flow with session management - 👤 **User Profiles** - Fetch and manage user profile data - ⚛️ **React Integration** - Provider and hooks for seamless React integration - 🎨 **UI Component** - Ready-to-use RenownAuthButton component - 🔄 **Session Persistence** - Automatic session restoration across page reloads - 🌐 **Renown Portal** - Easy integration with Renown authentication portal - 📦 **Type-Safe** - Full TypeScript support - 🎯 **Headless** - Customizable UI with optional render props ## Installation ```bash npm install @renown/sdk # or yarn add @renown/sdk # or pnpm add @renown/sdk ``` ## Quick Start ### 1. Wrap Your App with RenownUserProvider The RenownUserProvider automatically initializes the SDK - no manual setup needed! ```typescript // app/layout.tsx or app.tsx export default function RootLayout({ children }) { return ( {children} ) } ``` Optional: Customize with loading/error components: ```typescript

Initializing...

} errorComponent={(error, retry) => (

Failed to initialize

{error.message}

)} > {children}
``` ### 2. Use Authentication in Components ```typescript // components/Header.tsx export function Header() { return (

My App

) } ``` Or use the `useUser` hook for custom implementations: ```typescript // components/CustomAuth.tsx export function CustomAuth() { const { user, loginStatus, openRenown, logout } = useUser() if (user) { return (

Welcome, {user.name || user.did}

) } return } ``` ## Documentation Structure - **[Authentication Guide](../docs/docs/01-Authentication.md)** - Comprehensive guide to implementing authentication - **[API Reference](../docs/docs/02-APIReference.md)** - Complete API documentation ## Key Concepts ### RenownUserProvider The `` component is the central authentication provider that manages auth state across your application. It must wrap your application to provide authentication context. ### useUser Hook The `useUser()` hook provides access to authentication state and methods throughout your application. It can only be used within a ``. The hook returns `connectCrypto` and `renown` instances for advanced use cases. ### Session Management The SDK automatically manages user sessions using sessionStorage, allowing users to stay logged in across page reloads within the same browser session. ### Profile Data User profile data is automatically fetched from the Renown API after successful authentication, enriching the user object with display name, avatar, and other profile information. ### UI Component The SDK provides a ready-to-use component: - **RenownAuthButton** - Smart component that adapts to auth state (shows login button or user info) This component is optional - you can build your own UI using the `useUser` hook. ## Examples ### Next.js App Router ```typescript // app/layout.tsx - Minimal setup export default function RootLayout({ children }) { return ( {children} ) } // components/Navbar.tsx - Using RenownAuthButton component 'use client' export function Navbar() { return ( ) } // app/profile/page.tsx - Using useUser hook 'use client' export default function ProfilePage() { const { user, openRenown, logout } = useUser() if (!user) { return (

Login Required

) } return (

Profile

DID: {user.did}

Name: {user.name}

{user.avatar && Avatar}
) } ``` ### React SPA ```typescript // main.tsx ReactDOM.createRoot(document.getElementById('root')!).render( ) // App.tsx - Using RenownAuthButton function App() { return (

My App

) } // Or custom with useUser hook function CustomApp() { const { user, openRenown } = useUser() return (
{user ? (

Welcome {user.name}

) : ( )}
) } ``` ## Configuration ### RenownUserProvider Props Customize the Renown SDK initialization: ```typescript } // Custom loading screen errorComponent={(error, retry) => } // Custom error screen > ``` All props are optional - RenownUserProvider uses sensible defaults. ### Environment Variables You can use environment variables for configuration: ```typescript ``` ```bash # .env NEXT_PUBLIC_RENOWN_URL=https://www.renown.id ``` ## Troubleshooting ### Context Error **Error:** `useUser must be used within a RenownUserProvider` **Solution:** Ensure your component is wrapped by ``: ```typescript {/* ✅ Can use useUser */} ``` ### Custom Renown URL If you need to use a different Renown instance: ```typescript ``` ## Resources - [GitHub Repository](https://github.com/powerhouse-inc/powerhouse) - [NPM Package](https://www.npmjs.com/package/@renown/sdk) - [Renown Portal](https://www.renown.id) ## License AGPL-3.0-only --- ## Authentication Guide > Source: https://academy.vetra.io/academy/Reference/Authorization/renown-sdk/Authentication Comprehensive guide to implementing authentication with the Renown SDK. ## Table of Contents - [Overview](#overview) - [Authentication Flow](#authentication-flow) - [Setup](#setup) - [Implementation](#implementation) - [Advanced Patterns](#advanced-patterns) - [Security Considerations](#security-considerations) ## Overview The Renown SDK provides a complete authentication system that: 1. **Auto-initializes** the Renown SDK and ConnectCrypto (zero configuration!) 2. **Manages** user sessions across page reloads 3. **Handles** authentication redirects from Renown portal 4. **Fetches** user profile data automatically 5. **Provides** React hooks, components, and context for easy integration ## Authentication Flow ### 1. Initial Load ``` User visits app ↓ RenownUserProvider initializes ↓ Check sessionStorage for existing session ↓ ├─ Session found → Restore user → Authorized └─ No session → Check URL params → Initialize SDK → Not Authorized ``` ### 2. Login Flow ``` User clicks "Login" ↓ openRenown() called ↓ Redirect to Renown Portal ↓ User authenticates ↓ Redirect back to app with DID ↓ handleRenownReturn() processes ↓ login() called ↓ Fetch user profile ↓ Store in sessionStorage ↓ Update auth state → Authorized ``` ### 3. Session Restoration ``` User refreshes page ↓ RenownUserProvider checks sessionStorage ↓ Valid session found ↓ Fetch latest profile data ↓ Restore auth state → Authorized ``` ## Setup ### Step 1: Wrap Your App with RenownUserProvider The RenownUserProvider automatically initializes the Renown SDK - no manual setup required! ```typescript // app/layout.tsx (Next.js App Router) export default function RootLayout({ children, }: { children: React.ReactNode }) { return ( {children} ) } ``` That's it! The SDK is now initialized and ready to use. ### Optional: Customize Configuration You can customize the Renown URL, network, and chain: ```typescript {children} ``` ### Optional: Add Loading/Error Screens Provide custom UI for initialization states: ```typescript

Initializing authentication...

} errorComponent={(error, retry) => (

Authentication Failed

{error.message}

)} > {children}
``` ## Implementation ### Using the RenownAuthButton Component The simplest way to add authentication is to use the built-in `RenownAuthButton` component: ```typescript 'use client' export function Header() { return (

My App

) } ``` ### Custom Login Component with useUser Hook For full control, build your own component using the `useUser` hook: ```typescript 'use client' export function CustomRenownAuthButton() { const { user, loginStatus, isLoading, openRenown, logout } = useUser() if (isLoading) { return ( ) } if (loginStatus === 'authorized' && user) { return (
{user.avatar && ( {user.name )} {user.name || user.did.slice(0, 15)}...
) } return ( ) } ``` ### Protected Route Component ```typescript 'use client' export function ProtectedRoute({ children }: { children: React.ReactNode }) { const { user, loginStatus, isLoading, openRenown } = useUser() const router = useRouter() useEffect(() => { if (!isLoading && loginStatus !== 'authorized') { // Redirect to login or show login prompt router.push('/login') } }, [isLoading, loginStatus, router]) if (isLoading) { return
Loading...
} if (loginStatus !== 'authorized' || !user) { return (

Authentication Required

Please log in to access this page

) } return <>{children} } ``` ### User Profile Display ```typescript 'use client' export function UserProfile() { const { user, logout } = useUser() if (!user) return null return (
{user.avatar && ( {user.name )}

{user.name || 'Anonymous User'}

DID
{user.did}
{user.ethAddress && ( <>
Ethereum Address
{user.ethAddress}
)} {user.email && ( <>
Email
{user.email}
)}
) } ``` ## Advanced Patterns ### Conditional Navigation Based on Auth ```typescript 'use client' export function Navigation() { const { user, loginStatus } = useUser() const isAuthorized = loginStatus === 'authorized' return ( ) } ``` ### Auth State Listener ```typescript "use client"; export function AuthStateListener() { const { user, loginStatus } = useUser(); const router = useRouter(); useEffect(() => { if (loginStatus === "authorized" && user) { // User just logged in toast.success(`Welcome back, ${user.name || "User"}!`); // Track analytics analytics.identify(user.did, { name: user.name, ethAddress: user.ethAddress, }); // Redirect to dashboard router.push("/dashboard"); } }, [loginStatus, user, router]); useEffect(() => { if (loginStatus === "not-authorized") { // User logged out toast.info("You have been logged out"); // Clear analytics analytics.reset(); // Redirect to home router.push("/"); } }, [loginStatus, router]); return null; // This is a listener component } ``` ### Custom Auth Hook with Additional Logic ```typescript "use client"; interface ExtendedAuthState { user: User | null; isAuthenticated: boolean; isLoading: boolean; hasCompletedProfile: boolean; login: () => void; logout: () => Promise; } export function useUser(): ExtendedAuthState { const auth = useRenownAuth(); const [hasCompletedProfile, setHasCompletedProfile] = useState(false); useEffect(() => { if (auth.user) { // Check if user has completed their profile const isComplete = !!( auth.user.name && auth.user.avatar && auth.user.email ); setHasCompletedProfile(isComplete); } else { setHasCompletedProfile(false); } }, [auth.user]); return { user: auth.user, isAuthenticated: auth.loginStatus === "authorized", isLoading: auth.isLoading, hasCompletedProfile, login: auth.openRenown, logout: auth.logout, }; } ``` ### Role-Based Access Control ```typescript 'use client' interface RBACProps { children: ReactNode allowedRoles?: string[] fallback?: ReactNode } export function RoleBasedAccess({ children, allowedRoles = [], fallback =
Access Denied
}: RBACProps) { const { user, loginStatus } = useUser() if (loginStatus !== 'authorized' || !user) { return fallback } // Check user roles (you'd fetch this from your backend) const userRoles = getUserRoles(user.did) // Implement this const hasAccess = allowedRoles.length === 0 || allowedRoles.some(role => userRoles.includes(role)) return hasAccess ? <>{children} : fallback } // Usage function AdminPanel() { return (

Admin Panel

{/* Admin content */}
) } ``` ## Security Considerations ### 1. Token Storage The SDK stores session data in `sessionStorage` (not `localStorage`) for security: - ✅ Session data clears when tab closes - ✅ Not accessible across tabs - ✅ Not persisted across browser sessions - ✅ Protected from XSS via httpOnly (for API tokens) ### 2. DID Validation Always validate DIDs before processing: ```typescript function isValidDID(did: string): boolean { // Must start with did:pkh: if (!did.startsWith("did:pkh:")) return false; // Must have correct number of parts const parts = did.split(":"); if (parts.length !== 5) return false; // Validate ethereum address format const address = parts[4]; if (!address.match(/^0x[a-fA-F0-9]{40}$/)) return false; return true; } ``` ### 3. Secure Communication Always use HTTPS for Renown URLs: ```typescript const RENOWN_URL = process.env.NEXT_PUBLIC_RENOWN_URL; if (RENOWN_URL && !RENOWN_URL.startsWith("https://")) { console.warn("WARNING: Renown URL should use HTTPS"); } ``` ### 4. Session Timeout Implement session timeout for security: ```typescript const SESSION_TIMEOUT = 24 * 60 * 60 * 1000; // 24 hours function isSessionValid(timestamp: number): boolean { const now = Date.now(); const age = now - timestamp; return age < SESSION_TIMEOUT; } ``` ### 5. Server-Side Verification **Never trust client-side auth alone**. Always verify on the server: ```typescript // Server-side API route export async function GET(request: Request) { const authHeader = request.headers.get("authorization"); if (!authHeader) { return new Response("Unauthorized", { status: 401 }); } // Verify the JWT/credential with Renown const isValid = await verifyRenownCredential(authHeader); if (!isValid) { return new Response("Invalid credentials", { status: 403 }); } // Proceed with authorized request return Response.json({ data: "Protected data" }); } ``` ## Best Practices ### 1. Handle Loading States Always handle loading states to provide good UX: ```typescript function MyComponent() { const { user, isLoading, loginStatus } = useUser() if (isLoading) { return // Show skeleton/spinner } // Now safe to use user/loginStatus } ``` ### 2. Graceful Degradation Provide fallbacks for unauthenticated users: ```typescript function FeatureSection() { const { user } = useUser() return (
{user ? ( ) : ( )}
) } ``` ### 3. Cleanup on Unmount Clean up subscriptions and listeners: ```typescript useEffect(() => { const handleAuthChange = () => { // Handle auth changes }; // Subscribe to auth events const unsubscribe = subscribeToAuthEvents(handleAuthChange); return () => { unsubscribe(); // Cleanup }; }, []); ``` ### 4. Error Boundaries Wrap auth components in error boundaries: ```typescript }> ``` ## Troubleshooting ### Issue: Auth state not updating **Cause:** Component not re-rendering when auth changes **Solution:** Ensure you're using `useUser()` hook, not accessing `window.renown` directly ```typescript // ❌ Wrong const user = window.renown?.user; // ✅ Correct const { user } = useUser(); ``` ### Issue: Session not persisting **Cause:** SessionStorage might be disabled or cleared **Solution:** Check browser settings and handle gracefully ```typescript try { SessionStorageManager.setUserData(data); } catch (error) { console.warn("SessionStorage not available:", error); // Fallback to in-memory storage } ``` ### Issue: Multiple login popups **Cause:** `openRenown()` called multiple times **Solution:** Debounce the login button ```typescript const handleLogin = useCallback( debounce(() => { openRenown(); }, 1000), [openRenown], ); ``` ## Next Steps - Read the [API Reference](../docs/docs/02-APIReference.md) for detailed documentation --- ## API Reference > Source: https://academy.vetra.io/academy/Reference/Authorization/renown-sdk/APIReference Complete API reference for the Renown SDK. ## Table of Contents - [Components](#components) - [Hooks](#hooks) - [Functions](#functions) - [Types](#types) - [Classes](#classes) - [Constants](#constants) ## Components ### `RenownUserProvider` Central authentication provider that automatically initializes the Renown SDK. #### Props ```typescript interface RenownUserProviderProps { children: React.ReactNode; renownUrl?: string; networkId?: string; chainId?: string; loadingComponent?: React.ReactNode; errorComponent?: (error: Error, retry: () => void) => React.ReactNode; } ``` | Prop | Type | Default | Description | | ------------------ | ----------------------------- | ------------------------- | --------------------------------------- | | `children` | `React.ReactNode` | - | **Required.** Child components | | `renownUrl` | `string` | `'https://www.renown.id'` | Renown service URL | | `networkId` | `string` | `'eip155'` | Network identifier | | `chainId` | `string` | `'1'` | Chain identifier | | `loadingComponent` | `React.ReactNode` | undefined | Custom loading UI during initialization | | `errorComponent` | `(error, retry) => ReactNode` | undefined | Custom error UI if initialization fails | #### Example **Basic usage (auto-initializes with defaults):** ```typescript ``` **With custom configuration:** ```typescript

Initializing...

} errorComponent={(error, retry) => (

Failed to initialize

{error.message}

)} >
``` #### Behavior - **Automatically initializes** Renown SDK and ConnectCrypto on mount - Creates global `window.renown` and `window.connectCrypto` instances - Checks sessionStorage for existing sessions - Handles Renown authentication redirects - Shows `loadingComponent` during initialization (if provided) - Shows `errorComponent` if initialization fails (if provided) - If no custom components provided, renders children immediately - Provides auth context to all children --- ### `RenownAuthButton` Smart button component that adapts based on authentication state. #### Props ```typescript interface RenownAuthButtonProps { className?: string; profileBaseUrl?: string; renderAuthenticated?: (props: RenownAuthButtonRenderProps) => React.ReactNode; renderUnauthenticated?: (props: { openRenown: () => void; isLoading: boolean; }) => React.ReactNode; renderLoading?: () => React.ReactNode; showUsername?: boolean; showLogoutButton?: boolean; logoutButtonText?: string; } ``` | Prop | Type | Default | Description | | ----------------------- | ---------- | --------------------------------- | ---------------------------- | | `className` | `string` | `""` | Custom CSS class | | `profileBaseUrl` | `string` | `"https://www.renown.id/profile"` | Base URL for profile | | `renderAuthenticated` | `function` | Default renderer | Custom authenticated state | | `renderUnauthenticated` | `function` | Default renderer | Custom unauthenticated state | | `renderLoading` | `function` | Default renderer | Custom loading state | | `showUsername` | `boolean` | `true` | Show username next to avatar | | `showLogoutButton` | `boolean` | `false` | Show logout button | | `logoutButtonText` | `string` | `"Logout"` | Logout button text | #### Example ```typescript // Basic usage // Custom rendering (
{user.name}
)} renderUnauthenticated={({ openRenown }) => ( )} /> ``` --- ### `RenownLoginButton` A login button with Renown branding. By default, clicking the button triggers login directly. Optionally shows a popover with connect option. #### Props ```typescript interface RenownLoginButtonProps { onLogin: (() => void) | undefined; darkMode?: boolean; style?: CSSProperties; className?: string; renderTrigger?: (props: { onMouseEnter: () => void; onMouseLeave: () => void; isLoading: boolean; }) => ReactNode; showPopover?: boolean; } ``` | Prop | Type | Default | Description | | --------------- | ------------------------- | ------- | ----------------------------------------------------------------------- | | `onLogin` | `() => void \| undefined` | - | Callback when login is requested | | `darkMode` | `boolean` | `false` | Enable dark mode styling | | `style` | `CSSProperties` | - | Custom styles for the button | | `className` | `string` | - | Custom class name | | `renderTrigger` | `function` | - | Custom render function for the trigger button | | `showPopover` | `boolean` | `false` | Show a popover with connect option instead of triggering login directly | #### Example ```typescript // Direct login (default) - clicks trigger onLogin immediately // With popover - shows hover popover with "Connect" button // Dark mode // Custom trigger ( )} /> ``` --- ## Hooks ### `useUser()` Access authentication state and methods. #### Returns ```typescript interface RenownUserContextValue { user: User | null; loginStatus: LoginStatus; isLoading: boolean; isInitialized: boolean; login: (userDid?: string) => Promise; logout: () => Promise; openRenown: () => void; connectCrypto: IConnectCrypto | null; renown: IRenown | null; } ``` | Property | Type | Description | | --------------- | ------------------------ | --------------------------------------------------- | | `user` | `User \| null` | Current authenticated user or null | | `loginStatus` | `LoginStatus` | Current authentication status | | `isLoading` | `boolean` | Whether an auth operation is in progress | | `isInitialized` | `boolean` | Whether the auth system has initialized | | `login` | `function` | Authenticate with optional DID | | `logout` | `function` | Log out current user | | `openRenown` | `function` | Open Renown authentication portal | | `connectCrypto` | `IConnectCrypto \| null` | ConnectCrypto instance for cryptographic operations | | `renown` | `IRenown \| null` | Renown SDK instance | #### Example ```typescript function MyComponent() { const { user, loginStatus, isLoading, login, logout, openRenown, connectCrypto, renown } = useUser() if (isLoading) return
Loading...
if (!user) return return } ``` #### Throws Throws an error if used outside of ``: ``` Error: useUser must be used within a RenownUserProvider ``` --- ## Functions ### `initRenown()` Initialize the Renown SDK. #### Signature ```typescript function initRenown( did: string, networkId: string, renownUrl: string, ): Promise; ``` #### Parameters | Parameter | Type | Description | | ----------- | -------- | ----------------------------------- | | `did` | `string` | Decentralized identifier (DID) | | `networkId` | `string` | Network identifier (e.g., 'eip155') | | `renownUrl` | `string` | Renown service URL | #### Returns `Promise` - Initialized Renown instance #### Example ```typescript const renown = await initRenown( "did:pkh:eip155:1:0x123...", "eip155", "https://www.renown.id", ); ``` --- ### `login()` Authenticate a user with Renown. #### Signature ```typescript function login( userDid: string | undefined, renown: IRenown | undefined, connectCrypto: IConnectCrypto | undefined, ): Promise; ``` #### Parameters | Parameter | Type | Description | | --------------- | ----------------------------- | -------------------------- | | `userDid` | `string \| undefined` | User's DID to authenticate | | `renown` | `IRenown \| undefined` | Renown instance | | `connectCrypto` | `IConnectCrypto \| undefined` | ConnectCrypto instance | #### Returns `Promise` - Authenticated user or undefined #### Side Effects - Stores user session in sessionStorage - Fetches user profile data - Updates auth state #### Example ```typescript const user = await login( "did:pkh:eip155:1:0x123...", window.renown, window.connectCrypto, ); ``` --- ### `logout()` Log out the current user. #### Signature ```typescript function logout(): Promise; ``` #### Returns `Promise` #### Side Effects - Clears sessionStorage - Calls renown.logout() - Removes JWT handler #### Example ```typescript await logout(); ``` --- ### `openRenown()` Open the Renown authentication portal. #### Signature ```typescript function openRenown(): void; ``` #### Returns `void` #### Behavior - Constructs authentication URL with current DID - Adds network and chain parameters - Sets return URL to current location - Redirects to Renown portal #### Example ```typescript function MyLoginButton() { return } // Or use the built-in RenownAuthButton component function Header() { return } ``` --- ### `handleRenownReturn()` Process authentication redirect from Renown. #### Signature ```typescript function handleRenownReturn(): Promise; ``` #### Returns `Promise` #### Behavior - Checks URL for authentication parameters - Extracts user DID from query string - Calls login with the DID - Cleans up URL parameters #### Example ```typescript // Called automatically by UserProvider useEffect(() => { handleRenownReturn(); }, []); ``` --- ### `fetchProfileDataForUser()` Fetch user profile data from Renown API. #### Signature ```typescript function fetchProfileDataForUser(user: User): Promise; ``` #### Parameters | Parameter | Type | Description | | --------- | ------ | --------------------------------------- | | `user` | `User` | User object to enrich with profile data | #### Returns `Promise` - User with profile data #### Behavior - Extracts ETH address from user's DID - Calls Renown profile API - Enriches user object with profile data (name, avatar, etc.) - Returns original user if profile not found #### Example ```typescript const userWithProfile = await fetchProfileDataForUser(user); console.log(userWithProfile.name); // Display name console.log(userWithProfile.avatar); // Avatar URL ``` --- ### `reauthenticateFromSession()` Restore authentication from stored session. #### Signature ```typescript function reauthenticateFromSession(): Promise; ``` #### Returns `Promise` - Restored user or null #### Behavior - Checks for stored session in sessionStorage - Calls login with stored DID - Fetches fresh profile data - Returns null if session invalid or expired #### Example ```typescript const user = await reauthenticateFromSession(); if (user) { console.log("Session restored for:", user.did); } ``` --- ### `extractEthAddressFromDid()` Extract Ethereum address from a DID. #### Signature ```typescript function extractEthAddressFromDid(did: string): string | null; ``` #### Parameters | Parameter | Type | Description | | --------- | -------- | ---------------------------------------------- | | `did` | `string` | DID string (e.g., 'did:pkh:eip155:1:0x123...') | #### Returns `string | null` - Ethereum address or null if invalid #### Example ```typescript const address = extractEthAddressFromDid("did:pkh:eip155:1:0x1234..."); console.log(address); // '0x1234...' ``` --- ## Types ### `User` Represents an authenticated user. ```typescript interface User { did: string; // Decentralized identifier address: string; // Ethereum address name?: string; // Display name from profile email?: string; // Email address avatar?: string; // Avatar image URL ethAddress?: string; // Ethereum address (duplicate of address) } ``` --- ### `LoginStatus` Authentication status enumeration. ```typescript type LoginStatus = | "initial" // Not yet checked | "checking" // Currently checking auth | "authorized" // User is authenticated | "not-authorized"; // User is not authenticated ``` --- ### `RenownUserContextValue` Type for the authentication context value. ```typescript interface RenownUserContextValue { user: User | null; loginStatus: LoginStatus; isLoading: boolean; isInitialized: boolean; login: (userDid?: string) => Promise; logout: () => Promise; openRenown: () => void; connectCrypto: IConnectCrypto | null; renown: IRenown | null; } ``` --- ### `IRenown` Interface for the Renown instance. ```typescript interface IRenown { user: User | undefined | (() => Promise); login: (did: string) => Promise; logout: () => Promise; on: (event: string, handler: Function) => Unsubscribe; } ``` --- ### `IConnectCrypto` Interface for the ConnectCrypto instance. ```typescript interface IConnectCrypto { did: () => Promise; // Additional methods... } ``` --- ## Classes ### `ConnectCrypto` Manages cryptographic operations and DID generation. #### Constructor ```typescript constructor(keyStorage: IKeyStorage) ``` #### Parameters | Parameter | Type | Description | | ------------ | ------------- | -------------------------- | | `keyStorage` | `IKeyStorage` | Key storage implementation | #### Methods ##### `did()` Get the DID for the current key. ```typescript async did(): Promise ``` **Returns:** `Promise` - The DID **Example:** ```typescript const connectCrypto = new ConnectCrypto(new BrowserKeyStorage()); const did = await connectCrypto.did(); console.log(did); // 'did:pkh:eip155:1:0x...' ``` --- ### `BrowserKeyStorage` Browser-based key storage using IndexedDB. #### Constructor ```typescript constructor(); ``` #### Usage ```typescript const keyStorage = new BrowserKeyStorage(); const connectCrypto = new ConnectCrypto(keyStorage); ``` --- ### `SessionStorageManager` Manages user session persistence. #### Static Methods ##### `setUserData()` Store user session data. ```typescript static setUserData(data: { user: User userDid: string loginStatus: LoginStatus timestamp: number }): void ``` **Example:** ```typescript SessionStorageManager.setUserData({ user: currentUser, userDid: currentUser.did, loginStatus: "authorized", timestamp: Date.now(), }); ``` ##### `getUserData()` Retrieve stored user session. ```typescript static getUserData(): { user: User userDid: string loginStatus: LoginStatus timestamp: number } | null ``` **Returns:** Session data or null **Example:** ```typescript const session = SessionStorageManager.getUserData(); if (session) { console.log("Found session for:", session.user.did); } ``` ##### `clearUserData()` Clear stored session. ```typescript static clearUserData(): void ``` **Example:** ```typescript SessionStorageManager.clearUserData(); ``` ##### `isUserDataValid()` Check if session data is valid. ```typescript static isUserDataValid(data: { user: User userDid: string loginStatus: LoginStatus timestamp: number }): boolean ``` **Returns:** `boolean` - Whether session is valid **Example:** ```typescript const data = SessionStorageManager.getUserData(); if (data && SessionStorageManager.isUserDataValid(data)) { // Session is valid } ``` ##### `getStoredUserDid()` Get stored user DID. ```typescript static getStoredUserDid(): string | null ``` **Returns:** `string | null` - Stored DID or null --- ## Constants ### `RENOWN_URL` Default Renown service URL. ```typescript const RENOWN_URL: string = "https://www.renown.id"; ``` --- ### `RENOWN_NETWORK_ID` Default network identifier. ```typescript const RENOWN_NETWORK_ID: string = "eip155"; ``` --- ### `RENOWN_CHAIN_ID` Default chain identifier. ```typescript const RENOWN_CHAIN_ID: string = "1"; ``` --- ## Global Window Extensions The SDK extends the global `Window` interface: ```typescript declare global { interface Window { renown?: IRenown; connectCrypto?: IConnectCrypto; reactor?: { setGenerateJwtHandler: ( handler: (driveUrl: string) => Promise, ) => void; removeJwtHandler: () => void; }; } } ``` ### `window.renown` Global Renown instance after initialization. **Usage:** ```typescript if (window.renown) { const user = await window.renown.login("did:pkh:..."); } ``` ### `window.connectCrypto` Global ConnectCrypto instance after initialization. **Usage:** ```typescript if (window.connectCrypto) { const did = await window.connectCrypto.did(); } ``` --- ## Error Handling ### Common Errors #### `useUser must be used within a RenownUserProvider` **Cause:** Using `useUser()` outside of `` **Solution:** Wrap your component tree with `` ```typescript {/* ✅ Can use useUser */} ``` #### `Invalid DID format` **Cause:** DID doesn't match expected format `did:pkh:networkId:chainId:address` **Solution:** Ensure DID is properly formatted ```typescript // ✅ Valid "did:pkh:eip155:1:0x1234567890123456789012345678901234567890"; // ❌ Invalid "did:1234567890123456789012345678901234567890"; ``` #### `Renown or ConnectCrypto not available` **Cause:** SDK initialization failed **Solution:** The RenownUserProvider automatically initializes the SDK. If you see this error: 1. Check that `` is mounted 2. Check browser console for initialization errors 3. Verify network connectivity to Renown service 4. Try providing an `errorComponent` prop to see detailed error messages ```typescript (

Init failed: {error.message}

)} >
``` --- ## TypeScript Support The SDK is fully typed. Import types as needed: ```typescript User, LoginStatus, RenownUserContextValue, IRenown, IConnectCrypto, } from "@renown/sdk"; ``` --- ## Version Compatibility | SDK Version | React Version | TypeScript Version | | ----------- | ------------- | ------------------ | | 5.x | 18.x - 19.x | 4.5+ | | 4.x | 18.x | 4.5+ | --- ## Related Documentation - [Authentication Guide](../docs/docs/01-Authentication.md) - Comprehensive auth implementation guide --- ## CLI Identity & Authentication > Source: https://academy.vetra.io/academy/Reference/Authorization/renown-sdk/CLIIdentity This guide covers how to authenticate the Powerhouse CLI with your Ethereum identity and use that identity in the Switchboard for authenticated operations with remote services. ## Overview The Powerhouse CLI uses **Renown** for identity management. When you run `ph login`, the CLI: 1. Generates a cryptographic keypair (ECDSA P-256) stored locally 2. Creates a DID (Decentralized Identifier) in `did:key:...` format 3. Opens your browser to authorize this DID to act on behalf of your Ethereum address 4. Stores the authorization credentials for future use This enables the CLI and Switchboard to authenticate with remote drives and services using your Ethereum identity. ## Quick Start ```bash # 1. Login with your Ethereum wallet ph login # 2. Start switchboard with your identity ph switchboard --use-identity ``` ## The Login Command ### Basic Usage ```bash # Authenticate with Renown ph login # Check your authentication status ph login --status # Show only your CLI's DID (useful for scripts) ph login --show-did # Logout and clear credentials ph logout ``` ### How It Works ``` ┌──────────────────────────────────────────────────────────────────────┐ │ ph login │ ├──────────────────────────────────────────────────────────────────────┤ │ │ │ 1. CLI generates/loads keypair (.keypair.json) │ │ └─► Creates DID: did:key:zDnae... │ │ │ │ 2. Opens browser to Renown portal │ │ └─► URL includes CLI's DID │ │ │ │ 3. User connects wallet & signs authorization │ │ └─► "I authorize did:key:zDnae... to act on my behalf" │ │ │ │ 4. Renown issues credential │ │ └─► Links CLI DID to user's ETH address │ │ │ │ 5. CLI stores credentials (.auth.json in project dir) │ │ └─► Ready to authenticate with remote services │ │ │ └──────────────────────────────────────────────────────────────────────┘ ``` ### Output Example ``` $ ph login Initializing cryptographic identity... CLI DID: did:key:zDnaej4f3d83mmCodYjZyHzUKDSt2dGVKjzD8dd22AS83GtMo Opening browser for authentication... Session ID: a1b2c3d4... Waiting for authentication in browser (timeout in 300 seconds) Please connect your wallet and authorize this CLI to act on your behalf. Waiting................. Successfully authenticated! ETH Address: 0x1234...abcd User DID: did:pkh:eip155:1:0x1234...abcd CLI DID: did:key:zDnaej4f3d83mmCodYjZyHzUKDSt2dGVKjzD8dd22AS83GtMo The CLI can now act on behalf of your Ethereum identity. ``` ## Storage Locations All identity files are stored **per-project** in the current working directory: ``` your-project/ ├── .keypair.json # CLI's cryptographic keypair (did:key identity) ├── .auth.json # Authentication credentials (ETH address, User DID, etc.) ├── powerhouse.config.json └── ... ``` This means each project can have its own identity and credentials, which is useful for: - Different projects requiring different identities - Team members using the same machine - Separating development and production identities - Isolating credentials between projects ### Environment Variable For CI/CD environments, provide the keypair via environment variable: ```bash # Export keypair as JSON export PH_RENOWN_PRIVATE_KEY='{"publicKey":{"kty":"EC",...},"privateKey":{"kty":"EC",...}}' # Now ph login --show-did will use this keypair ph login --show-did ``` ## Using Identity in Switchboard ### Starting with Identity ```bash # Enable identity using keypair from ph login ph switchboard --use-identity # Output includes identity DID: # ➜ Switchboard: http://localhost:4001 # ➜ Identity: did:key:zDnaej4f3d83mmCodYjZyHzUKDSt2dGVKjzD8dd22AS83GtMo ``` ### Identity Options | Option | Description | | ----------------------- | ------------------------------------- | | `--use-identity` | Enable identity using `.keypair.json` | | `--keypair-path ` | Use a custom keypair file | | `--require-identity` | Fail if no keypair exists | ### Requiring Identity Use `--require-identity` when the switchboard must have a valid identity: ```bash # Fails if no keypair exists (user must run ph login first) ph switchboard --require-identity # Error if not logged in: # Error: Identity required but failed to initialize. Run "ph login" first. ``` ### Custom Keypair Path ```bash # Use a specific keypair file ph switchboard --use-identity --keypair-path /path/to/my-keypair.json ``` ## How the Switchboard Uses Identity When the Switchboard starts with identity enabled, it can: 1. **Authenticate with Remote Drives**: Generate bearer tokens for API requests 2. **Sign Operations**: Cryptographically sign document operations 3. **Identify Itself**: Present its DID to remote services ### Getting Bearer Tokens The Switchboard can generate bearer tokens for authenticated API calls: ```typescript // Get the switchboard's DID const did = await getConnectDid(); console.log("Switchboard DID:", did); // Get a bearer token for a remote drive const token = await getBearerToken("https://remote.drive.example.com"); console.log("Bearer Token:", token); // Use in API requests const response = await fetch("https://remote.drive.example.com/api/documents", { headers: { Authorization: `Bearer ${token}`, }, }); ``` ## Security Considerations ### Identity Files Protection The `.keypair.json` and `.auth.json` files contain sensitive data. Protect them: ```bash # Add to .gitignore echo ".keypair.json" >> .gitignore echo ".auth.json" >> .gitignore # Set restrictive permissions (Unix) chmod 600 .keypair.json .auth.json ``` ### CI/CD Best Practices For automated environments: 1. **Use environment variables** instead of files 2. **Store secrets securely** (GitHub Secrets, AWS Secrets Manager, etc.) 3. **Rotate keys** periodically 4. **Limit scope** - use separate identities for different environments ```yaml # GitHub Actions example jobs: deploy: runs-on: ubuntu-latest steps: - uses: actions/checkout@v4 - name: Setup identity env: PH_RENOWN_PRIVATE_KEY: ${{ secrets.PH_KEYPAIR }} run: | ph switchboard --use-identity & ``` ### Authorization Scope When you authorize the CLI's DID: - It can act on behalf of your Ethereum address - It can authenticate with services that trust Renown - It **cannot** sign Ethereum transactions or access your wallet ## Troubleshooting ### "No existing keypair found" ```bash $ ph switchboard --require-identity Error: Identity required but failed to initialize. Run "ph login" first. ``` **Solution**: Run `ph login` to create a keypair: ```bash ph login # Then retry ph switchboard --require-identity ``` ### "Authentication timed out" The browser authentication didn't complete in time. **Solutions**: - Increase timeout: `ph login --timeout 600` - Check browser opened correctly - Ensure you completed the wallet connection ### Different DID than expected Each project directory has its own `.keypair.json`. **Check current DID**: ```bash ph login --show-did ``` **Use specific keypair**: ```bash ph switchboard --use-identity --keypair-path ~/.shared-keypair.json ``` ## API Reference ### Login Options | Option | Type | Default | Description | | -------------- | ------- | ------------------------------ | ---------------------- | | `--renown-url` | string | `https://renown.powerhouse.io` | Renown server URL | | `--timeout` | number | `300` | Auth timeout (seconds) | | `--logout` | boolean | `false` | Clear credentials | | `--status` | boolean | `false` | Show auth status | | `--show-did` | boolean | `false` | Print DID only | ### Switchboard Identity Options | Option | Type | Default | Description | | -------------------- | ------- | --------------- | -------------------- | | `--use-identity` | boolean | `false` | Enable identity | | `--keypair-path` | string | `.keypair.json` | Keypair file path | | `--require-identity` | boolean | `false` | Fail without keypair | ### Exported Functions (Switchboard) ```typescript // Get the ConnectCrypto instance function getConnectCrypto(): IConnectCrypto | null; // Get the switchboard's DID async function getConnectDid(): Promise; // Get a bearer token for a remote URL async function getBearerToken( driveUrl: string, address?: string, refresh?: boolean, ): Promise; ``` ## Related Documentation - [Renown SDK Overview](../docs/docs/00-Overview.md) - Introduction to Renown - [Authentication Guide](../docs/docs/01-Authentication.md) - Web app authentication - [API Reference](../docs/docs/02-APIReference.md) - Full SDK reference --- ## Powerhouse CLI > Source: https://academy.vetra.io/academy/Reference/CLITooling/PowerhouseCLI ### Installing the Powerhouse CLI **TIP:** The **Powerhouse CLI tool** is the only essential tool to install on this page. Install it with the command below. You can find all of the commands on this page, similar to what would displayed when using ph --help or ph _command_ --help. Use the table of content or the search function to find what you are looking for. The Powerhouse CLI (`ph-cmd`) is a command-line interface tool that provides essential commands for managing Powerhouse Vetra projects. You can get access to the Powerhouse ecosystem tools by installing them globally. ```bash pnpm install -g ph-cmd ``` {/* AUTO-GENERATED-CLI-COMMANDS-START */} {/* This content is automatically generated. Do not edit directly. */} ## Quick Reference | Command | Description | Example | |---------|-------------|---------| | `ph init` | Initialize a new project | `ph init my-project --pnpm` | | `ph use` | Switch to a release version | `ph use staging` | | `ph update` | Update dependencies to latest | `ph update` | | `ph setup-globals` | Initialize global project | `ph setup-globals my-globals` | | `ph use-local` | Use local monorepo dependencies | `ph use-local ../powerhouse` | --- ### ph-cmd Commands - [Init](#init) - [Use](#use) - [Update](#update) - [Setup Globals](#setup-globals) - [Use Local](#use-local) ## Init Initialize a new project --- ## Parameters ### Arguments **Name** - The name of your project. A new directory will be created in your current directory with this name. - Usage: `[name]` ### Options **Name** - The name of your project. A new directory will be created in your current directory with this name. - Usage: `--name, -n ` **Package Manager** - Specify the package manager to use for your project. Can be one of: `npm`, `pnpm`, `yarn`, or `bun`. Defaults to your environment package manager. - Usage: `--package-manager, -p ` **Tag** - Specify the release tag to use for your project. Can be one of: "latest", "staging", "dev", or "rc". - Usage: `--tag, -t ` **Version** - Specify the exact semver release version to use for your project. - Usage: `--version, -v ` **Remote Drive** - Remote drive identifier. - Usage: `--remote-drive, -r ` **Clone** - Path to an existing scaffolded project to clone instead of resolving deps from scratch. Install runs offline from the cloned project's pnpm-lock.yaml (requires --pnpm; --version/--tag are ignored). - Usage: `--clone ` ### Flags **Npm** - Use 'npm' as package manager - Usage: `--npm` **Pnpm** - Use 'pnpm' as package manager - Usage: `--pnpm` **Yarn** - Use 'yarn' as package manager - Usage: `--yarn` **Bun** - Use 'bun' as package manager - Usage: `--bun` **Dev** - Use the `dev` release tag. - Usage: `--dev, -d` **Staging** - Use the `staging` release tag. - Usage: `--staging, -s` **Rc** - Use the `rc` release tag. - Usage: `--rc` **Debug** - Log arguments passed to this command - Usage: `--debug` **Help** - show help - Usage: `--help, -h` ## Use Specify the release version of Powerhouse dependencies to use. --- ## Parameters ### Arguments **Tag** - Specify the release tag to use for your project. Can be one of: "latest", "staging", "dev", or "rc". - Usage: `[tag]` ### Options **Tag** - Specify the release tag to use for your project. Can be one of: "latest", "staging", "dev", or "rc". - Usage: `--tag, -t ` **Version** - Specify the exact semver release version to use for your project. - Usage: `--version, -v ` ### Flags **Skip Install** - Skip running `install` with your package manager - Usage: `--skip-install, -s` **Debug** - Log arguments passed to this command - Usage: `--debug` **Help** - show help - Usage: `--help, -h` ## Update Update your powerhouse dependencies to their latest tagged version ### Flags **Skip Install** - Skip running `install` with your package manager - Usage: `--skip-install, -s` **Debug** - Log arguments passed to this command - Usage: `--debug` **Help** - show help - Usage: `--help, -h` ## Setup Globals Initialize a new global project --- ## Parameters ### Arguments **Name** - The name of your project. A new directory will be created in your current directory with this name. - Usage: `[name]` ### Options **Name** - The name of your project. A new directory will be created in your current directory with this name. - Usage: `--name, -n ` **Package Manager** - Specify the package manager to use for your project. Can be one of: `npm`, `pnpm`, `yarn`, or `bun`. Defaults to your environment package manager. - Usage: `--package-manager, -p ` **Tag** - Specify the release tag to use for your project. Can be one of: "latest", "staging", "dev", or "rc". - Usage: `--tag, -t ` **Version** - Specify the exact semver release version to use for your project. - Usage: `--version, -v ` **Remote Drive** - Remote drive identifier. - Usage: `--remote-drive, -r ` **Clone** - Path to an existing scaffolded project to clone instead of resolving deps from scratch. Install runs offline from the cloned project's pnpm-lock.yaml (requires --pnpm; --version/--tag are ignored). - Usage: `--clone ` ### Flags **Npm** - Use 'npm' as package manager - Usage: `--npm` **Pnpm** - Use 'pnpm' as package manager - Usage: `--pnpm` **Yarn** - Use 'yarn' as package manager - Usage: `--yarn` **Bun** - Use 'bun' as package manager - Usage: `--bun` **Dev** - Use the `dev` release tag. - Usage: `--dev, -d` **Staging** - Use the `staging` release tag. - Usage: `--staging, -s` **Rc** - Use the `rc` release tag. - Usage: `--rc` **Debug** - Log arguments passed to this command - Usage: `--debug` **Help** - show help - Usage: `--help, -h` ## Use Local Use your local `powerhouse` monorepo dependencies the current project. --- ## Parameters ### Arguments **Monorepo Path** - Path to your local powerhouse monorepo relative to this project - Usage: `[monorepo path]` ### Options **Path** - Path to your local powerhouse monorepo relative to this project - Usage: `--path, -p ` ### Flags **Skip Install** - Skip running `install` with `pnpm` - Usage: `--skip-install, -s` **Debug** - Log arguments passed to this command - Usage: `--debug` **Help** - show help - Usage: `--help, -h` ### ph-cli Commands - [Generate](#generate) - [All](#all) - [Document Model](#document-model) - [Editor](#editor) - [App](#app) - [Processor](#processor) - [Subgraph](#subgraph) - [Migration File](#migration-file) - [Vetra](#vetra) - [Connect](#connect) - [Connect Studio](#connect-studio) - [Connect Build](#connect-build) - [Connect Preview](#connect-preview) - [Access Token](#access-token) - [Inspect](#inspect) - [List](#list) - [Migrate](#migrate) - [Switchboard](#switchboard) - [Login](#login) - [Install](#install) - [Uninstall](#uninstall) ## Generate The generate command creates code for Powerhouse modules. It helps you create new code from scratch, or to re-generate existing code in your project. ## All Re-generate all modules in the current project ### Flags **Extract** - Instead of generating code, write a spec for every module into specs/ (one-shot migration to documents-as-source-of-truth) - Usage: `--extract, -x` **Help** - show help - Usage: `--help, -h` ## Document Model Generate a document model ### Options **Document** - Path to a document model spec (.phd or .json) to generate from - Usage: `--document, -d ` **Dir** - Name of the directory of an existing document model to re-generate - Usage: `--dir ` ### Flags **All** - Re-generate all existing document models in the current project - Usage: `--all, -a` **Extract** - Write a powerhouse/document-model spec for each existing document model into specs/document-models/ - Usage: `--extract, -x` **Debug** - Log arguments passed to this command - Usage: `--debug` **Help** - show help - Usage: `--help, -h` ## Editor Generate a document editor ### Options **Name** - The name of the document editor to generate - Usage: `--name, -n ` **Document Type** - The document type for the new editor - Usage: `--document-type, -t ` **Document** - Path to a powerhouse/document-editor spec file (.phd or .json) to drive codegen - Usage: `--document, -d ` **Dir** - Name of the directory of an existing editor to re-generate - Usage: `--dir ` ### Flags **All** - Re-generate all existing editors in the current project - Usage: `--all, -a` **Extract** - Write a powerhouse/document-editor spec for each existing editor into specs/editors/ - Usage: `--extract, -x` **Debug** - Log arguments passed to this command - Usage: `--debug` **Help** - show help - Usage: `--help, -h` ## App Generate a drive app ### Options **Name** - The name of the drive app to generate - Usage: `--name, -n ` **Document Types** - The document types allowed by the new app - Usage: `--document-types , -t=` **Document** - Path to a powerhouse/app spec file (.phd or .json) to drive codegen - Usage: `--document, -d ` **Dir** - Name of the directory of an existing app to re-generate - Usage: `--dir ` ### Flags **Disable Drag And Drop** - Do not allow drag and drop in this drive app. - Usage: `--disable-drag-and-drop` **Default:** `false` **All** - Re-generate all existing apps in the current project - Usage: `--all, -a` **Extract** - Write a powerhouse/app spec for each existing drive app into specs/apps/ - Usage: `--extract, -x` **Debug** - Log arguments passed to this command - Usage: `--debug` **Help** - show help - Usage: `--help, -h` ## Processor Generate a processor ### Options **Name** - The name of the processor to generate - Usage: `--name, -n ` **Type** - The type of processor to generate - Usage: `--type ` **Default:** `analytics` **Document Types** - The document types the processor will run on - Usage: `--document-types , -t=` **Default:** `` **Apps** - Whether the processor will run in switchboard (nodejs), connect (browser), or both - Usage: `--apps ` **Default:** `switchboard,connect` **Document** - Path to a powerhouse/processor spec file (.phd or .json) to drive codegen - Usage: `--document, -d ` **Dir** - Name of the directory of an existing processor to re-generate - Usage: `--dir ` ### Flags **All** - Re-generate all existing processors in the current project - Usage: `--all, -a` **Extract** - Write a powerhouse/processor spec for each existing processor into specs/processors/ - Usage: `--extract, -x` **Debug** - Log arguments passed to this command - Usage: `--debug` **Help** - show help - Usage: `--help, -h` ## Subgraph Generate a subgraph ### Options **Name** - The name of the subgraph to generate - Usage: `--name, -n ` **Document** - Path to a powerhouse/subgraph spec file (.phd or .json) to drive codegen - Usage: `--document, -d ` **Dir** - Name of the directory of an existing subgraph to re-generate - Usage: `--dir ` ### Flags **All** - Re-generate all existing subgraphs in the current project - Usage: `--all, -a` **Extract** - Write a powerhouse/subgraph spec for each existing subgraph into specs/subgraphs/ - Usage: `--extract, -x` **Debug** - Log arguments passed to this command - Usage: `--debug` **Help** - show help - Usage: `--help, -h` ## Migration File Generate a migration file ### Options **Path *[required]*** - Path to the migration file - Usage: `--path, -p ` **Schema File** - Path to the output file. Defaults to './schema.ts' - Usage: `--schema-file ` ### Flags **Debug** - Log arguments passed to this command - Usage: `--debug` **Help** - show help - Usage: `--help, -h` ## Vetra The vetra command sets up a Vetra development environment for working with Vetra projects. It starts a Vetra Switchboard and optionally Connect Studio, enabling document collaboration and real-time processing with a "Vetra" drive or connection to remote drives. **What it does:** - 1. Starts a Vetra Switchboard with a "Vetra" drive for document storage - 2. Optionally connects to remote drives instead of creating a local drive - 3. Starts Connect Studio pointing to the Switchboard for user interaction (unless disabled) - 4. Enables real-time updates, collaboration, and code generation ### Options **Switchboard Port** - port to use for the Vetra Switchboard - Usage: `--switchboard-port ` **Connect Port** - port to use for the Vetra Connect - Usage: `--connect-port ` **Default:** `3001` **Remote Drive** - URL of remote drive to connect to (skips switchboard initialization) - Usage: `--remote-drive ` **Drives Public Base** - public base URL for the drive URLs advertised to Connect; each drive is exposed as <base>/d/<slug> instead of `http://localhost:/d/`. Use when the switchboard is reachable through a reverse proxy. - Usage: `--drives-public-base ` **Db Path** - Database path or connection string. Use a `postgres://` URL for Postgres; otherwise treated as a PGlite filesystem path. Leave unset for in-memory PGlite. - Usage: `--db-path ` **Renown Namespace** - Renown localStorage namespace; share it across Connects to share login. - Usage: `--renown-namespace ` **Base** - Base path for the app - Usage: `--base ` **Log Level** - Log level for the application - Usage: `--log-level ` **Environment:** `PH_CONNECT_LOG_LEVEL` **Default:** `info` **Packages** - Comma-separated list of package names to load - Usage: `--packages ` **Environment:** `PH_PACKAGES` **Local Package** - Path to local package to load during development - Usage: `--local-package ` **Environment:** `PH_LOCAL_PACKAGE` **Default Drives Url** - The default drives url to use in connect - Usage: `--default-drives-url ` **Drive Preserve Strategy** - The preservation strategy to use on default drives - Usage: `--drive-preserve-strategy ` **Default:** `preserve-by-url-and-detach` **Host** - Expose the server to the network. Pass an IP (e.g. 0.0.0.0) to bind to a specific address. - Usage: `--host ` **Watch Timeout** - Amount of time to wait before a file is considered changed - Usage: `--watch-timeout ` **Default:** `300` **Https Key File** - path to the ssl key file - Usage: `--https-key-file ` **Https Cert File** - path to the ssl cert file - Usage: `--https-cert-file ` **Remote Drives** - Specify remote drive URLs to use - Usage: `--remote-drives ` ### Flags **Watch** - Enable dynamic loading for document-models and editors in connect-studio and switchboard - Usage: `--watch, -w` **Default:** `false` **Logs** - Show additional logs - Usage: `--logs` **Default:** `false` **Disable Connect** - Skip Connect initialization (only start switchboard and reactor) - Usage: `--disable-connect` **Default:** `false` **Interactive** - Enable interactive mode for code generation (requires user confirmation before generating code) - Usage: `--interactive` **Default:** `false` **Ignore Local** - Do not load local packages from this project - Usage: `--ignore-local` **Force** - Force dep pre-optimization regardless of whether deps have changed. - Usage: `--force` **Debug** - Log arguments passed to this command - Usage: `--debug` **Open** - Open browser on startup - Usage: `--open` **Cors** - Enable CORS - Usage: `--cors` **Strict Port** - Exit if specified port is already in use - Usage: `--strictPort` **Print Urls** - Print server urls - Usage: `--print-urls` **Default:** `true` **Bind Cli Shortcuts** - Bind CLI shortcuts - Usage: `--bind-cli-shortcuts` **Default:** `true` **Https** - Use https - Usage: `--https` **Dev** - enable development mode to load local packages - Usage: `--dev` **Help** - show help - Usage: `--help, -h` ## Connect Powerhouse Connect commands. Use with `studio`, `build`, `preview`, or `config`. Defaults to `studio` if not specified. ## Connect Studio The studio command starts the Connect Studio, a development environment for building and testing Powerhouse applications. It provides a visual interface for working with your project. **What it does:** - 1. Starts a local Connect Studio server - 2. Provides a web interface for development - 3. Allows you to interact with your project components - 4. Supports various configuration options for customization ### Options **Port** - Port to run the dev server on. - Usage: `--port ` **Default:** `3000` **Renown Namespace** - Renown localStorage namespace; share it across Connects to share login. - Usage: `--renown-namespace ` **Base** - Base path for the app - Usage: `--base ` **Log Level** - Log level for the application - Usage: `--log-level ` **Environment:** `PH_CONNECT_LOG_LEVEL` **Default:** `info` **Packages** - Comma-separated list of package names to load - Usage: `--packages ` **Environment:** `PH_PACKAGES` **Local Package** - Path to local package to load during development - Usage: `--local-package ` **Environment:** `PH_LOCAL_PACKAGE` **Default Drives Url** - The default drives url to use in connect - Usage: `--default-drives-url ` **Drive Preserve Strategy** - The preservation strategy to use on default drives - Usage: `--drive-preserve-strategy ` **Default:** `preserve-by-url-and-detach` **Host** - Expose the server to the network. Pass an IP (e.g. 0.0.0.0) to bind to a specific address. - Usage: `--host ` **Watch Timeout** - Amount of time to wait before a file is considered changed - Usage: `--watch-timeout ` **Default:** `300` ### Flags **Ignore Local** - Do not load local packages from this project - Usage: `--ignore-local` **Force** - Force dep pre-optimization regardless of whether deps have changed. - Usage: `--force` **Debug** - Log arguments passed to this command - Usage: `--debug` **Open** - Open browser on startup - Usage: `--open` **Cors** - Enable CORS - Usage: `--cors` **Strict Port** - Exit if specified port is already in use - Usage: `--strictPort` **Print Urls** - Print server urls - Usage: `--print-urls` **Default:** `true` **Bind Cli Shortcuts** - Bind CLI shortcuts - Usage: `--bind-cli-shortcuts` **Default:** `true` **Help** - show help - Usage: `--help, -h` ## Connect Build The Connect build command creates a production build with the project's local and external packages included. Runtime-config overrides (all combinable — last wins on collision): ph connect build Build with the current source config. ph connect build <key> <value> Build with a positional override applied (e.g. ph connect build connect.renown.url `https://renown.staging`). ph connect build --<field> <value> Build with a per-field flag override (e.g. --renown-url `https://renown.staging`). ph connect build --json '\{"…":"…"\}' Build with a bulk override. Build has no read mode; passing only <key> without <value> errors out (use `ph connect config ` to read). ### Options **Out Dir** - Output directory - Usage: `--outDir ` **Default:** `.ph/connect-build/dist/` **Json** - Inline JSON override for the runtime connect.* block, e.g. '\{"renown":\{"url":"..."\}\}'. Validated against the runtime schema; deep-merged on top of env seeds and source powerhouse.config.json. Individual --flag values beat --json on collision. - Usage: `--json ` **Renown Url** - Override connect.renown.url. - Usage: `--renown-url ` **Renown Network Id** - Override connect.renown.networkId. - Usage: `--renown-network-id ` **Renown Chain Id** - Override connect.renown.chainId. - Usage: `--renown-chain-id ` **Renown Namespace** - Renown localStorage namespace; share it across Connects to share login. - Usage: `--renown-namespace ` **Allow Add Drive** - Override connect.drives.allowAddDrive (top-level add-drive toggle). - Usage: `--allow-add-drive ` **External Packages** - Override connect.packages.externalEnabled. - Usage: `--external-packages ` **Remote Drives Enabled** - Override connect.drives.sections.remote.enabled (the unified cloud+public section). - Usage: `--remote-drives-enabled ` **Remote Drives Allow Add** - Override connect.drives.sections.remote.allowAdd. - Usage: `--remote-drives-allow-add ` **Remote Drives Allow Delete** - Override connect.drives.sections.remote.allowDelete. - Usage: `--remote-drives-allow-delete ` **Local Drives Enabled** - Override connect.drives.sections.local.enabled. - Usage: `--local-drives-enabled ` **Local Drives Allow Add** - Override connect.drives.sections.local.allowAdd. - Usage: `--local-drives-allow-add ` **Local Drives Allow Delete** - Override connect.drives.sections.local.allowDelete. - Usage: `--local-drives-allow-delete ` **Packages Registry** - Override the top-level packageRegistryUrl. - Usage: `--packages-registry ` **App Name** - Override connect.branding.appName. - Usage: `--app-name ` **Home Background** - Override connect.branding.homeBackground. URL or path to an image; pass an empty string ("") to reset to the bundled default. - Usage: `--home-background ` **Sentry Dsn** - Override connect.sentry.dsn (Sentry DSN URL). Pass an empty string ("") to set null and disable Sentry. - Usage: `--sentry-dsn ` **Sentry Env** - Override connect.sentry.env (Sentry environment label). - Usage: `--sentry-env ` **Sentry Tracing Enabled** - Override connect.sentry.tracing (Sentry performance tracing). - Usage: `--sentry-tracing-enabled ` **Favicon** - Path to a favicon file (e.g. .ico) to bundle in place of the default Connect icon. Emitted as icon.ico; resolved relative to the build cwd. - Usage: `--favicon ` **Base** - Base path for the app - Usage: `--base ` **Log Level** - Log level for the application - Usage: `--log-level ` **Environment:** `PH_CONNECT_LOG_LEVEL` **Default:** `info` **Packages** - Comma-separated list of package names to load - Usage: `--packages ` **Environment:** `PH_PACKAGES` **Local Package** - Path to local package to load during development - Usage: `--local-package ` **Environment:** `PH_LOCAL_PACKAGE` **Default Drives Url** - The default drives url to use in connect - Usage: `--default-drives-url ` **Drive Preserve Strategy** - The preservation strategy to use on default drives - Usage: `--drive-preserve-strategy ` **Default:** `preserve-by-url-and-detach` --- ## Parameters ### Arguments **Key** - Dotted path inside the runtime config (e.g. connect.renown.url). Pair with <value> to set; pass alone to `ph connect config` to read. - Usage: `[key]` **Value** - Value to set at <key>. Coerced against the runtime schema (string, bool, number, enum). Arrays and objects require --json instead. - Usage: `[value]` ### Flags **Dynamic Base** - Build one bundle that serves under any subpath; base resolved at serve time from a runtime global. Overrides --base. - Usage: `--dynamic-base` **Ignore Local** - Do not load local packages from this project - Usage: `--ignore-local` **Force** - Force dep pre-optimization regardless of whether deps have changed. - Usage: `--force` **Debug** - Log arguments passed to this command - Usage: `--debug` **Help** - show help - Usage: `--help, -h` ## Connect Preview The Connect preview command previews a built Connect project. NOTE: You must run `ph connect build` first ### Options **Port** - Port to run the preview server on. - Usage: `--port ` **Default:** `4173` **Out Dir** - Output directory - Usage: `--outDir ` **Default:** `.ph/connect-build/dist/` **Base** - Base path for the app - Usage: `--base ` **Log Level** - Log level for the application - Usage: `--log-level ` **Environment:** `PH_CONNECT_LOG_LEVEL` **Default:** `info` **Packages** - Comma-separated list of package names to load - Usage: `--packages ` **Environment:** `PH_PACKAGES` **Local Package** - Path to local package to load during development - Usage: `--local-package ` **Environment:** `PH_LOCAL_PACKAGE` **Default Drives Url** - The default drives url to use in connect - Usage: `--default-drives-url ` **Drive Preserve Strategy** - The preservation strategy to use on default drives - Usage: `--drive-preserve-strategy ` **Default:** `preserve-by-url-and-detach` **Host** - Expose the server to the network. Pass an IP (e.g. 0.0.0.0) to bind to a specific address. - Usage: `--host ` **Watch Timeout** - Amount of time to wait before a file is considered changed - Usage: `--watch-timeout ` **Default:** `300` ### Flags **Ignore Local** - Do not load local packages from this project - Usage: `--ignore-local` **Force** - Force dep pre-optimization regardless of whether deps have changed. - Usage: `--force` **Debug** - Log arguments passed to this command - Usage: `--debug` **Open** - Open browser on startup - Usage: `--open` **Cors** - Enable CORS - Usage: `--cors` **Strict Port** - Exit if specified port is already in use - Usage: `--strictPort` **Print Urls** - Print server urls - Usage: `--print-urls` **Default:** `true` **Bind Cli Shortcuts** - Bind CLI shortcuts - Usage: `--bind-cli-shortcuts` **Default:** `true` **Help** - show help - Usage: `--help, -h` ## Access Token The access-token command generates a bearer token for API authentication. This token can be used to authenticate requests to Powerhouse APIs like reactor-api (Switchboard). **What it does:** - 1. Uses your CLI's cryptographic identity (DID) to sign a verifiable credential - 2. Creates a JWT bearer token with configurable expiration - 3. Outputs the token to stdout (info to stderr) for easy piping Prerequisites: You must have a cryptographic identity. Run 'ph login' first to: - Generate a keypair (stored in .ph/.keypair.json) - Optionally link your Ethereum address (stored in .ph/.renown.json) Token Details: The generated token is a JWT (JSON Web Token) containing: - Issuer (iss): Your CLI's DID (did:key:...) - Subject (sub): Your CLI's DID - Credential Subject: Chain ID, network ID, and address (if authenticated) - Expiration (exp): Based on --expiry option - Audience (aud): If --audience is specified Output: - Token information (DID, address, expiry) is printed to stderr - The token itself is printed to stdout for easy piping/copying This allows you to use the command in scripts: TOKEN=$(ph access-token) curl -H "Authorization: Bearer $TOKEN" `http://localhost:4001/graphql` Usage with APIs: Generate token and use with curl TOKEN=$(ph access-token --expiry 1d) curl -X POST `http://localhost:4001/graphql` \ -H "Content-Type: application/json" \ -H "Authorization: Bearer $TOKEN" \ -d '\{"query": "\{ drives \{ id name \} \}"\}' Export as environment variable export PH_ACCESS_TOKEN=$(ph access-token) Notes: - Tokens are self-signed using your CLI's private key - No network request is made; tokens are generated locally - The recipient API must trust your CLI's DID to accept the token - For reactor-api, ensure AUTH_ENABLED=true to require authentication ### Options **Expiry** - Token expiry duration. Supports: "7d" (days), "24h" (hours), "3600" or "3600s" (seconds) - Usage: `--expiry ` **Default:** `7d` **Audience** - Target audience URL for the token - Usage: `--audience ` ### Flags **Debug** - Log arguments passed to this command - Usage: `--debug` **Help** - show help - Usage: `--help, -h` ## Inspect The inspect command examines and provides detailed information about a Powerhouse package. It helps you understand the structure, dependencies, and configuration of packages in your project. **What it does:** - 1. Analyzes the specified package - 2. Retrieves detailed information about its structure and configuration - 3. Displays package metadata, dependencies, and other relevant information - 4. Helps troubleshoot package-related issues --- ## Parameters ### Arguments **Package Name *[required]*** - The name of the package to inspect - Usage: `` ### Flags **Debug** - Log arguments passed to this command - Usage: `--debug` **Help** - show help - Usage: `--help, -h` ## List The list command displays information about installed Powerhouse packages in your project. It reads the powerhouse.config.json file and shows the packages that are currently installed. **What it does:** - 1. Examines your project configuration - 2. Lists all installed Powerhouse packages - 3. Provides a clear overview of your project's dependencies - 4. Helps you manage and track your Powerhouse components ### Flags **Debug** - Log arguments passed to this command - Usage: `--debug` **Help** - show help - Usage: `--help, -h` ## Migrate Run migrations --- ## Parameters ### Arguments **Version** - The version to migrate to. Accepts a valid semver version or `staging`, `dev`, `latest`. - Usage: `[version]` ### Options **Version** - The version to migrate to. Accepts a valid semver version or `staging`, `dev`, `latest`. - Usage: `--version, -v ` **Default:** `latest` ### Flags **Force** - Run migrate from the bundled codegen even if the target version cannot be resolved from the npm registry or differs from the installed ph-cli version. - Usage: `--force, -f` **Debug** - Log arguments passed to this command - Usage: `--debug` **Help** - show help - Usage: `--help, -h` ## Switchboard The switchboard command starts a local Switchboard instance, which acts as the document processing engine for Powerhouse projects. It provides the infrastructure for document models, processors, and real-time updates. **What it does:** - 1. Starts a local switchboard server - 2. Loads document models and processors - 3. Provides an API for document operations - 4. Enables real-time document processing - 5. Can authenticate with remote services using your identity from 'ph login' ### Flags **Https** - Use https - Usage: `--https` **Dev** - enable development mode to load local packages - Usage: `--dev` **Ignore Local** - Do not load local packages from this project - Usage: `--ignore-local` **Debug** - Log arguments passed to this command - Usage: `--debug` **Use Identity** - enable identity using keypair from ph login (uses ~/.ph/keypair.json) - Usage: `--use-identity` **Require Identity** - require existing keypair, fail if not found (implies --use-identity) - Usage: `--require-identity` **Migrate** - Run database migrations and exit - Usage: `--migrate` **Migrate Status** - Show migration status and exit - Usage: `--migrate-status` **Reset** - Wipe the local PGlite switchboard storage after confirmation, then exit - Usage: `--reset` **Yes** - Skip the interactive confirmation prompt for --reset (required for non-interactive use) - Usage: `--yes, -y` **Mcp** - enable Mcp route at /mcp - Usage: `--mcp` **Default:** `true` **Use Vetra Drive** - Use a Vetra drive - Usage: `--use-vetra-drive` **Default:** `false` **Help** - show help - Usage: `--help, -h` ### Options **Https Key File** - path to the ssl key file - Usage: `--https-key-file ` **Https Cert File** - path to the ssl cert file - Usage: `--https-cert-file ` **Remote Drives** - Specify remote drive URLs to use - Usage: `--remote-drives ` **Packages** - Comma-separated list of package names to load - Usage: `--packages ` **Environment:** `PH_PACKAGES` **Port** - Port to host the api - Usage: `--port ` **Default:** `4001` **Base Path** - base path for the API endpoints (sets the BASE_PATH environment variable) - Usage: `--base-path ` **Keypair Path** - path to custom keypair file for identity - Usage: `--keypair-path ` **Vetra Drive Id** - Specify a Vetra drive ID - Usage: `--vetra-drive-id ` **Default:** `vetra` **Db Path** - path to the database - Usage: `--db-path ` ## Login The login command authenticates you with Renown using your Ethereum wallet. This enables the CLI to act on behalf of your Ethereum identity for authenticated operations. **What it does:** - 1. Generates or loads a cryptographic identity (DID) for the CLI - 2. Opens your browser to the Renown authentication page - 3. You authorize the CLI's DID to act on behalf of your Ethereum address - 4. Stores the credentials locally in .ph/.renown.json ### Options **Renown Url** - Renown server URL. - Usage: `--renown-url ` **Environment:** `PH_CONNECT_RENOWN_URL` **Default:** `https//www.renown.id` **Timeout** - Authentication timeout in seconds. - Usage: `--timeout ` **Default:** `300` ### Flags **Logout** - Sign out and clear stored credentials - Usage: `--logout` **Status** - Show current authentication status - Usage: `--status` **Show Did** - Show the CLI's DID and exit - Usage: `--show-did` **Debug** - Log arguments passed to this command - Usage: `--debug` **Help** - show help - Usage: `--help, -h` ## Install The install command adds Powerhouse dependencies to your project. By default it only registers the package in powerhouse.config.json with provider "registry" — Connect will load it from the registry CDN at runtime. With --local, the package is also installed into node_modules and marked as provider "local" — it will be bundled into ph connect build so the preview works without the registry being reachable. Resolution order for the registry URL: --registry flag > PH_REGISTRY_URL env > powerhouse.config.json > default --- ## Parameters ### Arguments **Dependencies *[required]*** - Names of the dependencies to install - Usage: `[...dependencies]` ### Options **Registry** - Registry URL to install from (overrides config and environment) - Usage: `--registry ` **Allow Build** - A list of package names that are allowed to run postinstall scripts during installation. - Usage: `--allow-build ` **Package Manager** - Specify the package manager to use for your project. Can be one of: `npm`, `pnpm`, `yarn`, or `bun`. Defaults to your environment package manager. - Usage: `--package-manager, -p ` ### Flags **Local** - Also install packages into node_modules (marks them as provider: "local" so they get bundled into ph connect build) - Usage: `--local` **Npm** - Use 'npm' as package manager - Usage: `--npm` **Pnpm** - Use 'pnpm' as package manager - Usage: `--pnpm` **Yarn** - Use 'yarn' as package manager - Usage: `--yarn` **Bun** - Use 'bun' as package manager - Usage: `--bun` **Debug** - Log arguments passed to this command - Usage: `--debug` **Help** - show help - Usage: `--help, -h` ## Uninstall The uninstall command removes Powerhouse dependencies from your project. It handles the removal of packages, updates configuration files, and ensures proper cleanup. **What it does:** - 1. Uninstalls specified Powerhouse dependencies using your package manager - 2. Updates powerhouse.config.json to remove the dependencies - 3. Supports various uninstallation options and configurations - 4. Works with npm, yarn, yarn@berry, pnpm, pnpm@6, bun, deno package managers --- ## Parameters ### Arguments **Dependencies *[required]*** - Names of the dependencies to uninstall - Usage: `[...dependencies]` ### Options **Package Manager** - Specify the package manager to use for your project. Can be one of: `npm`, `pnpm`, `yarn`, or `bun`. Defaults to your environment package manager. - Usage: `--package-manager, -p ` ### Flags **Npm** - Use 'npm' as package manager - Usage: `--npm` **Pnpm** - Use 'pnpm' as package manager - Usage: `--pnpm` **Yarn** - Use 'yarn' as package manager - Usage: `--yarn` **Bun** - Use 'bun' as package manager - Usage: `--bun` **Debug** - Log arguments passed to this command - Usage: `--debug` **Help** - show help - Usage: `--help, -h` {/* AUTO-GENERATED-CLI-COMMANDS-END */} --- ## Vetra Remote Drive > Source: https://academy.vetra.io/academy/Reference/CLITooling/VetraRemoteDrive These commands enable collaborative development using Vetra remote drives. Instead of working with local drives only, you can connect your Powerhouse project to a remote drive that syncs across team members. ## Commands Overview ### `ph init --remote-drive` **Purpose:** Create a new Powerhouse project and connect it to a remote Vetra drive. **When to use:** You're starting a NEW project that will be shared via a remote drive. **How it works:** 1. Validates the remote drive URL and checks that no GitHub URL is configured yet 2. Creates a standard Powerhouse project from the boilerplate 3. Adds Vetra configuration to `powerhouse.config.json`: ```json { "vetra": { "driveId": "abc123", "driveUrl": "https://vetra.example.com/d/abc123" } } ``` **Usage:** ```bash ph init my-project --remote-drive https://vetra.example.com/d/abc123 ``` **After initialization:** - Create a GitHub repository - Commit and push your code - Run `ph vetra` to configure the GitHub URL in the remote drive --- ### `ph checkout --remote-drive` **Purpose:** Clone an existing Powerhouse project that's already connected to a remote drive. **When to use:** You're joining an EXISTING project that someone else initialized. **How it works:** 1. Queries the remote drive to find the configured GitHub URL 2. Clones the repository from GitHub 3. Installs dependencies 4. The project is already configured to use the remote drive **Usage:** ```bash ph checkout --remote-drive https://vetra.example.com/d/abc123 ``` **Requirements:** - The remote drive must have a GitHub URL configured (done during `ph vetra` after init) --- ### `ph vetra` **Purpose:** Start the Vetra development environment with Switchboard and Connect Studio. **When to use:** After initializing or checking out a project, to start development. **How it works:** 1. Reads the remote drive URL from `powerhouse.config.json` (or `--remote-drive` flag) 2. Starts Switchboard connected to the remote drive (syncs automatically) 3. Prompts to configure GitHub URL if not set (first time after init) 4. Starts Connect Studio pointing to the drive(s) **With `--watch` flag:** - Creates a second "Vetra Preview" drive for testing local changes - Dynamically loads your local document models and editors - Main drive stays stable, preview drive for experimentation **Usage:** ```bash # Basic usage (uses config from powerhouse.config.json) ph vetra # With watch mode for development ph vetra --watch # Override remote drive URL ph vetra --remote-drive https://vetra.example.com/d/abc123 # Disable Connect Studio ph vetra --disable-connect ``` **Key options:** - `--watch` - Enable dynamic loading and create preview drive - `--remote-drive ` - Specify remote drive URL - `--switchboard-port ` - Custom Switchboard port (default: 4001) - `--connect-port ` - Custom Connect Studio port (default: 3000) - `--disable-connect` - Skip Connect Studio - `--interactive` - Enable interactive mode for code generation --- ## Workflows ### Starting a New Project (Owner) ```bash # 1. Initialize with remote drive ph init my-project --remote-drive https://vetra.example.com/d/abc123 # 2. Create GitHub repo and push cd my-project git add . git commit -m "Initial commit" git remote add origin https://github.com/user/my-project.git git push -u origin main # 3. Start Vetra and configure GitHub URL ph vetra # (Select option to use detected GitHub URL when prompted) # 4. Start developing with watch mode ph vetra --watch ``` ### Joining an Existing Project (Collaborator) ```bash # 1. Checkout from remote drive ph checkout --remote-drive https://vetra.example.com/d/abc123 # 2. Navigate to project cd project-name # 3. Start Vetra environment with watch mode ph vetra --watch # You're now synced with the remote drive ``` --- ## Key Concepts **Remote Drive vs Local Drive:** - Without remote drive: `ph vetra` creates a local drive on your machine only - With remote drive: `ph vetra` connects to a shared drive that syncs across team members **When to use each command:** - Use `ph init --remote-drive` when starting a NEW project (no GitHub URL configured in drive yet) - Use `ph checkout --remote-drive` when joining an EXISTING project (GitHub URL already configured) - Use `ph vetra --watch` to start development after either init or checkout **Preview Drive (`--watch` mode):** - Main "Vetra" drive: syncs with remote, contains stable package configuration - "Vetra Preview" drive: created locally with `--watch`, for testing local document models - Without `--watch`: safer, prevents untested code from affecting Connect - With `--watch`: enables rapid development and testing --- # Book of Powerhouse ## Overview > Source: https://academy.vetra.io/bookofpowerhouse/Overview Powerhouse is an initiative at the intersection of software development, legal innovation, and new business models for open-source projects. These elements form a common vision for reimagining how software is created, funded, and sustained. While each component has its own purpose, they are deeply interconnected and designed to support one another.
Book of Powerhouse Outline: 1. General Framework and Philosophy 2. Powerhouse Software Architecture 3. Technical Development Approaches 4. SNOs as an extension of DAOs 5. The Powerhouse Operations Platform --- ## **Part 1: Powerhouse General Framework and Open-Source Capitalism** > Source: https://academy.vetra.io/bookofpowerhouse/GeneralFrameworkAndPhilosophy Powerhouse emerged in the wake of Ethereum’s DAO movement, which began gaining momentum after the collapse of _The DAO_ in 2016. This turning point spurred the creation of blockchain-enabled organizations capable of operating without centralized corporate structures. Over the years, governance systems and decentralized operational tools have advanced, paving the way for the next generation of organizations across chains like Solana, Ethereum Layer 2 solutions, and beyond. Powerhouse aims to advance these principles and build large, global organizations around networks. Powerhouse operates at the intersection of open-source innovation and decentralized coordination. This section outlines the philosophical foundation and systemic structure that guides its operations and vision—what we call “Open-Source Capitalism.” ## **Why Open-Source Capitalism?** Capitalism is the most powerful system of economic coordination ever invented. It incentivizes productivity, innovation, and risk-taking. But just as important—open-source has proven to be one of the most powerful engines of innovation within that system. Open-source unlocks coordination across boundaries: between companies, communities, and individuals. It builds shared infrastructure at unprecedented speed, allows bottom-up experimentation, and lowers barriers to participation. This is why Big Tech, for all its closed platforms and walled gardens, has embraced open-source at the core of its own operations—releasing projects like React, Kubernetes, and TensorFlow not out of charity, but because open collaboration is often the best way to build foundational technology. Yet this dynamic is incomplete. While open-source has dominated infrastructure, it has consistently struggled to capture value—particularly in consumer applications and services. The common assumption is that the challenge is distribution: how to equitably allocate funding, resources, and decision-making. But Open-Source Capitalism takes a broader view. Before we can redistribute value, we have to make sure value is being captured in the first place. That’s the central promise of Open-Source Capitalism: not just to build open alternatives, but to make them self-sustaining, investable, and scalable. It’s about combining the pro-market, pro-innovation ethos of open-source with incentive structures that actually work—so we can build networks that don’t just survive, but thrive. ## **Four Principles of Open-Source Capitalism** 1. **Coordination Through Marketplace Platforms** Open-Source Capitalism demands new types of platforms—public marketplaces where contributors, customers, and investors can interact transparently. Like Uber or Airbnb, these marketplaces optimize for liquidity and coordination, but with open governance and ownership. \ 2. **Incentive Alignment via Tokens and Revenue Sharing** Powerhouse uses Proof of Work Tokens (POWTs) to compensate contributors fairly over time, enabling deferred compensation models that align long-term incentives. \ 3. **Reinvestment Through Revenue-Generating Hubs** Monetized OSS must funnel returns back to the contributors. The RGH (Revenue Generating Hub) manages licensing, sales, and commercial transactions in alignment with decentralized values. \ 4. **Make Open Source Investable** By enabling investor flows through the Operational Collateral Fund (OCF), open-source projects gain sustainable funding channels. Returns are tied to the downstream use of open infrastructure. \ ## **Decentralized Operations and Collaboration** Open-Source Capitalism doesn’t work without new organizational structures. DAOs promised a way forward, but fell short: plagued by coordination failures, incentive misalignment, and lack of clarity around roles, responsibilities, and execution. Powerhouse emerged from this gap—building systems that retain the openness of decentralized networks while introducing the operational rigor of traditional institutions. At the core of this approach is a belief in structured decentralization. Powerhouse enables independent teams to coordinate around shared goals, using workflows encoded in software rather than enforced by hierarchy. Contributors take ownership over workstreams, reputations are built over time, and budgets are allocated based on transparent processes. This is not decentralization for its own sake—it is a functional reimagining of how work gets done at scale. Transparency plays a critical role. Rather than relying on opaque decision-making or internal politics, Powerhouse makes contributions, decisions, and payments legible. Governance and compensation are traceable across time, creating a persistent and auditable record of organizational behavior. The result is a system that fosters trust not just between individuals, but across entire networks. This is what makes Powerhouse unique: it’s not just about running decentralized software—it’s about running decentralized organizations. Open-Source Capitalism is the economic philosophy. Scalable Network Organizations are the structure. And these principles come to life through the operational frameworks that guide every action on the network. --- ## Part 2: Powerhouse Software Architecture > Source: https://academy.vetra.io/bookofpowerhouse/PowerhouseSoftwareArchitecture Powerhouse’s software architecture is designed to empower scalable, decentralized organizations with a modular, layered approach. It uses document models as the core unit that used across three layers: - the **Data Infrastructure Layer**, which handles secure storage and synchronization across local, cloud, and decentralized systems; - the **Host Application Layer**, which provides contributor tools like Powerhouse Connect and Fusion; - and the Customization **Layer**, enabling bespoke solutions for specific use cases. ## Software Architecture ### Document Models - A **document model** is a structured representation of data and workflows that captures relationships, states, and operations within a system. By treating documents as dynamic entities that evolve over time, document models allow multiple people to contribute, make changes, and track progress in a flexible and transparent way. Document models are central to Powerhouse’s development approach, forming the backbone of adaptable workflows and versatile data management. In environments where contributors work asynchronously and systems must respond to evolving needs, document models provide the flexibility and responsiveness that traditional, static structures often lack. - Building on this foundation, Powerhouse’s document models are designed to go beyond static data storage, encapsulating the complex relationships, states, and operations that drive decentralized workflows. Each document functions as a living entity, continuously evolving to reflect updates and interactions among contributors. This allows for: - **Asynchronous Collaboration**: Contributors can work on documents without being bound by linear processes. For example, a task document can move through different states (e.g., draft, review, approved) based on specific triggers or events. - **Customizable Processes**: Document models are highly adaptable, supporting unique workflows for different teams or organizations. This flexibility ensures that systems can address specialized requirements while maintaining overall consistency and transparency. - **Event-Driven Updates**: By integrating with Powerhouse’s event-driven architecture, documents can respond to real-time changes, such as new data inputs or status updates, ensuring workflows remain efficient and responsive. ### Three layers of Powerhouse 1. **Data Infrastructure Layer -** This layer is responsible for data storage and synchronization, whether locally, in the cloud, or on decentralized storage networks like Ceramic or IPFS. It includes: - **Reactor**: A storage node for documents and files, supporting multiple storage adapters for various environments. - **Powerhouse Network Components**: services required to build scalable networks of Reactor nodes, such as event buses, queues, caching services, and load balancers. 2. **Host Application Layer - t**his layer provides the tools to build apps and platforms using modular host applications. Each host application is an empty shell that gains functionality through plugins. The key host applications include: - **Powerhouse Connect**: Tools for contributors to perform their roles with tailored plugins for document management. - **Powerhouse Switchboard**: A scalable API service for aggregating data into operational, analytical, or other specialized read models. - **Powerhouse Fusion**: Public-facing collaboration platforms or marketplaces for the SNO’s platform economy. - **Powerhouse Renown**: Decentralized authentication and reputation management for contributors. - **Powerhouse Academy**: Onboarding and training tools for contributors, offering tutorials and reputation badges. 3. **Customization Layer - t**his layer consists of organization-specific plugins and instances of the host applications. It enables customization and deployment of unique platforms for each network organization. Examples include: - **Connect Plugins**: Tailored apps for contributors. - **Switchboard Plugins**: Aggregated data and API services. - **Fusion Plugins**: Custom marketplaces and user-facing platforms. - **Renown and Academy Plugins**: Contributor reputation systems and training resources. --- ## Part 3: Development Approaches > Source: https://academy.vetra.io/bookofpowerhouse/DevelopmentApproaches Powerhouse’s development approaches are designed to enable efficient, scalable, and innovative solutions for decentralized organizations. By drawing from blockchain principles, adopting Model-Driven Development (MDD), leveraging dynamic document models, and employing a Rapid Application Development (RAD) process, Powerhouse provides a comprehensive framework to address the unique challenges of decentralized systems. These methodologies enhance collaboration, streamline workflows, and accelerate iteration cycles, empowering teams to design, implement, and adapt their solutions seamlessly while staying aligned with Powerhouse’s vision for sustainable and decentralized growth. ### Blockchain principles applied to decentralized operations - Powerhouse’s development approach draws inspiration from the principles of blockchain technology while adapting them to meet the specific needs of decentralized organizations. These principles heavily influence its architecture, blending blockchain’s strengths with practical adaptations for scalable operations. - Powerhouse shares several core ideas with blockchain: - **Immutability**: Like a blockchain, Powerhouse emphasizes immutable data records. Through event sourcing, every state change is preserved as an append-only event, ensuring transparent, auditable histories. - **Decentralization**: Both systems operate without relying on a centralized authority. Powerhouse’s Document Synchronization Protocol (DocSync) does not rely on a centralized server but can run P2P. It is also storage agnostic, so there is no lock-in. Users have the option to rely on decentralized, centralized or local storage solutions. - **Transparency**: Inspired by the visibility of blockchain transactions, Powerhouse ensures operational workflows and changes are traceable, which makes governance and accountability easier. - While Powerhouse builds on blockchain principles, it diverges in key ways to address operational challenges: - **Local Scalability**: Blockchain’s global consensus can limit speed and scalability. Powerhouse prioritizes local-first workflows, ensuring contributors can operate efficiently without requiring global synchronization. - **Tailored Operations**: Unlike blockchain’s general-purpose design, Powerhouse’s architecture focuses on organizational needs, supporting custom workflows, dynamic governance, and flexible scaling. ### Model-Driven Development & Rapid Application Development (RAD) - Powerhouse leverages **Model-Driven Development (MDD)** and **Rapid Application Development (RAD)** to streamline the creation of scalable, decentralized systems. - MDD enables cross-functional collaboration by using **abstract models** as blueprints for workflows, data, and system behaviors—similar to how GraphQL schemas unify API design. These models ensure alignment across teams, enable early validation, and support seamless system evolution. **Meta-models** extend this by automating code generation, documentation, and workflow updates, reducing manual effort and ensuring consistency. - RAD accelerates development by eliminating backend complexity and leveraging **automated code generation**. Pre-built frameworks and reusable components let developers focus on UI/UX without managing backend logic. An **event-driven architecture** handles state and data sync, while document models serve as a **source of truth**, ensuring APIs, data structures, and front-end scaffolding stay in sync. Developers can rapidly iterate on tailored user experiences—akin to “swapping skins” in a game—without disrupting core functionality. ### CQRS (Command Query Responsibility Segregation) - CQRS, or Command Query Responsibility Segregation, is a key design principle in Powerhouse’s software architecture. It separates the responsibilities of handling write operations (commands) and read operations (queries) into distinct models, optimizing both for their specific purposes. - In the Powerhouse framework: - **Commands** handle operations that modify the state, such as creating or updating documents. These commands are validated and stored as events, forming the immutable history central to the system’s transparency and auditability. - **Queries** are optimized for retrieving data, leveraging read models designed for performance, scalability, and flexibility. These models aggregate data from events to provide users with tailored insights, whether for analytics, search, or operational tasks. - This separation offers significant advantages: 1. **Scalability**: Write and read models can scale independently, allowing Powerhouse to support large decentralized organizations without performance bottlenecks. 2. **Maintainability**: By isolating business logic (commands) from query logic, developers can iterate on one without affecting the other, ensuring the system evolves efficiently. 3. **Flexibility**: Powerhouse supports multiple types of read models—such as relational databases, full-text search, and analytics—each tailored to specific organizational needs. ### Event-driven Architectures (EDA) - Event-Driven Architecture (EDA) is a foundational element of Powerhouse’s software philosophy, designed to create responsive, scalable systems that support asynchronous workflows. In EDA, events represent meaningful changes or actions, such as “Document Updated” or “Contributor Added,” and these events trigger reactions across the system in real time. - EDA enables Powerhouse to design systems that are inherently responsive and scalable. By decoupling components, EDA allows systems to react to events independently, ensuring high availability and performance even as complexity grows. For example, when a document is updated, different processes like validation, notifications, and analytics generation can run in parallel without blocking each other. This architecture makes Powerhouse systems highly efficient in handling distributed operations, as it allows them to scale dynamically by adding or replicating components where needed. It also improves fault tolerance, as failures in one part of the system do not cascade to others due to the loosely coupled design. - **Asynchronous Workflows -** EDA is particularly effective in supporting asynchronous workflows, which are critical for decentralized organizations. In this model, components communicate through events, eliminating the need for direct dependencies. This loose coupling enables workflows to operate flexibly, allowing different tasks to be executed simultaneously without blocking others. For instance, when a contributor submits work, separate processes—like task approval, logging, and analytics—can run independently, ensuring smoother coordination. Additionally, event histories can be replayed to debug workflows or audit past operations, providing transparency and traceability essential to decentralized systems. --- ## Part 4: Scalable Network Organizations (SNOs) > Source: https://academy.vetra.io/bookofpowerhouse/SNOsandANewModelForOSSandPublicGoods Decentralized Autonomous Organizations (DAOs) once promised to revolutionize global collaboration by enabling decentralized governance, transparent decision-making, and equitable ownership. However, the reality has often fallen short. DAOs have struggled with legal ambiguity, resource allocation inefficiencies, and broken incentive structures. These challenges have stifled their ability to scale and compete with centralized organizations. Scalable Network Organizations (SNOs) emerge as the next evolutionary step. Combining the principles of decentralization with the operational rigor of traditional organizations, SNOs provide a structured framework for decentralized governance, sustainable operations, and global scalability. Powerhouse’s vision for SNOs aims to deliver on the original promise of DAOs, empowering organizations to scale without sacrificing their decentralized principles. ### Core Components of SNOs[​](https://staging.powerhouse.academy/docs/bookofpowerhouse/SNOsandANewModelForOSSandPublicGoods#core-components-of-snos) At the heart of Scalable Network Organizations (SNOs) are five entities, each fulfilling a critical role in scaling decentralized operations. From governance to funding and IP management, these components work together to ensure alignment, collaboration, and financial sustainability. - DAO - The DAO is the governing entity responsible for setting the strategic vision and ensuring alignment across the SNO. Through on-chain governance mechanisms powered by smart contracts, the DAO facilitates transparent decision-making, distributed ownership, and accountability. Members participate in proposing and voting on budgets, initiatives, and key operational decisions, creating a decentralized system where authority is widely distributed rather than concentrated in a single entity. - By maintaining immutable records and eliminating the need for intermediaries, the DAO supports scalable and adaptable governance structures that suit decentralized networks. Its ability to flexibly adapt rules and processes ensures that the SNO remains efficient and innovative as it grows, while retaining the values of transparency and inclusivity. - Operational Hub (OH) - The Operational Hub acts as the administrative core of the SNO, handling contributor relationships, compliance, and payment processing. By leveraging legal structures like Swiss Associations, the OH ensures contributors are protected from liability while enabling the SNO to interact with banks, vendors, and regulatory entities. This hub simplifies complex operations such as tax reporting, cross-border compliance, and contributor agreements, removing these burdens from individual participants. - The Operational Hub acts as the administrative core of the SNO, handling contributor relationships, compliance, and payment processing. By leveraging legal structures like Swiss Associations, the OH ensures contributors are protected from liability while enabling the SNO to interact with banks, vendors, and regulatory entities. This hub simplifies complex operations such as tax reporting, cross-border compliance, and contributor agreements, removing these burdens from individual participants. - Operational Collateral Fund (OCF) - The OCF provides the financial infrastructure to fuel the SNO’s growth. It allocates resources to high-potential initiatives and rewards contributors by issuing Proof of Work Tokens (POWTs). These tokens align incentives by linking compensation to measurable contributions, ensuring that individuals and teams are motivated to create long-term value. POWTs represent a stake in the success of the network, making contributors invested in the outcomes of the projects they support. - Beyond its internal role, the OCF also attracts external investment by offering structured opportunities for funding impactful projects within the network. By maintaining transparency in its allocation processes and linking funding to measurable outputs, the OCF builds trust among both contributors and investors, creating a virtuous cycle where capital supports meaningful innovation. - Revenue Generating Hub (RGH) - The RGH is the SNO’s commercial interface, enabling the network to generate sustainable revenue while maintaining its decentralized principles. It manages licensing agreements, product sales, and customer-facing activities, ensuring that all revenue-generating operations align with the broader goals set by the DAO. By addressing the regulatory complexities associated with handling fiat revenue or contractual obligations, the RGH provides a seamless bridge between decentralized networks and traditional market systems. - The RGH supports multiple revenue streams, including enterprise licensing for proprietary versions of open-source software, subscription models for SaaS offerings, and consulting services tailored to client needs. A portion of the revenue collected flows back into the ecosystem, funding operations, rewarding contributors through the OCF, and sustaining the open-source projects that drive the SNO’s long-term success. - IP-Holding Entity (IPSPV) - The IP-Holding Entity safeguards the SNO’s intellectual property assets, including trademarks, copyrights, and other IP rights. It is responsible for enforcing licensing agreements and ensuring that the use of the network’s IP aligns with governance decisions made by the DAO. By employing a dual licensing model, the IPSPV supports open-source availability through copyleft licenses while generating revenue from enterprise licenses, allowing businesses to use proprietary versions of the SNO’s software. - The IPSPV also plays a critical role in protecting the network’s creative assets from exploitation or infringement. It ensures that the IP is managed as a collective resource, aligned with the community’s mission and values, while providing a steady revenue stream for reinvestment into the ecosystem. By separating IP management from operational activities, the IPSPV ensures that the SNO remains focused on innovation without losing control of its most valuable assets. ### Legal Foundations for SNOs[​](https://staging.powerhouse.academy/docs/bookofpowerhouse/SNOsandANewModelForOSSandPublicGoods#legal-foundations-for-snos) Legal structures are crucial for the success of SNOs, providing clarity, compliance, and protection. - Multisig Participation Agreements (MPAs) \ MPAs are a foundational legal tool within the SNO framework. These agreements define the roles and responsibilities of multisig wallet signers, ensuring accountability and mitigating internal liability risks. By formalizing governance processes, MPAs reduce the chaos and inefficiency often associated with decentralized decision-making. They also protect contributors by clarifying liability boundaries, preventing signers from inadvertently exposing themselves to legal risks. \ MPAs are fully customizable, allowing SNOs to adapt them to their specific operational needs. They integrate seamlessly with Gnosis Safe wallets, creating a transparent and secure environment for managing resources. - Swiss Associations \ Swiss Associations offer a flexible and cost-effective legal wrapper for early-stage SNOs. These entities provide liability protection, separate legal personhood, and the ability to engage in commercial activities that support the SNO’s mission. Notably, Swiss Associations do not require registration, preserving privacy while maintaining compliance. Their reputation as part of Switzerland’s crypto-friendly regulatory environment makes them ideal for DAOs transitioning into SNOs. These are typically used as legal structures for the OCR and IPSPV, while the OH and RGH may be Swiss foundations but their jurisdiction is likely determined by where inbound and outbound payments are taking place. - Open Source Legal Templates \ Powerhouse has developed a library of open-source legal templates to simplify the setup and operation of SNO entities. These templates include Contributor Agreements, MPAs, and licensing contracts, reducing the complexity and cost of navigating legal requirements. By standardizing these processes, Powerhouse enables SNOs to focus on innovation and growth. --- ## **Part 5: Powerhouse Platforms – Decentralized Operations and Builder** > Source: https://academy.vetra.io/bookofpowerhouse/SNOsInActionAndPlatformEconomies ## **Introduction** The Powerhouse architecture is not only organizational but also deeply technological. To enable scalable network organizations (SNOs) to operate effectively, Powerhouse has developed two core platforms that provide the infrastructure for decentralized coordination and execution: the **Decentralized Operations Platform** and the **Builder Platform**. These platforms are complementary: one structures and stabilizes daily operations; the other opens up participation and innovation. Together, they form the digital substrate of the Powerhouse model, encoding its governance logic, collaboration structures, and incentive mechanisms directly into software. --- ## **Decentralized Operations Platform** The Decentralized Operations Platform serves as the operational engine of a SNO. It provides the workflows, rules, and execution logic required for contributors to collaborate without a central management layer. This includes systems for compensation, budgeting, IP management, and contributor reputation. At its core, the platform acts as a programmable coordination system. Contributors are onboarded, assigned tasks, compensated, and recognized through transparent, rule-based processes encoded in smart contracts and synchronized document models. These workflows are not static: they evolve based on activity, inputs, and contributor feedback, adapting to the changing needs of the network. The Decentralized Operations Platform also embeds accountability. Actions taken on the platform generate verifiable records—both financial and reputational—that form a shared source of truth. Disputes can be resolved, work can be audited, and contributors can prove their track record across projects and teams. This persistent memory allows SNOs to grow while retaining coherence and trust. Strategically, the platform supports multiple service categories, including governance operations, legal and financial services, and compliance. Each of these is modular, and the marketplace of service providers enables networks to plug in what they need, when they need it. Revenue is structured around project-based transactions and reinforced by policies that encourage on-platform fulfillment, ensuring alignment across stakeholders. --- ## **Builder Platform** While the Decentralized Operations Platform governs execution, the Builder Platform governs creation. It is designed for extending the Powerhouse architecture—enabling developers and contributors to build new tools, workflows, and modules that others in the ecosystem can use. The Builder Platform represents a shift in how coordination infrastructure is developed. Instead of building monolithic applications, contributors define document types, schemas, automation rules, and interfaces as reusable modules. These are published to a shared registry, where they can be discovered, forked, extended, or monetized. Every time a module is used in another network’s deployment, its original authors receive a share of the value generated. In this way, Powerhouse makes open-source infrastructure economically sustainable and creates a new incentive model for public goods. Technically, the Builder Platform is integrated with the rest of the Powerhouse stack. Its outputs are interoperable with the Operations Platform, the Governance layer, and the contributor onboarding systems. It uses typed schemas, CLI scaffolding, and standardized packaging to ensure modules are composable and production-ready. Strategically, the platform ensures that innovation remains decentralized. No single team or organization controls what can or cannot be built. Any contributor with sufficient context and intent can extend the system—and be rewarded for doing so. This model transforms Powerhouse from a static platform into a living ecosystem. --- ## **A Unified Infrastructure Layer** Together, these platforms operationalize the vision of scalable, decentralized networks. The Operations Platform provides the scaffolding for work: roles, rules, payments, and projects. The Builder Platform enables the ecosystem to evolve: by building, sharing, and monetizing new capabilities. They are not products to be sold—they are foundational infrastructure for a new kind of organization. Powerhouse is not simply offering software; it is building the operating system for a post-corporate world. --- # Release Notes ## Powerhouse v5.3.0 🚀 > Source: https://academy.vetra.io/academy/ReleaseNotes/v5.3.0 ## ✨ Highlights 1. **Authentication & Permissions** - CLI authentication and document-level permissions 2. **Improved Code Generation** - TS Morph and templates for faster, more reliable generation 3. **Runtime Document Model Subgraphs** - No more generated subgraph code to manage This release focuses on authentication, permissions, improved code generation, and runtime document model subgraphs. ## 🔐 CLI Authentication New commands for authentication workflows: | Command | Description | | ----------------- | --------------------------------------------- | | `ph login` | Authenticate with your Powerhouse identity | | `ph access-token` | Generate access tokens for API authentication | The CLI now supports full authentication workflows for secure operations and programmatic API access. ## 🛡️ Document Permission Service Fine-grained access control at the document level for Switchboard. - **Operation Permissions** - Control who can perform specific operations - **Document Group Permissions** - Organize documents with shared access rules - **Feature Flag** - Enable/disable via configuration When enabled, all document operations are validated against permission rules. Enterprise-grade access control that integrates seamlessly with existing Switchboard deployments. ## 📊 Autogenerated Document Model Subgraphs Subgraphs are now **automatically available** on Switchboard at runtime. ### ⚠️ Action Required Previously generated subgraphs should be **deleted** to avoid conflicts. This eliminates manual subgraph generation and maintenance. Clean up old generated files to prevent runtime conflicts. ## ⚛️ New React Hooks `useGetDocument` and `useGetDocuments` ```typescript const getDocument = useGetDocument(); const onDocumentSelected = async (id: string) => { const document = await getDocument(id); // Fetch on demand }; ``` ## ⚛️ Dispatch Callbacks Optional callbacks to handle results of dispatched actions. ```typescript const [document, dispatch] = useDocumentById(documentId); dispatch( myAction, (errors) => { // Handle errors (e.g., show toast notification) alert(errors); }, (document) => { // Handle success console.log("Document updated:", document); }, ); ``` Useful for showing toast notifications or triggering follow-up actions based on dispatch results. ## ⚛️ React Hooks Bug Fixes - Hooks returning multiple documents now correctly update when any document changes - Improved React Suspense integration to avoid unnecessary loading states Thank you **Liberuum**! These improvements make working with documents more reliable and flexible. ## 🎨 Document Model Editor Improvements Enhanced state editing experience in the Document Model Editor. The Document Model Editor now provides a better experience for editing document state schemas with improved validation and feedback. ## 🛠️ Improved Code Generation Faster, more reliable code generation with **TS Morph** and **templates**. - Templates are easier to maintain and customize - More predictable output - Better error messages The new template-based approach makes codegen more maintainable and gives developers clearer error messages when something goes wrong. ## 📝 Updated Editor Boilerplate Better starting point for custom editors with improved default styling. The new boilerplate includes DocumentToolbar integration, proper state management with hooks, and cleaner default styles. ## 🔄 Migration Steps 1. **Run migrations** - `ph migrate` 2. **Update editor styles** - Editors now control their own padding 3. **Delete document model subgraphs** - Remove generated subgraphs to avoid conflicts 4. **Update config files** - Add `vitest.config.ts` to `tsconfig.json` exclude and ESLint's `allowDefaultProject` Follow these steps carefully for a smooth upgrade to v5.3.0. ## 📚 Documentation Coming soon to **https://academy.vetra.io** - Reactor API Authorization - Document Permission System - Inspector Modal guide - Updated hooks documentation - Vetra Studio usage guides --- ## Powerhouse v6.0.0 🚀 > Source: https://academy.vetra.io/academy/ReleaseNotes/v6.0.0 ## ✨ Highlights 1. **Redesigned Reactor with sync reliability** — Complete rewrite of the write model, sync pipeline, and job system with quarantine, dead letters, paging, and FIFO batching 2. **Vetra Package Ecosystem** — Private npm-compatible registry, `ph publish/install/unpublish`, and dynamic package loading at runtime in Connect and Switchboard 3. **Reactor Attachments** — New `reactor-attachments` package for document-linked file storage with reservations, direct upload, and soft-delete 4. **Switchboard Load Balancer** — Built-in `switchboard-lb` for multi-node deployments with least-conn routing and drive-id-based pinning 5. **Full Observability** — OpenTelemetry metrics, Sentry source map uploads, Prometheus exporter, and OTel-to-Sentry span bridging ## ⚙️ Reactor — Rewritten Write Model & Sync Engine The reactor's core write model was fundamentally rearchitected to unify transactions with execution context. The sync pipeline gained per-document quarantine (instead of blocking entire remotes), a persistent dead-letter store, buffered batched mailboxes, abort signals on GQL channels, and cursor-based paging for large sync batches. Key additions: - **DocumentIntegrityService** — validates and rebuilds document keyframes/snapshots - **Sync paging** — `getOperations` now pages across scopes - **Job timeout** via abort signals propagated through the entire job pipeline - **Yield utilities** for cooperative scheduling in the job executor - **Exponential backoff + jitter** on retries - **`test-sync-queue` CLI app** for detecting sync drift on large drives ```bash # New profiling script for direct reactor performance testing npx tsx profiling/reactor-direct.ts --docs 1000 --otel ``` ## 📦 Vetra Package Ecosystem A full end-to-end package ecosystem now powers Powerhouse apps. A private npm-compatible registry (Verdaccio-backed) hosts packages, and the CLI, Connect, and Switchboard all integrate with it. **New CLI commands:** ```bash # Publish a built package to the Powerhouse registry ph publish # Install from the registry (uses Powerhouse registry by default) ph install @your-org/your-package # Unpublish a package and purge the CDN cache ph unpublish @your-org/your-package@1.0.0 ``` **Dynamic loading:** Connect and Switchboard load processors and subgraphs at runtime from the HTTP registry — no rebuild required when new packages are published. **Auto-discovery:** Connect automatically finds and installs the correct package when it encounters an unknown document type. **Version picker:** The Connect UI lets users choose specific dist-tag versions when installing packages. ```json // powerhouse.config.json { "registry": "https://your-registry-url" } ``` ## 📎 Reactor Attachments New `reactor-attachments` package provides document-linked file storage, integrated directly into the reactor and switchboard. Features: - Upload reservations + direct upload to storage - Switchboard transport implementation - `HEAD` support, soft-delete, and case-insensitive hash indexing - `Attachment-Metadata` headers ## ⚖️ Switchboard Load Balancer New `switchboard-lb` package provides HTTP load balancing for multi-node Switchboard deployments: - **M1:** Least-connections proxying of upstream routes - **M2:** Request pinning across restarts - **M3:** Rewrite to drive-id header for deterministic routing ## 📊 OpenTelemetry & Sentry Observability ```bash # Enable OTel metrics export from Switchboard OTEL_EXPORTER_OTLP_ENDPOINT=http://tempo:4318 ph switchboard start # Prometheus metrics (opt-in) PROMETHEUS_METRICS=true ph switchboard start ``` - New `opentelemetry-instrumentation-reactor` package for distributed tracing across reactor internals - Sentry source maps uploaded in CI and releases tagged automatically - OTel spans bridged to Sentry for unified error correlation - Opt-out error reporting for `ph-cli` and `ph-cmd` via config - Lightweight Sentry SDK replaces full SDK in CLI ## 🪝 `useDocumentSafe` Hook ```typescript function MyEditor({ documentId }: { documentId: string }) { const { document, error, isLoading } = useDocumentSafe(documentId); if (isLoading) return ; if (error) return ; return ; } ``` Replaces the pattern of calling `useDocument` and catching thrown errors — now surfaces error and loading state as first-class values. ## 🤖 `ph code` Subcommand — AI Agent Harness ```bash # Launch an AI-assisted code generation session ph code ``` New subcommand that wires Mastra and ph-clint into the CLI for AI-powered code assistance scoped to your Powerhouse project. ## 🛡️ Per-Document Authentication - **Signature verification** on Switchboard: operations must carry a valid app-key signature - **Per-document protection model**: configure which documents require authentication - `ph login` / `ph logout` / `ph access-token` login flow now implemented in the Renown SDK and forwarded by the CLI ## 🔧 Codegen Improvements - **Versioned reducers by default** — reducers are version-stamped at generation time - **`satisfies DocumentModelModule`** instead of type casts - **CI/CD + Docker templates** scaffolded by `ph init` for new projects - **Vitest coverage** scaffolded with reducer threshold checks - **Separate `ph generate` commands** for reducers, editors, and processors - **AGENTS.md template** with editor drag-and-drop guidance and reducer testing playbook - **E2E codegen tests** for processor and subgraph generation ## 🖥️ Connect Improvements - **Processor inspector** panel showing live processor state - **Offline preview** for locally installed packages (bundled into Connect) - **PGlite migration banner** for DB version transitions - **Dump & import** for local PGlite database - **Version picker** UI for dist-tag selection - **Git hash display** in settings/URL for build traceability - **Drive info** shown in settings menu - **JSON viewer** in operations tooltip - **Retry on startup** for default drives with backoff ## 📡 Reactor MCP The `reactor-mcp` package now creates a fresh `McpServer` per `/mcp` request, fixing concurrent transport collision when multiple clients connect simultaneously. ## 🔄 Improvements - **tsdown** replaces the previous build toolchain across all packages: `analytics-engine`, `builder-tools`, `ph-cli`, `ph-cmd`, `registry`, `shared`, `design-system` - **Separate node/browser processor bundles** — processors now publish distinct `node` and `browser` entrypoints - **Tree-shaking** — `sideEffects: false` added to generated package boilerplate; pglite, jszip, and renown crypto are now lazy-loaded - **Document cache** made compatible with GraphQL clients directly - **Remote document controller** in `reactor-browser` for server-driven document state - **Single batch query** in `reactor-browser` for pulling operations on remote controllers - **Switchboard**: dynamic model loading behind `DYNAMIC_MODEL_LOADING` env var; OTel provider registration ordering enforced - **Registry**: SSE + webhook publish notifications; npm uplink for transparent CDN fallback; Renown JWT auth in front of Verdaccio - **`ph-cmd`** now delegates `init` and all forwarded commands to the versioned `ph-cli` binary — version pinning works correctly - **`ph migrate`** now runs against the target codegen version with `--force` flag available - **`ph install`**: `--allow-build` flag supported; prompts for dist-tag on prerelease publish ## 🐞 Bug Fixes - Reactor: orphan reshuffle and cross-batch FIFO bugs fixed; documents with out-of-order `ADD_RELATIONSHIP` now correctly backfilled - Reactor: deleted documents no longer returned by queries; jobs targeting deleted documents are not retried - Reactor: GQL channel now correctly handles abort signals, backpressure, and dead-letter placement - Connect: PGlite idb cleared on storage wipe to avoid flush race; duplicate document models deduplicated by type+version - Switchboard: falls back to a free port on `EADDRINUSE` and propagates to Vetra - Switchboard: `migrate` command now honors correct env vars - Registry: concurrent tarball extraction prevented; correct package version resolved on CDN - ph-cli: lazy-loaded for faster startup; `PH_REGISTRY_URL` env takes precedence over config - Design system: static asset paths fixed post-tsdown migration; icons path corrected ## ⚠️ Breaking Changes **Node.js 24 is now the minimum supported version.** ```bash # Check your Node version node --version # must be >= 24.0.0 # Install Node 24 via nvm nvm install 24 && nvm use 24 ``` **`DriveEditor` renamed** — a bulk rename was applied across all packages. Search your codebase for old `DriveEditor` references and update as directed by TypeScript. **Generated subgraph code should be deleted** — subgraphs are now generated and loaded at runtime. Delete any `src/subgraphs/` directory in your project to avoid conflicts. ```bash rm -rf src/subgraphs/ ``` --- # Miscellaneous ## 00-Home > Source: https://academy.vetra.io/academy/Home --- ## Prerequisites > Source: https://academy.vetra.io/academy/Build/GettingStartedBuilding/Prerequisites **TIP:** This **Build** chapter is the **manual experience** — you build Powerhouse packages by hand on your own machine with the Powerhouse CLI, controlling every step (document models, editors, processors, and publishing). If you'd rather have an AI agent build for you, use the **AI-guided experience** in [**Vetra Studio**](/academy/GetStarted/VetraStudio): you describe what you want in chat and the agent writes the specs and code for you — no local setup required. The two paths produce the same kind of package, so you can mix and match: prototype with the agent, then drop down to the manual workflow for fine-grained control. The rest of this section sets up your machine for the manual path and walks you through the end-to-end package workflow. It covers Node.js 24, VS Code, Git, and the Powerhouse CLI. **INFO:** If you've already set up **Git, Node.js 24, and a package manager (pnpm or npm)**, your most important step is to install the **Powerhouse CLI** with the command: `pnpm install -g ph-cmd` or `npm install -g ph-cmd`. A global install is recommended if you want to use the command from any directory as a power user. The Powerhouse CLI is used to create, build, and run your Document Models and gives you direct access to a series of Powerhouse Builder Tools. Move to the end of this page to [verify your installation.](#verify-installation) --- ## Overview Before building your Document Model, install some software on your machine. You need three tools: - Node.js 24, which runs your code. - Visual Studio Code (VS Code), where you write your code. - Git, which manages your code. Follow the steps below based on your computer's operating system. ### Windows Users: Consider Using WSL If you're on Windows, we recommend using **Windows Subsystem for Linux (WSL)** for the best development experience. WSL lets you run a full Linux environment directly on Windows without the overhead of a virtual machine. This gives you access to Linux command-line tools and utilities, which are often preferred for modern web development workflows. **To install WSL:** 1. Open PowerShell as Administrator (right-click and select "Run as administrator") 2. Run the following command: ```powershell wsl --install ``` 3. Restart your computer when prompted 4. After restart, a terminal will open asking you to create a Linux username and password Once WSL is set up, you can follow the **Linux (Ubuntu/Debian)** instructions below for installing Node.js, Git, and other tools. Your Linux environment will be accessible through the Windows Terminal or by typing `wsl` in PowerShell. **TIP:** Using WSL provides a consistent development experience that matches most production environments and online tutorials. You can still use VS Code on Windows — it integrates with WSL through the [Remote - WSL extension](https://marketplace.visualstudio.com/items?itemName=ms-vscode-remote.remote-wsl). For more details, see the official [WSL installation guide](https://learn.microsoft.com/en-us/windows/wsl/install). --- ### Installing Node.js 24 Node.js 24 runs your application. Install it with the steps below. #### For Windows: 1. **Set up PowerShell for running commands:** - Press the Windows key - Type "PowerShell" - Right-click on "Windows PowerShell" and select "Run as administrator" - In the PowerShell window, type this command and press Enter: ```powershell Set-ExecutionPolicy RemoteSigned -Scope CurrentUser ``` - Type 'A' when prompted to confirm - You can now close this window and open PowerShell normally for the remaining steps 2. **Install Node.js 24:** - Visit the [Node.js official website](https://nodejs.org/) - Click the big green button that says "LTS" (this means Long Term Support - it's the most stable version) - Once the installer downloads, double-click it to start installation - Click "Next" through the installation wizard, leaving all settings at their defaults 3. **Install a package manager (pnpm or npm):** - Open PowerShell (no need for admin mode) - For pnpm (recommended), type this command and press Enter: ```powershell npm install -g pnpm ``` - Note: Node.js comes with npm by default, so npm is already available after installing Node.js 4. **Verify Installation:** - Open PowerShell (no need for admin mode) - Type these commands one at a time and press Enter after each: ```powershell node --version pnpm --version # or npm --version ``` - Version numbers should appear after each command (e.g., v24.x.x for Node.js). If they do, Node.js and your package manager are installed. > **Note**: If Node.js commands don't work in VS Code, restart VS Code to refresh environment variables. #### For macOS: 1. **Install Homebrew:** - Open Terminal (press Command + Space and type "Terminal") - Copy and paste this command into Terminal and press Enter: ```bash /bin/bash -c "$(curl -fsSL https://raw.githubusercontent.com/Homebrew/install/HEAD/install.sh)" ``` - Follow any additional instructions that appear 2. **Install Node.js 24:** - In the same Terminal window, type this command and press Enter: ```bash brew install node@24 ``` - Then, optionally install pnpm (npm comes with Node.js): ```bash brew install pnpm ``` 3. **Verify Installation:** - In Terminal, type these commands one at a time and press Enter after each: ```bash node --version pnpm --version # or npm --version ``` - If version numbers appear, Node.js and your package manager are installed. #### For Linux (Ubuntu/Debian): 1. **Open Terminal:** - Press Ctrl + Alt + T on your keyboard, or - Click the Activities button and type "Terminal" 2. **Update Package List:** ```bash sudo apt update ``` 3. **Install Node.js 24 and optionally pnpm:** ```bash sudo apt install nodejs # Optionally install pnpm (npm comes with Node.js) sudo apt install pnpm ``` 4. **Verify Installation:** - Type these commands one at a time and press Enter after each: ```bash node --version pnpm --version # or npm --version ``` - If version numbers appear, your installation is complete. ### Installing Visual Studio Code VS Code is the editor we'll use to write our code. Here's how to install it: #### For Windows: 1. Visit the [Visual Studio Code website](https://code.visualstudio.com/) 2. Click the blue "Download for Windows" button 3. Once the installer downloads, double-click it 4. Accept the license agreement and click "Next" 5. Leave the default installation location and click "Next" 6. In the Select Additional Tasks window, make sure "Add to PATH" is checked 7. Click "Next" and then "Install" 8. When installation is complete, click "Finish" #### For macOS: 1. Visit the [Visual Studio Code website](https://code.visualstudio.com/) 2. Click the blue "Download for Mac" button 3. Once the .zip file downloads, double-click it to extract 4. Drag Visual Studio Code.app to the Applications folder 5. Double-click the app to launch it 6. To make VS Code available in your terminal: - Open VS Code - Press Command + Shift + P - Type "shell command" and select "Shell Command: Install 'code' command in PATH" #### For Linux (Ubuntu/Debian): 1. Open Terminal (Ctrl + Alt + T) 2. First, update the packages list: ```bash sudo apt update ``` 3. Install the dependencies needed to add Microsoft's repository: ```bash sudo apt install software-properties-common apt-transport-https wget ``` 4. Import Microsoft's GPG key: ```bash wget -q https://packages.microsoft.com/keys/microsoft.asc -O- | sudo apt-key add - ``` 5. Add the VS Code repository: ```bash sudo add-apt-repository "deb [arch=amd64] https://packages.microsoft.com/repos/vscode stable main" ``` 6. Install VS Code: ```bash sudo apt install code ``` 7. Once installed, you can launch VS Code by: - Typing `code` in the terminal, or - Finding it in your Applications menu ### Install Git #### For Windows 1. Open PowerShell (press Windows key, type "PowerShell", and press Enter) 2. Visit the [Git website](https://git-scm.com/) 3. Download the latest version for Windows 4. Run the installer and use the recommended settings 5. Verify installation by opening PowerShell: ```powershell git --version ``` #### For macOS 1. Install using Homebrew: ```bash brew install git ``` 2. Verify installation: ```bash git --version ``` #### For Linux (Ubuntu/Debian) 1. Update package list: ```bash sudo apt update ``` 2. Install Git: ```bash sudo apt install git ``` 3. Verify installation: ```bash git --version ``` ### Configure Git (All Systems) After installation, set up your identity: ```bash git config --global user.name "Your Name" git config --global user.email "your.email@example.com" ``` ### Install the Powerhouse CLI The Powerhouse CLI (installed via the `ph-cmd` package) is a command-line interface tool. It provides the `ph` command, which is essential for managing Powerhouse projects. You can get access to the Powerhouse Ecosystem tools by installing them globally using: ```bash pnpm install -g ph-cmd ``` Or if you're using npm: ```bash npm install -g ph-cmd ``` Key commands include: - `ph connect` for running the Connect application locally - `ph switchboard` or `ph reactor` for starting the API service - `ph init` to start a new project and build a document model - `ph help` to get an overview of all the available commands Use it to create, build, and run Document Models.
How to use different branches? When installing or using the Powerhouse CLI commands you can use the dev & staging branches. These branches contain more experimental features than the latest stable release the PH CLI uses by default. They can be used to get access to a bug fix or features under development. | Command | Description | | ---------------------------------- | ------------------------------------------------- | | **pnpm install -g ph-cmd** | Install latest stable version | | **pnpm install -g ph-cmd@dev** | Install development version | | **pnpm install -g ph-cmd@staging** | Install staging version | | **ph init** | Use latest stable version of the boilerplate | | **ph init --dev** | Use development version of the boilerplate | | **ph init --staging** | Use staging version of the boilerplate | | **ph use latest** | Switch all dependencies to latest stable versions | | **ph use dev** | Switch all dependencies to development versions | | **ph use staging** | Switch all dependencies to staging versions | Please be aware that these versions can contain bugs and experimental features that aren't fully tested.
Managing ph-cmd Versions and Package Information ### Switching Between Versions To change to a different version of `ph-cmd`, reinstall it globally with your package manager: ```bash # Install latest version with a specific tag npm install -g ph-cmd@staging pnpm install -g ph-cmd@dev # Install a specific version number npm install -g ph-cmd@1.2.3-staging.10 pnpm install -g ph-cmd@6.0.0-dev.33 ``` **Important:** Always use the same package manager you used for the original global install to avoid conflicting installations. ### Checking Your Installation Use the `which` command to see where your global install is located: ```bash which ph # Example output: /Users/username/Library/pnpm/ph ``` This shows which package manager was used (in this case, pnpm). ### Viewing Available Versions Use `npm view` to see all available versions and tags: ```bash npm view ph-cmd ``` **Example dist-tags output:** ``` dist-tags: latest: 5.3.0 dev: 6.0.0-dev.33 staging: 5.3.0-staging.24 test: 2.5.0-test.0 ``` ### Best Practices - Use specific version numbers instead of tags when you need exact version consistency - Check `npm view ph-cmd` before switching to see the latest available versions - Remember that without specifying a version, `@latest` is installed by default
### Verify Installation Open your terminal (command prompt) and run the following commands to verify your setup: ```bash node --version pnpm --version git --version ph --version ``` You should see version numbers displayed for all commands, similar to the example output below (your versions might be higher). The output for `ph --version` includes its version and may also show additional messages if further setup like `ph setup-globals` is needed. You're now ready to start building your first Document Model! ```bash % node --version v24.13.0 % pnpm --version 10.10.0 % git --version git version 2.39.3 % ph --version PH CMD version: 0.43.18 ------------------------------------- PH CLI is not available, please run `ph setup-globals` to generate the default global project ``` ## Up next Your machine is ready. Next, set up your [Vetra Drive](/academy/Build/GettingStartedBuilding/VetraDrive) — the workspace where you'll manage document model specifications, editors, and data integrations. --- ## Vetra Drive > Source: https://academy.vetra.io/academy/Build/GettingStartedBuilding/VetraDrive ## Introducing Vetra Drive for Builders Vetra Studio is the builder environment where you create, manage, and collaborate on Powerhouse packages. It consists of two main components: - **Vetra Studio Drive**: Serves as a hub for developers to access, manage & share specifications through a remote Vetra drive. It functions as the orchestration hub where you as a builder assemble all the necessary specifications for your intended use-case, software solution, or package. Each specification document corresponds to a **module** — a distinct building block of your package (such as a document model, editor, or data integration). - **Vetra Package Library**: Store, publish, and fork git repositories of packages in the Vetra Package Library. Visit the [Vetra Package Library here](https://vetra.io/packages) **INFO:** What is a Specification Document? A **specification document** is a configuration file that defines how a specific module in your package should behave. Think of it as a blueprint: it describes the structure, rules, and relationships that Powerhouse uses to generate the actual code for that module. Specification documents make **Specification-Driven Design & Development** possible: you communicate your solution and intent through a structured framework designed for AI collaboration. Specs are a shared language that enables precise, iterative edits. As Vetra Studio matures, each of these specification documents will offer an interface by which you as a builder get more control over the modules that make up your package. For now, the specification documents offer you a template for code generation.
Modules
The list of available modules color coded according to the 3 categories.
### Module Categories ### 1. Document Models A **document model** is a structured data type that defines what information your application can store and how it can be modified. Unlike traditional databases, document models use **operations** (actions like "add item" or "update title") rather than direct data manipulation, making them ideal for collaborative and auditable applications. - **Document model specification**: Defines the structure and operations of a document model using [GraphQL SDL](https://graphql.org/learn/schema/) (Schema Definition Language), ensuring consistent data management and processing. → [Learn more about Document Models](/academy/Build/DocumentModelCreation/WhatIsADocumentModel) ### 2. User Experiences - **Editor specification**: Outlines the interface and functionalities of a document model editor, allowing users to interact with and modify document data. - **Drive-app specification**: Specifies the UI and interactions for managing documents within a drive, providing tailored views and functionalities. → [Learn more about Building Document Editors](/academy/Build/BuildingUserExperiences/BuildingDocumentEditors) → [Learn more about Building a Drive Explorer](/academy/Build/BuildingUserExperiences/BuildingADriveExplorer) ### 3. Data Integrations - **Subgraph specification**: Details the connections and relationships within a subgraph (a subset of your data exposed via a GraphQL API), facilitating efficient data querying and manipulation. - **Codegen Processor Specification**: Describes the process for automatically generating code from document model specifications, ensuring alignment with intended architecture. - **RelationalDb Processor Specification**: Defines how relational databases are structured and queried, supporting efficient data management and retrieval. → [Learn more about Using Subgraphs](/academy/Build/WorkWithData/UsingSubgraphs) → [Learn more about Relational DB Processor](/academy/Build/WorkWithData/RelationalDbProcessor)
Vetra Studio Drive
The Vetra Studio Drive, a builder app that collects all of the specifications of a package.
### Configure a Vetra Drive in Your Project You can connect to a remote Vetra drive instead of using the local one auto-generated when you run `ph vetra` (where `ph` is short for "powerhouse", the CLI tool and the Organization behind Vetra). - **Without** the `--remote-drive` option: Vetra will create a local drive for you that lives in your browser's local storage. This is useful for solo development or experimentation. - **With** the `--remote-drive` argument: Vetra will connect to a remote drive instead of creating a local one. The remote drive can be hosted wherever you want (e.g., on your own server or a shared team environment). The Powerhouse config includes a Vetra URL for consistent project configuration across different environments. ```typescript vetra: { driveId: string; driveUrl: string; } ``` Imagine you are a builder and want to work on, or continue with a set of specifications from your teammates. You could then add the specific remote Vetra drive to your Powerhouse configuration in the `powerhouse.config.json` file to get going: ```json "vetra": { "driveId": "bai-specifications", "driveUrl": "https://switchboard.staging.vetra.io/d/bai-specifications" } ``` An example of a builder team building on the Powerhouse Vetra Ecosystem and its complementary Vetra Studio Drive specifications for the different packages can be found [here](https://vetra.io/builders/bai). ### Connect Claude to the Reactor MCP Claude can connect directly to your running Reactor via the [Model Context Protocol (MCP)](https://modelcontextprotocol.io/), giving it live access to your drives, documents, and document model operations. Add the following configuration to your Claude MCP settings (e.g. `~/.claude/mcp.json` for Claude Code, or the MCP servers section in Claude Desktop): ```json { "mcpServers": { "reactor-mcp": { "command": "npx", "args": ["-y", "mcp-remote", "http://localhost:4001/mcp"] } } } ``` This connects Claude to the Reactor running at `http://localhost:4001`. Make sure `ph vetra --watch` (or `ph reactor`) is running before starting a Claude session that uses the MCP. → See [Connecting Claude with Reactor MCP](/academy/Lookup/Cookbook#connecting-claude-with-reactor-mcp) for a step-by-step walkthrough.
📦 Vetra Remote Drive Commands Remote drives enable collaborative development by syncing specifications across team members. **Key Commands:** - `ph init --remote-drive ` - Create or connect to a project using a remote drive - `ph vetra --watch` - Start development with a preview drive for testing local changes **Workflows:** - **Project Owner**: `ph init --remote-drive` → Create GitHub repo → Push → `ph vetra --watch` to configure - **Collaborator**: `ph init --remote-drive ` → `ph vetra --watch` to start developing **Preview Drive (`--watch` mode):** The preview drive allows you to safely test changes before they affect the shared remote drive. - The main **"Vetra" drive** syncs with the remote and contains the stable package configuration. - The **"Vetra Preview" drive** is created locally for testing document models and editors before syncing your changes to the team. - When restarting Vetra, always use `ph vetra --watch` so it loads your local documents and editors. → [Full Vetra Remote Drive Reference](/academy/Reference/CLITooling/VetraRemoteDrive)
## Up next With your drive set up, [create a package with Vetra](/academy/Build/GettingStartedBuilding/CreateAPackageWithVetra) to see the end-to-end flow, then build one by hand in the [Manual Todo tutorial](/academy/Build/ManualTodoTutorial/ExploreDemoPackage). --- ## Create a package with Vetra > Source: https://academy.vetra.io/academy/Build/GettingStartedBuilding/CreateAPackageWithVetra **INFO:** A **Powerhouse Package** is a distributable unit that bundles one or more document models, editors, and optional reactor modules into a single installable artifact. Once published to the Vetra registry, a package can be installed in any Vetra Cloud environment — extending Connect with new document types and editors, and extending Switchboard with the corresponding reactor logic.
Create a Package
The five steps to build and publish a package to the Vetra ecosystem.
On Vetra Cloud you'll find these steps as a quick reference for creating a package. This guide walks you through each one in detail — from installing the CLI and scaffolding your project to building and testing document models and editors. Publishing is covered separately in [Launch](/academy/Build/Launch/PublishYourProject). **WARNING:** **This tutorial is a summary for builders that are already familiar with building document models**. It summarizes the flow from initial setup to a built, tested package. Please start with the [**Manual Todo tutorial**](/academy/Build/ManualTodoTutorial/CreateNewPowerhouseProject) or the [**Document Model Creation**](/academy/Build/DocumentModelCreation/SpecifyTheStateSchema) section if you are unfamiliar with building a document model.
Key commands that you'll use in this flow - `pnpm install -g ph-cmd` or `npm install -g ph-cmd`: Installs the Powerhouse CLI globally. - `ph init`: Initializes a new Powerhouse project or sets up the local environment. - `ph vetra --interactive`: Launches Vetra Studio in interactive mode for package development. - `ph vetra --interactive --watch`: Launches Vetra Studio with dynamic reloading for document-models and editors. - `ph build`: Builds the project for production. - `pnpm run test` or `npm test`: Runs unit tests. - `ph publish`: Publishes your package to the Vetra registry. - `ph install @your-org-ph/your-package-name`: Installs a published package into a local Powerhouse environment.
## Phase 1: Setup and initialization ### 1.1. Install Powerhouse CLI Ensure you have the Powerhouse Command Line Interface (`ph-cmd`) installed. You use it to manage your Powerhouse projects. ```bash pnpm install -g ph-cmd ``` Or if you're using npm: ```bash npm install -g ph-cmd ``` **INFO:** See the [Prerequisites](/academy/Build/GettingStartedBuilding/Prerequisites) guide for detailed installation instructions for Node.js 24, package managers (pnpm or npm), and Git if you haven't set them up yet. ### 1.2. Initialize your project environment Before creating a specific project, or if you're setting up your environment for the first time, initialize the Powerhouse environment. This command prepares your local setup, including a local Reactor configuration. ```bash ph init my-package ``` Replace `my-package` with your desired package name. If you run `ph init` without a name you will be prompted for one.
How to make use of different branches? When installing or using the Powerhouse CLI commands you are able to make use of the dev & staging branches. These branches contain more experimental features than the latest stable release the PH CLI uses by default. They can be used to get access to a bugfix or features under development. | Command | Description | | ----------------------------------------------------------------------- | ------------------------------------------------- | | **pnpm install -g ph-cmd** or **npm install -g ph-cmd** | Install latest stable version | | **pnpm install -g ph-cmd@dev** or **npm install -g ph-cmd@dev** | Install development version | | **pnpm install -g ph-cmd@staging** or **npm install -g ph-cmd@staging** | Install staging version | | **ph init** | Use latest stable version of the boilerplate | | **ph init --dev** | Use development version of the boilerplate | | **ph init --staging** | Use staging version of the boilerplate | | **ph use latest** | Switch all dependencies to latest stable versions | | **ph use dev** | Switch all dependencies to development versions | | **ph use staging** | Switch all dependencies to staging versions | Please be aware that these versions can contain bugs and experimental features that aren't fully tested.
### 1.3. Launch Vetra Studio You can launch Vetra Studio in two modes: #### Interactive Mode (Recommended for Development) ```bash ph vetra --interactive ``` In interactive mode: - You'll receive confirmation prompts before any code generation - Changes require explicit confirmation before being processed - Provides better control and visibility over document changes #### Watch Mode ```bash ph vetra --interactive --watch ``` In watch mode: - Adding `--watch` to your command enables dynamic loading for document-models and editors in Vetra studio and switchboard. - When enabled, the system will watch for changes in these directories and reload them dynamically. **WARNING:** When you are building your document model the code can break the Vetra Studio environment. A full overview of the Vetra Studio commands can be found in the [Powerhouse CLI](/academy/Reference/CLITooling/PowerhouseCLI#vetra) #### Standard Mode ```bash ph vetra ``` In standard mode: - Changes are processed automatically with 1-second debounce - Multiple changes are batched and processed together - Uses the latest document state for processing
Alternatively: Use Connect Connect is your local development hub. Running it in Studio Mode spins up a local instance with a local Reactor, allowing you to define, build, and test document models. ```bash ph connect ``` This command typically opens Connect in your browser at `http://localhost:3000/`. **INFO:** **Powerhouse Reactors** are essential nodes in the Powerhouse network. They store documents, manage versions, resolve conflicts, and verify document operation histories by rerunning them. Reactors can be configured for local storage (as in Studio Mode), centralized cloud storage, or decentralized storage networks.
### 1.4. Launch Claude with Reactor-MCP Vetra Studio connects to Claude through MCP (Model Context Protocol). This gives you greater control and direction over what the LLM codes for you. **INFO:** Vetra embraces **Specification Driven Design & Development** —an approach where your structured specification documents become the shared language between you and AI agents. You communicate intent through precise specs that are machine-readable and executable.
Explainer: Specification Driven AI In the **Manual Todo tutorial** we've been making use of strict schema definition principles to communicate the intended use case of our document models. The **schema definition language** is not only a shared language that bridges the gap between developer, designer and analyst but also the gap between builder and AI-agent through **specification driven AI control**. - Communicate your solution and intent through a structured specification framework designed for AI collaboration. - Specifications enable precise, iterative edits, since all our specification documents are machine-readable and executable. #### Key Reactor MCP Features **Reactor-mcp** is a Model Context Protocol (MCP) server that bridges AI agents with Powerhouse document operations. - It supports automatic document model creation from natural language descriptions - It implements a smart editor based on the underlying document models - It automatically triggers code generation when documents reach valid state - The MCP server enables the agent to work with both existing and newly created document models - Vetra supports integration with custom remote drives, allowing users to create, share and manage documents within these drives **Document Operations:** - `createDocument` / `getDocument` / `deleteDocument` - Manage documents - `addActions` - Modify document state through operations **Drive Operations:** - `getDrives` / `addDrive` / `getDrive` - Manage document drives - `addRemoteDrive` - Connect to remote drives **Document Model Operations:** - `getDocumentModels` - List available document model types - `getDocumentModelSchema` - Get schema for specific models **Document Model Agent:** A specialized AI agent that guides users through document model creation with requirements gathering, design confirmation, and implementation including state schema definition, operation creation, and code generation.
#### 0. Configure the Reactor MCP Add the following to your Claude MCP settings (`~/.claude/mcp.json` for Claude Code, or the MCP servers section in Claude Desktop): ```json { "mcpServers": { "reactor-mcp": { "command": "npx", "args": ["-y", "mcp-remote", "http://localhost:4001/mcp"] } } } ``` This only needs to be done once. Make sure `ph vetra` is running before starting a Claude session that uses the MCP. #### 1. Start the Reactor MCP: Make sure you are in the same directory as your project. Claude will automatically recognize the necessary files and MCP tools. ```bash claude ``` Claude also understands natural language, so similar phrasings work as well. ```bash connect to the reactor mcp ``` #### 2. Verify MCP connection: - Check that the Reactor MCP is available. - Confirm Vetra Studio shows "Connected to Reactor MCP" ```bash Connected to MCP successfully! I can see there's a "vetra-4de7fa45" drive available. The reactor-mcp server is running and ready for document model operations. or Connected to reactor MCP. You have access to 1 drive: vetra+a049e1b1== ``` ## Phase 2: Package Creation ### 2.1. Set Package Description (Required) 1. Provide a name for your package 2. Add a meaningful description 3. Add keywords to add search terms to your package 4. Confirm changes when prompted in interactive mode ### 2.2. Define Document Model (Required) You can create document models in two ways: #### Manual Creation - Define document schema with fields and types as in the **Manual Todo tutorial** - Create the necessary operations - Add the required modules to your package - The document model creation chapter in the Mastery track provides in depth support [here](/academy/Build/DocumentModelCreation/SpecifyTheStateSchema) → [Learn more about Document Models](/academy/Build/DocumentModelCreation/WhatIsADocumentModel) #### Using MCP (AI-Assisted) - Describe your package, it's functionality and your needs in natural language in great detail. - Claude will: - Generate an appropriate schema in the document model - Create the necessary operations - Implement the required reducers - Place the document in the Vetra drive - Claude will also add the necessary interface in the form of a [document editor](/academy/Build/BuildingUserExperiences/BuildingDocumentEditors) and scaffold the [drive-app functionality](/academy/Build/BuildingUserExperiences/BuildingADriveExplorer) when specified. → [Learn more about Building Document Editors](/academy/Build/BuildingUserExperiences/BuildingDocumentEditors) → [Learn more about Building a Drive Explorer](/academy/Build/BuildingUserExperiences/BuildingADriveExplorer)
Alternatively: Use Connect Within Connect Studio Mode, navigate to the Document Model Editor. Here, you'll specify the structure of your document model using GraphQL Schema Definition Language (SDL). - **State Schema:** Describes the data fields and types within your document (e.g., `ToDoItem` with `id`, `text`, `checked` fields). - This schema is the blueprint for your document model's data. In the same editor, specify the operations (state transitions) for your document model. These are also defined using GraphQL, specifically input types. - **Operations Schema:** Specifies the actions that can be performed on the document (e.g., `AddTodoItemInput`, `UpdateTodoItemInput`, `DeleteTodoItemInput`). - Each input type details the parameters required for an operation. - **Best Practices:** - Clearly define operations (often aligning with CRUD principles). - Use GraphQL input types for operation parameters. - Ensure operations reflect user intent for a clean API. Once your schema and operations are defined in Connect, export the specification. This will download a `.phdm.zip` file (e.g., `YourModelName.phdm.zip`). Save this file in the root of your Powerhouse project directory. Use the Powerhouse CLI to process an exported `.phdm.zip` file and generate the necessary boilerplate code for your document model. ```bash ph generate document-model --document YourModelName.phdm.zip ``` This command creates a new directory under `document-models/YourModelName/` containing: - A JSON file with the document model specification. - A GraphQL file with the state and operation schemas. - A `gen/` folder with autogenerated TypeScript types, action creators, and utility functions based on your schema. - A `src/` folder where you'll implement your custom logic (reducers, utils).
### 2.3. Add Document Editor (Required) #### Manual Creation - Select your target document model - Configure the currently limited editor properties - Add the editor specification to Vetra Studio drive - The system will generate scaffolding code #### Using MCP (AI-Assisted) - Request Claude to create an editor for your document. Do this with the help of a detailed description of the user interface, user experience and logic that you wish to generate. Make sure to reference operations from the document model to get the best results - Claude will: - Generate editor components - Implement necessary hooks - Create required UI elements → [Learn more about Building Document Editors](/academy/Build/BuildingUserExperiences/BuildingDocumentEditors)
Alternatively: Generate command A document editor provides the user interface for interacting with your document model. Generate an editor template: ```bash ph generate editor --name YourModelName --document-type powerhouse/YourModelName ``` - The `--name YourModelName` flag specifies the document model this editor is for. - The `--document-type powerhouse/YourModelName` flag links the editor to the specific document type defined in your model specification. This creates a template file, typically at `editors/your-model-name/editor.tsx`. - Customize this React component to build your UI. - You can use standard HTML, Tailwind CSS (available in Connect), or import custom CSS. - Utilize components from `@powerhousedao/document-engineering` for consistency and rapid development. Learn more at [Document-Engineering](/academy/Reference/EditorsUI/DocumentEngineering)
## Phase 3: Implementation and testing ### 3.1. Implement reducer logic Reducers are pure functions that implement the state transition logic for each operation defined in your schema. Navigate to `document-models/YourModelName/src/reducers/to-do-list.ts` (or similar, based on your model name). - Implement the functions for each operation (e.g., `addTodoItemOperation`, `updateTodoItemOperation`). - These functions take the current state and an action (containing input data) and return the new state. - Powerhouse handles immutability behind the scenes. ### 3.2. Write unit tests for reducers Test your reducer logic. Write unit tests in the `document-models/YourModelName/src/reducers/tests/` directory. - Verify that each operation correctly transforms the document state. - Use the auto-generated action creators from the `gen/` folder to create operation actions for your tests. Run tests using: ```bash pnpm run test ``` Or with npm: ```bash npm test ``` ### 3.3. Test the editor Test your editor in Vetra Studio by creating a new document of your defined type. Interact with your editor, test all functionalities, and ensure it correctly dispatches actions to the reducers and reflects state changes.
Alternatively: Use Connect Run Connect locally to see your editor in action: ```bash ph connect ``` Create a new document of your defined type. Interact with your editor, test all functionalities, and ensure it correctly dispatches actions to the reducers and reflects state changes.
**TIP:** **Working with MCP and Claude** 1. Provide clear, specific instructions. 2. Ask for clarifying questions to be answered before code generation. 3. Review generated schemas before confirmation. 4. Work in layers instead of 'one-shotting' your code. 5. Verify implementation details in generated code before continuing. 6. Always double-check proposed next actions.
Complete Guide: Tips for Working with Claude in Vetra Studio ## Before You Start **Setup Requirements:** 1. Run `ph vetra --interactive --watch` in one terminal first 2. Start Claude in a separate terminal from your project directory 3. Connect with: `claude` or `connect to the reactor mcp` 4. Verify you see the confirmation message with your drive name ## Communication Best Practices ### 1. Always Review Before Implementation **CRITICAL**: Claude will present a proposal before creating anything. You'll see: - Proposed document model structure (state schema, operations, modules) - How data will be organized - What actions users can perform **Always review and confirm** before Claude proceeds. This is your chance to adjust the design. ### 2. Be Specific and Detailed When describing what you need, include: **For Document Models:** - Purpose of the document (what problem does it solve?) - All data fields and their types (strings, numbers, dates, etc.) - What operations users should be able to perform - Any relationships between data - Business rules or constraints **For Document Editors:** - Which document model it's for - UI layout and components you want - User interactions and workflows - Specific operations to use (by name from your document model) - Any styling preferences ### 3. Use Clear Examples Good prompt for a document model: ``` Create a document model for expense tracking with: - Each expense has: amount (number), description (text), category (expense type), date, and receipt URL (optional) - Users can: add expenses, edit expense details, delete expenses, and categorize by type - Track total amount automatically ``` Good prompt for an editor: ``` Create an editor for the expense tracker with: - A form to add new expenses (amount, description, category, date) - A table showing all expenses with sort by date - Each row has edit and delete buttons - Show total at the bottom - Use the addExpense, updateExpense, and deleteExpense operations ``` ### 4. Work in Layers (Don't "One-Shot") Instead of asking for everything at once: - ✅ Start with the core document model - ✅ Test it works - ✅ Then add the editor - ✅ Then add advanced features This approach catches issues early and gives you better results. ### 5. Interactive Mode Benefits Using `ph vetra --interactive` gives you confirmation prompts: - Schema changes - Operation definitions - Code generation **Review each step** before confirming - it's easier to adjust now than later. ### 6. What to Expect After Implementation Claude will automatically: - Run TypeScript checks (`npm run tsc`) - Run linting (`npm run lint:fix`) - Report any errors found - Fix issues if needed You'll see confirmation when everything compiles successfully. ### 7. Common Issues and How to Avoid Them **Issue**: Generated model doesn't match expectations - **Solution**: Provide more detailed requirements upfront. Ask clarifying questions. **Issue**: Operations don't work as expected - **Solution**: Be explicit about all actions and their parameters. Use real-world examples. **Issue**: Editor UI doesn't look right - **Solution**: Describe the UI in detail (layout, components, interactions). Reference similar interfaces if helpful. ## Key Concepts to Know - **Document Model**: The template/blueprint for your documents (like a database schema) - **Document**: An actual instance with real data (like a database record) - **Operations**: Actions users can perform (like "add expense", "update status") - **Editor**: The user interface to interact with your documents - **Drive**: A collection that holds your documents (like a folder) ## Quick Tips 1. **Be specific**: More detail = better results 2. **Review proposals**: Always check before confirming 3. **Work incrementally**: Build in layers, not all at once 4. **Use operation names**: Reference them when describing editor functionality 5. **Ask questions**: If unsure, ask Claude to clarify or suggest options 6. **Test as you go**: Create model first, test it, then add the editor ## What Claude Can Do For You - Generate complete document models from natural language - Create all necessary operations automatically - Build React editor interfaces with your specifications - Handle all the TypeScript and boilerplate code - Fix type errors and linting issues - Add demo documents to test your models ## What You Should Focus On - Clearly describing your business requirements - Defining what data you need to track - Specifying what actions users should perform - Reviewing and confirming proposals - Testing the generated results **Remember**: Claude works best with clear, detailed requirements. Take time to explain what you want - it's faster than multiple iterations to fix misunderstandings.
## Phase 4: Package and publish With your document model and editor implemented and tested, package and publish them for distribution. Publishing is covered in one place for both the manual and Vetra workflows — it walks through configuring package details, building, versioning, and publishing to NPM or the Vetra registry: → [Publish your package](/academy/Build/Launch/PublishYourProject) ## Up next You've seen the full Vetra flow. Now build a package by hand, step by step, in the [Manual Todo tutorial](/academy/Build/ManualTodoTutorial/ExploreDemoPackage). --- ## Vetra builder tooling > Source: https://academy.vetra.io/academy/Build/GettingStartedBuilding/BuilderTools An overview of the builder tooling in the Powerhouse/Vetra ecosystem, for the manual (CLI) builder workflow. This list grows as the toolkit does. ## Powerhouse CLI The Powerhouse CLI (`ph-cmd`) is the command-line entry point for building by hand: scaffolding projects, generating code, and running Connect and the Reactor locally. - Install it and verify your setup in [Prerequisites](/academy/Build/GettingStartedBuilding/Prerequisites). - For the full command list — `ph init`, `ph use`, `ph update`, `ph generate`, and the rest — see the [Powerhouse CLI reference](/academy/Reference/CLITooling/PowerhouseCLI). - For task-oriented walkthroughs (switching versions, managing dependencies, publishing), see the [Cookbook](/academy/Lookup/Cookbook). ## Boilerplate The Document Model boilerplate is the foundational template used for code generation when scaffolding your editors and models. It ensures compatibility with host applications like Connect and Switchboard for document model and editor integration. After installing `ph-cmd`, run `ph init` to initialize a project directory and structure; this command uses the boilerplate. The boilerplate includes scripts for generating code, linting, formatting, building, and testing. ## Design system The Powerhouse Design System is a collection of reusable front-end components based on GraphQL scalars, including custom scalars specific to the web3 ecosystem. It provides: - Consistent UI components across Powerhouse applications - Automatic inclusion as a dependency in new document model projects - Customization options using CSS variables Read more in the [Component Library documentation](/academy/Reference/EditorsUI/DocumentEngineering). ## Reactor libraries Reactors are the nodes in the Powerhouse network that handle document storage, conflict resolution, and operation verification. The Reactor libraries include: - **API** — **Subgraphs** (modular GraphQL services that connect to the Reactor for structured data access) and **Processors** (event-driven components that react to document changes and process data). - **Browser** — handles client-side interactions. - **Local** — manages local storage and offline functionality. - **drive-app** — handles document organization and storage management, and can be customized to offer specific functionality, categorization, or tailored interfaces for your documents. ## Code generators Powerhouse provides several code generation tools: ### Document model scaffolding Generates the basic structure for new document models with `ph init`, based on the boilerplate. ### Editor generator Creates template code for document model editors: `ph generate editor --name --document-type `. ### Subgraph generator Creates GraphQL subgraph templates for data access automatically on `ph reactor`. ### Processor generator Generates processor templates for event handling automatically on `ph reactor`. ### Analytics processor generator Creates specialized processors for analytics tracking. ## Analytics engine The Analytics Engine tracks and analyzes operations and state changes on document models. Features include: - Custom dashboard and report generation - Document-model-specific analytics - Metric and dimension tracking - Data combination from multiple document models Generate an analytics processor with: ```bash ph generate processor --type analytics ``` --- ## Explore the demo package > Source: https://academy.vetra.io/academy/Build/ManualTodoTutorial/ExploreDemoPackage Before recreating the package yourself, install the finished version to see what you'll build. The demo is a pre-built package containing a document model, an editor, and a Drive-app — the same "To-do List Demo Package" you'll recreate across this tutorial. ## Step 1: Confirm the CLI is installed You set up `ph-cmd` in [Prerequisites](/academy/Build/GettingStartedBuilding/Prerequisites). Verify it: ```bash ph --version ``` If the command isn't found, complete [Prerequisites](/academy/Build/GettingStartedBuilding/Prerequisites) first. ## Step 2: Initialize a new project Now use the `ph init` command to initialize a new project and install a Powerhouse package inside the project. You'll be asked to name your project. Afterwards, move inside your project with `cd project-name` ## Step 3: Install the to-do list demo package Now, use the `ph install` command to install the demo package inside the project. ```bash # Install the package ph install @powerhousedao/todo-demo ``` This command downloads and sets up the `@powerhousedao/todo-demo`, making its features available in your Powerhouse project.
Expected CLI result ```bash installing dependencies 📦 ...  WARN  19 deprecated subdependencies found: @esbuild-kit/core-utils@3.3.2, @esbuild-kit/esm-loader@2.6.5, @npmcli/move-file@1.1.2, @paulmillr/qr@0.2.1, are-we-there-yet@3.0.1, gauge@4.0.4, glob@7.2.3, graphql-language-service-interface@2.10.2, graphql-language-service-parser@1.10.4, graphql-language-service-types@1.8.7, graphql-language-service-utils@2.7.1, inflight@1.0.6, multibase@4.0.6, multicodec@3.2.1, node-domexception@1.0.0, npmlog@6.0.2, rimraf@2.7.1, rimraf@3.0.2, sudo-prompt@8.2.5 Packages: +1 + Progress: resolved 2277, reused 2106, downloaded 1, added 1, done  WARN  Issues with peer dependencies found . ├─┬ @powerhousedao/reactor-browser 3.1.0 │ └─┬ @powerhousedao/analytics-engine-browser 0.6.0 │ └── ✕ unmet peer @powerhousedao/analytics-engine-knex@0.5.1: found 0.6.0 ├─┬ @types/react-dom 19.1.6 │ └── ✕ unmet peer @types/react@^19.0.0: found 18.3.23 └─┬ react-native 0.80.0 ├── ✕ unmet peer @types/react@^19.1.0: found 18.3.23 ├── ✕ unmet peer react@^19.1.0: found 18.3.1 └─┬ @react-native/virtualized-lists 0.80.0 └── ✕ unmet peer @types/react@^19.0.0: found 18.3.23 dependencies: + @powerhousedao/todo-demo-package 1.1.1 ╭ Warning ───────────────────────────────────────────────────────────────────────────────────────────────╮ │ │ │ Ignored build scripts: @acaldas/graphql-codegen-typescript-validation-schema, @apollo/protobufjs, │ │ @datadog/pprof, @ipshipyard/node-datachannel, @parcel/watcher, @prisma/client, @prisma/engines, │ │ @tailwindcss/oxide, bufferutil, esbuild, keccak, prisma, sqlite3, utf-8-validate. │ │ Run "pnpm approve-builds" to pick which dependencies should be allowed to run scripts. │ │ │ ╰────────────────────────────────────────────────────────────────────────────────────────────────────────╯ Done in 6s using pnpm v10.9.0 Dependency installed successfully 🎉 ⚙️ Updating powerhouse config file... Config file updated successfully 🎉 ```
You have now successfully installed `ph-cmd`, initalized a product project and added your first package! ## Step 4: Run the Connect host application To run the package locally in Connect, run: ```bash ph connect ``` Click the returned localhost URL and you should see Connect appear in your browser. **INFO:** **Connect** is the Powerhouse host application—a container that runs all your apps, editors, and drives. Think of it as the browser for your Powerhouse ecosystem. **Vetra Studio** (which you'll use for building) runs inside Connect, just like how a web app runs inside a browser.
Connect Home
The Powerhouse Connect interface.
When you click the settings wheel in the bottom right corner, you'll get access to the **Package Manager**. Here, you'll see that you've installed the `@powerhousedao/todo-demo`, which contains not only a **Document Model** and its accompanying editor but also a **Drive-app** specific to the todo-list document model.
Package Manager
The Package Manager showing the installed todo-demo-package.
## Step 5: Create a todo list document **TIP:** A **drive** is a folder to store and organize your documents in. Powerhouse offers the ability to build customized Drive-apps for your documents. Think of a Drive-app as a specialized lens—it offers **different ways to visualize, organize, and interact with** the data stored within a drive, making it more intuitive and efficient for specific use cases. To learn more, visit [Building a Drive-app](/academy/Build/BuildingUserExperiences/BuildingADriveExplorer) **TIP:** An **editor** is a UI component for viewing and modifying a single document. A **Drive-app** is a custom interface for managing multiple documents within a drive—providing aggregated views, progress tracking, and specialized workflows across your document collection. ### 5.1 Create a local todo-list app drive First, let's create a dedicated drive for your to-do lists: - Click the new drive icon in the interface - In the **Drive-app** field, select 'todo-list Drive-app' - This creates a specialized drive that's optimized for to-do list documents ### 5.2 Create a todo-list document Now move into the drive you've just created: - Click the button at the bottom of the page to create a new to-do list document - This opens the to-do list editor where you can start managing your tasks ### 5.3 Add a few todos and inspect the document history - Add a few to-dos that are on your mind - You'll see a statistics widget that counts the open to-dos - After closing the document, look at the todo-list Drive-app interface—you'll see that it tracks your tasks and displays a progress bar This is an example of the **usefulness and impact of Drive-apps**. They offer a customized interface that works well with the different documents inside your drive. Read more about Drive-apps in the Mastery Track: [Drive-apps](/academy/Build/BuildingUserExperiences/BuildingADriveExplorer). A key feature of Connect is the **Operations History**. Every change to a document is stored as an individual operation, creating an immutable and replayable history. This provides complete auditability and transparency, as you can inspect each revision, its details, and any associated signatures. For example, you can see a chronological list of all modifications, along with who made them and when.
Operations History Button
You can find the button to visit the operations history in the document model toolbar
Operations History
Example of the operations history for a document, showing all modifications made to it in a list.{" "}
Learn more about the [Operations History](/academy/Build/BuildingUserExperiences/DocumentTools/OperationHistory) and other document tools you get for free. ## Step 6: Enable operation signing and verification through Renown Renown is Powerhouse's **decentralized identity and reputation system** designed to address the challenge of trust within open organizations, where contributors often operate under pseudonyms. In traditional organizations, personal identity and reputation are key to establishing trust and accountability. Renown replicates this dynamic in the digital space, allowing contributors to earn experience and build reputation without revealing their real-world identities. **TIP:** When signing in with Renown, use an Ethereum or blockchain address that can function as your 'identity', as this address will accrue more experience and history over time. ### 6.1 Click the renown icon and connect your Ethereum identity "**Log in with Renown**" is a decentralized authentication flow that enables you to log into applications by signing a credential with your Ethereum wallet. Upon signing in, a Decentralized Identifier (DID) is created based on your Ethereum key.
Renown Login
The Renown login screen, prompting for a signature from a wallet.
### 6.2 Authorize Connect to sign document edits on your behalf This DID is then associated with a credential that authorizes a specific Connect instance to act on your behalf. That credential is stored securely on Ceramic, a decentralized data network. When you perform actions through the Powerhouse Connect interface, those operations are signed with the DID and transmitted to Switchboard, which serves as the verifier.
Connect Address for DID
A newly generated DID and address shown within the Connect interface.
Renown Login Complete
Confirmation of a successful login with Renown.
### 6.3 Verify the signatures of new operations in the todo list With this system, every operation made to a document is cryptographically signed by the contributor's Renown identity. Each change is verifiable, traceable, and attributable to a specific pseudonymous user, giving every document a complete audit trail. Now, return to your to-do list and make some additional changes. You'll notice that these operations are now signed with your Renown identity, making every action traceable and verifiable in the operations history.
Operation History Signature
Your DID is now signing the operations that are being added to the history.
## Step 7: Export a document Export the document as a `.phd` (Powerhouse Document) file using the export button in the document toolbar at the top. In this toolbar, you will find all available functionality for your documents. The `.phd` file can be sent through any of your preferred channels to other users on your network. ### Up next Now that you have explored a Powerhouse package and discovered its basic functionalities, it is time to start building your own. Our next tutorial focuses on creating a simple to-do list document and will introduce you to the world of **Document Models**—the foundation of **Specification Driven Design & Development**, where structured specs become the shared language between you and AI agents. --- ## Create a new to-do list document > Source: https://academy.vetra.io/academy/Build/ManualTodoTutorial/CreateNewPowerhouseProject **TIP:** 📦 **Reference Code**: [step-1-initialize-with-ph-init](https://github.com/powerhouse-inc/todo-tutorial/tree/step-1-initialize-with-ph-init) This tutorial step has a corresponding branch in the repository. You can: - View the complete code for this step - Clone and checkout the branch to see the result - Compare your implementation using `git diff` ::: ## Overview This tutorial guides you through creating a simplified version of a 'Powerhouse project' for a **todo-list**. A Powerhouse project primarily consists of a document model and its editor. As your projects use-case expands you can add data-integrations or a specific Drive-app as seen in the demo package. For today's purpose, you'll be using **Vetra Studio**, the builder platform through which developers can access and manage specifications of your project. Vetra Studio runs inside **Connect**, the Powerhouse host application that serves as a container for all Powerhouse apps and drives. ## Prerequisites - Powerhouse CLI installed: `pnpm install -g ph-cmd` or `npm install -g ph-cmd` - Node.js 24 and a package manager (pnpm or npm) installed - Visual Studio Code (or your preferred IDE) - Terminal/Command Prompt access If you need help with installing the prerequisites you can visit our page [prerequisites](/academy/Build/GettingStartedBuilding/Prerequisites)
📖 How to use this tutorial This tutorial is designed for you to **build your own project from scratch** while having access to reference code at each step. ### Setup: Create your project and connect to tutorial repo 1. **Create your project** following the tutorial: ```bash mkdir ph-projects cd ph-projects ph init # When prompted, enter project name: todo-tutorial cd todo-tutorial ``` 2. **Add the tutorial repository as a remote** to access reference branches: ```bash git remote add tutorial https://github.com/powerhouse-inc/todo-tutorial.git git fetch tutorial --prune ``` 3. **Create your own branch** to keep your work organized: ```bash git checkout -b my-todo-project ``` Now you have access to all tutorial step branches while working on your own code! ### Compare your work with reference steps At any point, compare what you've built with a tutorial step: ```bash # Compare your current work with step-1 git diff tutorial/step-1-initialize-with-ph-init # See what changed between tutorial steps git diff tutorial/step-1-initialize-with-ph-init..tutorial/step-2-generate-todo-list-document-model # Compare specific files git diff tutorial/step-1-initialize-with-ph-init -- package.json ``` ### Visual diff with GitHub Desktop For a more visual comparison, use GitHub Desktop: 1. **First, make your initial commit** (GitHub Desktop won't show your branch until you have at least one commit): ```bash git add . git commit -m "Initial project setup" ``` 2. **Open GitHub Desktop** and open your repository 3. **Compare branches visually**: - Click on **Branch** menu in the top menu bar - Select **"Compare to Branch..."** - Choose the tutorial branch you want to compare with (e.g., `tutorial/step-1-initialize-with-ph-init`) - GitHub Desktop will show you all file differences in a visual interface 4. **Review the differences**: - Click on any file to see side-by-side or unified diff view - See exactly what's different between your code and the reference **Tip**: You can also use VS Code's Git Graph extension or the command palette → "Git: Compare with Branch" ### If you get stuck Reset your code to match a tutorial step: ```bash # Reset to step-2 (WARNING: loses your changes) git reset --hard tutorial/step-2-generate-todo-list-document-model ```
## Quick start Create a new Powerhouse project with a single command: ```bash ph init ``` ## Before you begin 1. Open your terminal (either your system terminal or IDE's integrated terminal) 2. Optionally, create a folder first to keep your Powerhouse projects: ```bash mkdir ph-projects cd ph-projects ``` 3. Ensure you're in the correct directory before running the `ph init` command. In the terminal, you will be asked to enter the project name. Fill in the project name and press Enter. ````bash you@yourmachine:~/ph-projects % ph init ? What is the project name? ‣ todo-tutorial ``` ```` Once the project is created, you will see output like: ```bash 🚀 Initializing a new project... ▶️ Creating directory for project "todo-tutorial"... ✅ Project directory created ▶️ Initializing git repository... ✅ Git repository initialized ▶️ Creating project boilerplate files... ✅ Project boilerplate files created ▶️ Installing project dependencies with npm... ✅ Project dependencies installed ▶️ Formatting boilerplate project files... ✅ Boilerplate files formatted 🎉 Successfully created project "todo-tutorial" 🎉 ``` Navigate to the newly created project directory: `bash cd todo-tutorial ` ## Develop a single document model in Vetra Studio **Vetra Studio** is the builder's orchestration hub for assembling all specifications needed for your package. It provides a **Vetra Studio Drive** to access, manage, and share document model specifications, editors, and data integrations—all through a visual interface. For deeper coverage, see the [Vetra Studio documentation](/academy/GetStarted/VetraStudio). Once in the project directory, run the `ph vetra --watch` command to start a Vetra Studio Drive where you'll be defining your specifications. This is the preferred way to launch your development environment. **INFO:** You'll notice "reactor-api" in the terminal output. A **Reactor** is the Powerhouse back-end service that hosts your drives, handles document synchronization, and provides the GraphQL API. When you run `ph vetra --watch`, a local Reactor starts automatically to power your development environment. ```bash ph vetra --watch ``` The host application for Vetra Studio will start and you will see the following output: ```bash ℹ [reactor-api] [package-manager] Loading packages: @powerhousedao/vetra 14:44:19 ℹ [reactor-api] [server] WebSocket server available at /graphql/subscriptions 14:44:22 ℹ [reactor-api] [graphql-manager] Registered /graphql/system subgraph. 14:44:22 ℹ [reactor-api] [graphql-manager] Registered /graphql/analytics subgraph. 14:44:22 ℹ [reactor-api] [graphql-manager] Registered /d/:drive subgraph. 14:44:22 ℹ [reactor-api] [graphql-manager] Registered /graphql supergraph 14:44:23 ℹ [reactor-api] [graphql-manager] Registered /graphql/document-editor subgraph. 14:44:23 ℹ [reactor-api] [graphql-manager] Registered /graphql/vetra-package subgraph. 14:44:23 ℹ [reactor-api] [graphql-manager] Registered /graphql/subgraph-module subgraph. 14:44:23 ℹ [reactor-api] [graphql-manager] Registered /graphql/processor-module subgraph. 14:44:23 ℹ [reactor-api] [graphql-manager] Registered /graphql/app-module subgraph. 14:44:23 ℹ [reactor-api] [graphql-manager] Registered /graphql/vetra-read-model subgraph. 14:44:23 ℹ [reactor-api] [server] MCP server available at http://localhost:4001/mcp 14:44:24 Switchboard initialized 14:44:24 ➜ Drive URL: http://localhost:4001/d/vetra-bac239dd 14:44:24 2:44:24 PM [vite] (client) Re-optimizing dependencies because vite config has changed 14:44:24 Port 3000 is in use, trying another one... 14:44:24 ➜ Local: http://localhost:3000/ 14:44:24 ➜ Network: use --host to expose 14:44:24 ➜ press h + enter to show help ```` A new browser window will open when visiting localhost and you will see the Vetra Studio Drive
Vetra Studio Drive
The Vetra Studio Drive, a builder app that collects all of the specification of a package.
Create a new document model by clicking the Document Models 'Add new specification' button. Name your document TodoList (PascalCase, no spaces or hyphens). If you've followed the steps correctly, you'll have an empty TodoList document where you can define the 'Document Specifications' in the next step.
Alternatively: Develop a single document model in Connect (legacy) **NOTE:** The `ph connect` command is a legacy feature. We recommend using `ph vetra --watch` for all new development, as it provides better tooling and automatic code generation. Once in the project directory, run the `ph connect` command to start a local instance of the Connect application. This allows you to start your document model specification document. Run the following command to start the Connect application: ```bash ph connect ``` The Connect application will start and you will see the following output: ```bash ➜ Local: http://localhost:3000/ ➜ Network: http://192.168.5.110:3000/ ➜ press h + enter to show help ``` A new browser window will open and you will see the Connect application. If it doesn't open automatically, you can open it manually by navigating to `http://localhost:3000/` in your browser. You will see your local drive and a button to create a new drive. **TIP:** If you local drive is not present navigate into Settings in the bottom left corner. Settings > Danger Zone > Clear Storage. Clear the storage of your localhost application as it might has an old session cached. 4. Move into your local drive. Create a new document model by clicking the `DocumentModel` button, found in the 'New Document' section at the bottom of the page. Name your document `TodoList` (PascalCase, no spaces or hyphens). If you've followed the steps correctly, you'll have an empty `TodoList` document where you can define the **'Document Specifications'**.
## Verify your setup At this point, your project structure should match the `step-1-initialize-with-ph-init` branch. You should have: - Empty `document-models/`, `editors/`, `processors/`, and `subgraphs/` directories - Configuration files: `powerhouse.config.json`, `powerhouse.manifest.json` - Package management files: `package.json`, `pnpm-lock.yaml` - Build configuration: `tsconfig.json`, `vite.config.ts`, `vitest.config.ts` ### Compare with reference implementation Verify your initial setup matches the tutorial: ```bash # Compare your project structure with step-1 git diff tutorial/step-1-initialize-with-ph-init # List files in the tutorial's step-1 git ls-tree -r --name-only tutorial/step-1-initialize-with-ph-init # View a specific config file from step-1 git show tutorial/step-1-initialize-with-ph-init:package.json ```` ## ph install / ph add ```bash ph install [dependencies...] [--registry ] [--local] [--allow-build ] ``` Aliases: `ph add`, `ph i` The install command adds Powerhouse dependencies to your project. By default it only registers the package in `powerhouse.config.json` with provider `"registry"` — Connect will load it from the registry CDN at runtime. With `--local`, the package is also installed into `node_modules` and marked as provider `"local"` — it will be bundled into `ph connect build` so the preview works without the registry being reachable. Resolution order for the registry URL: `--registry` flag > `PH_REGISTRY_URL` env > `powerhouse.config.json` > default ## Up next In the next tutorials, you will learn how to specify, add code and build an editor for your document model and export it to be used in your Powerhouse package. --- ## Write the document specification > Source: https://academy.vetra.io/academy/Build/ManualTodoTutorial/DefineToDoListDocumentModel **TIP:** 📦 **Reference Code**: [step-2-generate-todo-list-document-model](https://github.com/powerhouse-inc/todo-tutorial/tree/step-2-generate-todo-list-document-model) This tutorial step has a corresponding branch. After completing this step, your project will have a generated document model with: - Document model specification files (`todo-list.json`, `schema.graphql`) - Auto-generated TypeScript types and action creators - Reducer scaffolding ready for implementation :::
📖 How to use this tutorial **Prerequisites**: Complete step 1 and set up the tutorial remote (see previous step). ### Compare your generated code After running `ph generate document-model --document TodoList.phdm.zip`, compare with the reference: ```bash # Compare all generated files with step-2 git diff tutorial/step-2-generate-todo-list-document-model # Compare specific directory git diff tutorial/step-2-generate-todo-list-document-model -- document-models/todo-list/ ``` ### See what was generated View the complete step-2 reference code: ```bash # List files in the tutorial's step-2 git ls-tree -r --name-only tutorial/step-2-generate-todo-list-document-model document-models/ # View a specific file from step-2 git show tutorial/step-2-generate-todo-list-document-model:document-models/todo-list/schema.graphql ``` ### Visual comparison with GitHub Desktop After making a commit, use GitHub Desktop for visual diff: 1. **Branch** menu → **"Compare to Branch..."** 2. Select `tutorial/step-2-generate-todo-list-document-model` 3. Review all file differences in the visual interface See step 1 for detailed GitHub Desktop instructions.
In this tutorial, you will learn how to define the specifications for a **todo-list** document model within Vetra Studio using its GraphQL schema, and then export the resulting document model specification document for your Powerhouse project. If you don't have a document specification file created yet, have a look at the previous step of this tutorial to create a new document specification. ## TodoList document specification We'll continue with this project to teach you how to create a document model specification and later an editor for your document model. We use the **GraphQL Schema Definition Language** (SDL) to define the schema for the document model. Below, you can see the SDL for the `TodoList` document model. **INFO:** This schema defines the **data structure** of the document model and the types involved in its operations, which are detailed further as input types. Documents in Powerhouse use **event sourcing**: every state transition is an operation. GraphQL input types describe those operations and the parameters each one needs, which makes state transitions explicit, validated, and reproducible. This is the essence of **Specification Driven Design & Development**: your schema serves as a machine-readable specification that both humans and AI agents can understand and execute—turning your intent into precise, maintainable functionality.
State schema of our simplified TodoList ```graphql # The state of our TodoList - contains an array of todo items type TodoListState { items: [TodoItem!]! } # A single to-do item with its properties type TodoItem { id: OID! # Unique identifier for each to-do item text: String! # The text description of the to-do item checked: Boolean! # Status of the to-do item (checked/unchecked) } ```
Operations schema of our simplified TodoList ```graphql # Defines a GraphQL input type for adding a new to-do item # Only text is required - ID is generated automatically, checked defaults to false input AddTodoItemInput { text: String! # The text for the new todo item } # Defines a GraphQL input type for updating a to-do item # ID is required to identify which item to update # text and checked are optional - only provided fields will be updated input UpdateTodoItemInput { id: OID! # Required: which item to update text: String # Optional: new text value checked: Boolean # Optional: new checked state } # Defines a GraphQL input type for deleting a to-do item input DeleteTodoItemInput { id: OID! # The ID of the item to delete } ```
## Define the document model specification ### The steps below show you how to do this: 1. In Vetra Studio, click on **'document model'** to open the document model specification editor. 2. Name your document model `TodoList` (PascalCase, no spaces or hyphens) in the Connect application. **Pay close attention to capitalization, as it influences code generation.** 3. You'll be presented with a form to fill in metadata about the document model. Fill in the details in the respective fields. In the **Document Type** field, type `powerhouse/todo-list` (lowercase with hyphen). This defines the new type of document that will be created with this document model specification. ![TodoList Document Model Form Metadata](../docs/docs/images/DocumentModelHeader.png) 4. In the code editor, you can see the SDL for the document model. Replace the existing SDL template with the SDL defined in the [State Schema](#state-schema) section. Only copy and paste the types, leaving the inputs for the next step. You can, however, already press the 'Sync with schema' button to set the initial state of your document model specification based on your Schema Definition Language. 5. Below the editor, find the input field `Add module`. You'll use this to create and name a module for organizing your input operations. In this case, we will name the module `todos`. Press enter. 6. Now there is a new field, called `Add operation`. Here you will have to add each input operation to the module, one by one. 7. Inside the `Add operation` field, type `ADD_TODO_ITEM` and press enter. A small editor will appear underneath it, with an empty input type that you have to fill. Copy the first input type from the [Operations Schema](#operations-schema) section and paste it in the editor. The editor should look like this: ```graphql input AddTodoItemInput { text: String! } ``` 8. Repeat the process from step 7 for the other input operations: `UPDATE_TODO_ITEM` and `DELETE_TODO_ITEM`. You may have noticed that you only need to add the name of the operation (e.g., `UPDATE_TODO_ITEM`, `DELETE_TODO_ITEM`) without the `Input` suffix. It will then be generated once you press enter. 9. In the meantime Vetra has been keeping an eye on your inputs and started code generation in your directory. In your terminal you will also find any validation errors that help you to identify missing specifications. Check below screenshot for the complete implementation: ![ToDoList Document Model](../docs/docs/images/DocumentModelOperations.png) ## Verify your document model generation If you have been watching the terminal in your IDE you will see that Vetra has been tracking your changes and scaffolding your directory. It will mention: ``` ℹ [Vetra] Document model TodoList is valid, proceeding with code generation ``` Your project should have the following structure in `document-models/todo-list/`: ``` document-models/todo-list/ ├── index.ts ├── todo-list.json # Document model specification ├── v1/ │ ├── index.ts │ ├── actions.ts │ ├── hooks.ts │ ├── module.ts │ ├── schema.graphql # GraphQL schema │ ├── utils.ts │ ├── gen/ # Auto-generated code (don't edit) │ │ ├── schema/ │ │ │ └── index.ts │ │ ├── actions.ts │ │ ├── controller.ts │ │ ├── creators.ts │ │ ├── document-model.ts │ │ ├── document-schema.ts │ │ ├── document-type.ts │ │ ├── index.ts │ │ ├── ph-factories.ts │ │ ├── reducer.ts │ │ ├── types.ts │ │ ├── utils.ts │ │ └── todos/ # Per-module generated files │ │ ├── actions.ts │ │ ├── creators.ts │ │ ├── error.ts │ │ └── operations.ts │ ├── src/ # Your custom implementation │ │ ├── index.ts │ │ ├── utils.ts │ │ └── reducers/ │ │ └── todos.ts │ └── tests/ │ ├── document-model.test.ts │ └── todos.test.ts └── upgrades/ ├── index.ts ├── upgrade-manifest.ts ├── v1.ts └── versions.ts ``` **TIP:** To make sure everything works as expected: ```bash # Check types compile correctly pnpm tsc # Check linting passes pnpm lint # Compare your generated files with step-2 git diff tutorial/step-2-generate-todo-list-document-model -- document-models/todo-list/ ``` ### Up next: reducers Up next, you'll learn how to implement the runtime logic and components that will use the `TodoList` document model specification you've just created and exported. --- ## Implement the document model reducers > Source: https://academy.vetra.io/academy/Build/ManualTodoTutorial/ImplementOperationReducers **TIP:** 📦 **Reference Code**: [step-3-implement-reducer-operation-handlers](https://github.com/powerhouse-inc/todo-tutorial/tree/step-3-implement-reducer-operation-handlers) This step focuses on implementing the reducer logic for add, update, and delete operations.
📖 How to use this tutorial ### Compare your reducer implementation After implementing your reducers: ```bash # Compare your reducers with the reference git diff tutorial/step-3-implement-reducer-operation-handlers -- document-models/todo-list/src/reducers/ # View the reference reducer implementation git show tutorial/step-3-implement-reducer-operation-handlers:document-models/todo-list/src/reducers/todos.ts ``` ### Visual comparison with GitHub Desktop After committing your work, compare visually: 1. **Branch** menu → **"Compare to Branch..."** 2. Select `tutorial/step-3-implement-reducer-operation-handlers` 3. Review differences in the visual interface ### If you get stuck View or reset to a specific step: ```bash # View the reducer code git show tutorial/step-3-implement-reducer-operation-handlers:document-models/todo-list/src/reducers/todos.ts # Reset to this step (WARNING: loses your changes) git reset --hard tutorial/step-3-implement-reducer-operation-handlers ```
Now implement the operation reducers for the **todo-list** document model. In the previous step, Vetra imported the document specification and scaffolded the code and directory through live code generation. **INFO:** Reducers are a core concept in Powerhouse document models. They implement the state transition logic for each operation defined in your schema. **Connection to schema definition language (SDL)**: The reducers directly implement the operations you defined in your SDL. Remember how we defined `AddTodoItemInput`, `UpdateTodoItemInput`, and `DeleteTodoItemInput` in our schema? The reducers provide the actual implementation of what happens when those operations are performed. ## Explore the generated reducer file Navigate to `/document-models/todo-list/src/reducers/todos.ts` and open it. You should see scaffolding code that needs to be filled for the three operations you specified: ```typescript export const todoListTodosOperations: TodoListTodosOperations = { addTodoItemOperation(state, action) { // TODO: Implement "addTodoItemOperation" reducer throw new Error('Reducer "addTodoItemOperation" not yet implemented'); }, updateTodoItemOperation(state, action) { // TODO: Implement "updateTodoItemOperation" reducer throw new Error('Reducer "updateTodoItemOperation" not yet implemented'); }, deleteTodoItemOperation(state, action) { // TODO: Implement "deleteTodoItemOperation" reducer throw new Error('Reducer "deleteTodoItemOperation" not yet implemented'); }, }; ``` ## Implement the operation reducers Let's implement each reducer one by one. ### Step 1: Add the import First, add the `generateId` import at the top of the file: ```typescript // added-line ``` ### Step 2: Implement addTodoItemOperation Replace the boilerplate `addTodoItemOperation` with the actual implementation: ```typescript export const todoListTodosOperations: TodoListTodosOperations = { // removed-start addTodoItemOperation(state, action) { // TODO: Implement "addTodoItemOperation" reducer throw new Error('Reducer "addTodoItemOperation" not yet implemented'); }, // removed-end // added-start addTodoItemOperation(state, action) { const id = generateId(); state.items.push({ ...action.input, id, checked: false }); }, // added-end updateTodoItemOperation(state, action) { // ... }, deleteTodoItemOperation(state, action) { // ... }, }; ``` **What's happening here:** - We generate a unique ID using `generateId()` from `document-model/core` - We push a new item to the `items` array with the input text, new ID, and `checked: false` - Under the hood, Powerhouse uses Immer.js, so this "mutation" is actually immutable ### Step 3: Implement updateTodoItemOperation Replace the boilerplate `updateTodoItemOperation`: ```typescript // removed-start updateTodoItemOperation(state, action) { // TODO: Implement "updateTodoItemOperation" reducer throw new Error('Reducer "updateTodoItemOperation" not yet implemented'); }, // removed-end // added-start updateTodoItemOperation(state, action) { const item = state.items.find((item) => item.id === action.input.id); if (!item) return; item.text = action.input.text ?? item.text; item.checked = action.input.checked ?? item.checked; }, // added-end ``` **What's happening here:** - We find the item by its ID - We return early if the item is not found - We use nullish coalescing (`??`) to only update fields that are provided ### Step 4: Implement deleteTodoItemOperation Replace the boilerplate `deleteTodoItemOperation`: ```typescript // removed-start deleteTodoItemOperation(state, action) { // TODO: Implement "deleteTodoItemOperation" reducer throw new Error('Reducer "deleteTodoItemOperation" not yet implemented'); }, // removed-end // added-start deleteTodoItemOperation(state, action) { state.items = state.items.filter((item) => item.id !== action.input.id); }, // added-end ``` **What's happening here:** - We filter out the item with the matching ID - This creates a new array without the deleted item ## Complete reducer file Here's the complete implementation:
Complete todos.ts ```typescript export const todoListTodosOperations: TodoListTodosOperations = { addTodoItemOperation(state, action) { const id = generateId(); state.items.push({ ...action.input, id, checked: false }); }, updateTodoItemOperation(state, action) { const item = state.items.find((item) => item.id === action.input.id); if (!item) return; item.text = action.input.text ?? item.text; item.checked = action.input.checked ?? item.checked; }, deleteTodoItemOperation(state, action) { state.items = state.items.filter((item) => item.id !== action.input.id); }, }; ```
**TIP:** To make sure everything works as expected: ```bash # Check types compile correctly pnpm tsc # Check linting passes pnpm lint # Compare with reference implementation git diff tutorial/step-3-implement-reducer-operation-handlers -- document-models/todo-list/src/reducers/ ``` ## Up next: Writing tests In the next chapter, you'll write tests to verify your reducer implementations work correctly. --- ## Write document model tests > Source: https://academy.vetra.io/academy/Build/ManualTodoTutorial/WriteDocumentModelTests **TIP:** 📦 **Reference Code**: [step-4-implement-tests-for-todos-operations](https://github.com/powerhouse-inc/todo-tutorial/tree/step-4-implement-tests-for-todos-operations) This step covers writing tests for the reducers you implemented in the previous step.
📖 How to use this tutorial ### Compare your tests After writing tests: ```bash # Compare your tests with the reference git diff tutorial/step-4-implement-tests-for-todos-operations -- document-models/todo-list/src/tests/ # View the reference test implementation git show tutorial/step-4-implement-tests-for-todos-operations:document-models/todo-list/src/tests/todos.test.ts ``` ### Visual comparison with GitHub Desktop After committing your work, compare visually: 1. **Branch** menu → **"Compare to Branch..."** 2. Select `tutorial/step-4-implement-tests-for-todos-operations` 3. Review differences in the visual interface
To verify the operation reducers work as expected, write tests for them. Generating your document model code created boilerplate tests; now extend them to check the reducer logic. ## Understanding the generated test file Navigate to `/document-models/todo-list/src/tests/todos.test.ts`. You will see that we have some basic "sanity check" style tests already. These make sure that your operations at least result in a valid document model state. ```typescript reducer, utils, isTodoListDocument, addTodoItem, AddTodoItemInputSchema, updateTodoItem, UpdateTodoItemInputSchema, deleteTodoItem, DeleteTodoItemInputSchema, } from "todo-tutorial/document-models/todo-list"; describe("Todos Operations", () => { it("should handle addTodoItem operation", () => { // The `createDocument` utility function from your document model creates // a new empty document, i.e. one with your default initial state const document = utils.createDocument(); // The generateMock function takes one of your generated input schemas // and creates an object populated with random values for each field const input = generateMock(AddTodoItemInputSchema()); // We call your document model's reducer with the new document we just created // and the action we want to test, `addTodoItem` in this case. // The reducer returns a new object, which is the document with the action applied. // If successful, there will be an operation which corresponds to this action // in the updated document's operations list. const updatedDocument = reducer(document, addTodoItem(input)); // When you generate a document model, we give you validation utilities like // `isTodoListDocument` which confirms the document is of the correct form // in a way that TypeScript recognizes expect(isTodoListDocument(updatedDocument)).toBe(true); // At the start a document will have 0 operations, so after applying this action // there should now be one operation expect(updatedDocument.operations.global).toHaveLength(1); // The operation added to the list should correspond to the correct action type expect(updatedDocument.operations.global[0].action.type).toBe( "ADD_TODO_ITEM", ); }); it("should handle updateTodoItem operation", () => { // ... boilerplate test }); it("should handle deleteTodoItem operation", () => { // ... boilerplate test }); }); ``` ## Enhance the tests The boilerplate tests check that operations are applied, but they don't verify the **actual results**. Extend them to assert on the resulting state. ### Test 1: Update the addTodoItem test The add test is already fairly complete. We just need to add type annotations: ```typescript it("should handle addTodoItem operation", () => { const document = utils.createDocument(); // added-line const input: AddTodoItemInput = generateMock(AddTodoItemInputSchema()); const updatedDocument = reducer(document, addTodoItem(input)); expect(isTodoListDocument(updatedDocument)).toBe(true); expect(updatedDocument.operations.global).toHaveLength(1); expect(updatedDocument.operations.global[0].action.type).toBe( "ADD_TODO_ITEM", ); expect(updatedDocument.operations.global[0].action.input).toStrictEqual( input, ); expect(updatedDocument.operations.global[0].index).toEqual(0); }); ``` ### Test 2: Replace the updateTodoItem test Delete the existing boilerplate and add two separate tests - one for updating text, one for updating the checked state: ```typescript // removed-start it("should handle updateTodoItem operation", () => { const document = utils.createDocument(); const input = generateMock(UpdateTodoItemInputSchema()); const updatedDocument = reducer(document, updateTodoItem(input)); expect(isTodoListDocument(updatedDocument)).toBe(true); // ... }); // removed-end ``` **Add the new test for updating text:** ```typescript it("should handle updateTodoItem operation to update text", () => { // We need there to already be a todo item in the document, // since we want to test updating an existing item const mockItem = generateMock(TodoItemSchema()); // We also need to generate a mock input for the update operation we are testing const input: UpdateTodoItemInput = generateMock(UpdateTodoItemInputSchema()); // Since the mocks are generated with random values, we need to set the `id` // on our mock input to match the `id` of the existing mock item input.id = mockItem.id; // We want to easily check if the item's text was updated to our new value, // so we assign a variable and use that for the mock input's text field const newText = "new text"; input.text = newText; // We are only testing updating the text here, so we want the checked field // on the input to be undefined, i.e. it should not change anything on the existing item input.checked = undefined; // We can pass a different initial state to the `createDocument` utility, // so in this case we pass in an `items` array with our existing item already in it const document = utils.createDocument({ global: { items: [mockItem], }, }); // Create an updated document by applying the reducer with the action and input const updatedDocument = reducer(document, updateTodoItem(input)); // Use our validator to check that the document conforms to the document model schema expect(isTodoListDocument(updatedDocument)).toBe(true); // There should now be one operation in the operations list expect(updatedDocument.operations.global).toHaveLength(1); expect(updatedDocument.operations.global[0].action.type).toBe( "UPDATE_TODO_ITEM", ); // Find the updated item in the items list by its `id` const updatedItem = updatedDocument.state.global.items.find( (item) => item.id === input.id, ); // The item's text should now be updated to be our new text expect(updatedItem?.text).toBe(newText); // The item's `checked` field should be unchanged expect(updatedItem?.checked).toBe(mockItem.checked); }); ``` **Add the new test for updating checked state:** ```typescript it("should handle updateTodoItem operation to update checked", () => { // Generate a mock existing item const mockItem = generateMock(TodoItemSchema()); // Generate a mock input const input: UpdateTodoItemInput = generateMock(UpdateTodoItemInputSchema()); // Set the mock input's `id` to the mock item's `id` input.id = mockItem.id; // We want the new `checked` field value to be the opposite of the // randomly generated value from the mock const newChecked = !mockItem.checked; input.checked = newChecked; // Leave the `text` field unchanged input.text = undefined; // Create a document with the existing item in it const document = utils.createDocument({ global: { items: [mockItem], }, }); // Apply the reducer with the action and the mock input const updatedDocument = reducer(document, updateTodoItem(input)); // Validate your document expect(isTodoListDocument(updatedDocument)).toBe(true); // Get the updated item by its `id` const updatedItem = updatedDocument.state.global.items.find( (item) => item.id === input.id, ); // The item's `text` field should remain unchanged expect(updatedItem?.text).toBe(mockItem.text); // The item's `checked` field should be updated to our new checked value expect(updatedItem?.checked).toBe(newChecked); }); ``` ### Test 3: Update the deleteTodoItem test The boilerplate delete test passes even without an existing item to delete. Let's fix that: ```typescript it("should handle deleteTodoItem operation", () => { // removed-start const document = utils.createDocument(); const input = generateMock(DeleteTodoItemInputSchema()); // removed-end // added-start // Create an existing item to delete const mockItem = generateMock(TodoItemSchema()); const document = utils.createDocument({ global: { items: [mockItem], }, }); const input: DeleteTodoItemInput = generateMock(DeleteTodoItemInputSchema()); input.id = mockItem.id; // added-end const updatedDocument = reducer(document, deleteTodoItem(input)); expect(isTodoListDocument(updatedDocument)).toBe(true); expect(updatedDocument.operations.global).toHaveLength(1); expect(updatedDocument.operations.global[0].action.type).toBe( "DELETE_TODO_ITEM", ); expect(updatedDocument.operations.global[0].action.input).toStrictEqual( input, ); expect(updatedDocument.operations.global[0].index).toEqual(0); // added-start // Verify the item was actually removed const updatedItems = updatedDocument.state.global.items; expect(updatedItems).toHaveLength(0); // added-end }); ``` ## Complete test file Here's the complete test file with all updates. Don't forget to add the missing imports:
Complete todos.test.ts ```typescript AddTodoItemInput, DeleteTodoItemInput, UpdateTodoItemInput, } from "todo-tutorial/document-models/todo-list"; reducer, utils, isTodoListDocument, addTodoItem, AddTodoItemInputSchema, updateTodoItem, UpdateTodoItemInputSchema, deleteTodoItem, DeleteTodoItemInputSchema, TodoItemSchema, } from "todo-tutorial/document-models/todo-list"; describe("Todos Operations", () => { it("should handle addTodoItem operation", () => { const document = utils.createDocument(); const input: AddTodoItemInput = generateMock(AddTodoItemInputSchema()); const updatedDocument = reducer(document, addTodoItem(input)); expect(isTodoListDocument(updatedDocument)).toBe(true); expect(updatedDocument.operations.global).toHaveLength(1); expect(updatedDocument.operations.global[0].action.type).toBe( "ADD_TODO_ITEM", ); expect(updatedDocument.operations.global[0].action.input).toStrictEqual( input, ); expect(updatedDocument.operations.global[0].index).toEqual(0); }); it("should handle updateTodoItem operation to update text", () => { const mockItem = generateMock(TodoItemSchema()); const input: UpdateTodoItemInput = generateMock( UpdateTodoItemInputSchema(), ); input.id = mockItem.id; const newText = "new text"; input.text = newText; input.checked = undefined; const document = utils.createDocument({ global: { items: [mockItem], }, }); const updatedDocument = reducer(document, updateTodoItem(input)); expect(isTodoListDocument(updatedDocument)).toBe(true); expect(updatedDocument.operations.global).toHaveLength(1); expect(updatedDocument.operations.global[0].action.type).toBe( "UPDATE_TODO_ITEM", ); const updatedItem = updatedDocument.state.global.items.find( (item) => item.id === input.id, ); expect(updatedItem?.text).toBe(newText); expect(updatedItem?.checked).toBe(mockItem.checked); }); it("should handle updateTodoItem operation to update checked", () => { const mockItem = generateMock(TodoItemSchema()); const input: UpdateTodoItemInput = generateMock( UpdateTodoItemInputSchema(), ); input.id = mockItem.id; const newChecked = !mockItem.checked; input.checked = newChecked; input.text = undefined; const document = utils.createDocument({ global: { items: [mockItem], }, }); const updatedDocument = reducer(document, updateTodoItem(input)); expect(isTodoListDocument(updatedDocument)).toBe(true); const updatedItem = updatedDocument.state.global.items.find( (item) => item.id === input.id, ); expect(updatedItem?.text).toBe(mockItem.text); expect(updatedItem?.checked).toBe(newChecked); }); it("should handle deleteTodoItem operation", () => { const mockItem = generateMock(TodoItemSchema()); const document = utils.createDocument({ global: { items: [mockItem], }, }); const input: DeleteTodoItemInput = generateMock( DeleteTodoItemInputSchema(), ); input.id = mockItem.id; const updatedDocument = reducer(document, deleteTodoItem(input)); expect(isTodoListDocument(updatedDocument)).toBe(true); expect(updatedDocument.operations.global).toHaveLength(1); expect(updatedDocument.operations.global[0].action.type).toBe( "DELETE_TODO_ITEM", ); const updatedItems = updatedDocument.state.global.items; expect(updatedItems).toHaveLength(0); }); }); ```
**TIP:** To make sure everything works as expected: ```bash # Check types compile correctly pnpm tsc # Check linting passes pnpm lint # Run tests pnpm test # Compare with reference implementation git diff tutorial/step-4-implement-tests-for-todos-operations -- document-models/todo-list/src/tests/ ``` Expected test output: ```bash ✓ document-models/todo-list/src/tests/document-model.test.ts (3 tests) 1ms ✓ document-models/todo-list/src/tests/todos.test.ts (4 tests) 8ms Test Files 2 passed (2) Tests 7 passed (7) ``` ## Up next: Building the editor In the next chapter, you'll learn how to implement a user interface (editor) for your document model so you can interact with it visually. --- ## Build a to-do list editor > Source: https://academy.vetra.io/academy/Build/ManualTodoTutorial/BuildToDoListEditor **TIP:** 📦 **Reference Code**: - **Editor Scaffolding**: [step-5-generate-todo-list-document-editor](https://github.com/powerhouse-inc/todo-tutorial/tree/step-5-generate-todo-list-document-editor) - **Complete Editor UI**: [step-6-add-basic-todo-editor-ui-components](https://github.com/powerhouse-inc/todo-tutorial/tree/step-6-add-basic-todo-editor-ui-components) This tutorial covers two steps: 1. **Step 5**: Generating the editor template with Vetra Studio 2. **Step 6**: Building a complete, interactive UI with components for adding, editing, and deleting todos Compare implementations: `git diff step-5-generate-todo-list-document-editor step-6-add-basic-todo-editor-ui-components`
📖 How to use this tutorial This tutorial shows building from **generated scaffolding** (step-5) to **complete UI** (step-6). ### Compare your generated editor After running `ph generate editor`: ```bash # Compare generated scaffolding with step-5 git diff tutorial/step-5-generate-todo-list-document-editor -- editors/ # View the generated editor template git show tutorial/step-5-generate-todo-list-document-editor:editors/todo-list-editor/editor.tsx ``` ### Compare your custom components After building your UI: ```bash # Compare your complete editor with step-6 git diff tutorial/step-6-add-basic-todo-editor-ui-components -- editors/ # See what was added from scaffolding to complete UI git diff tutorial/step-5-generate-todo-list-document-editor..tutorial/step-6-add-basic-todo-editor-ui-components ``` ### Browse the complete implementation Explore the production-ready component structure: ```bash # List all components in step-6 git ls-tree -r --name-only tutorial/step-6-add-basic-todo-editor-ui-components editors/todo-list-editor/components/ # View a specific component git show tutorial/step-6-add-basic-todo-editor-ui-components:editors/todo-list-editor/components/TodoList.tsx ``` ### Visual comparison with GitHub Desktop After committing your editor code: 1. **Branch** menu → **"Compare to Branch..."** 2. Select `tutorial/step-5-generate-todo-list-document-editor` or `tutorial/step-6-add-basic-todo-editor-ui-components` 3. See all your custom components vs. the reference implementation See step 1 for detailed GitHub Desktop instructions.
Now build the editor: the user interface for the **todo-list** document model. It runs inside Connect to create, update, and delete your todo-list items. ## Add a document editor specification in Vetra Studio. Go back to Vetra Studio and click the 'Add new specification' button in the User Experiences column under 'Editors'. This will create an editor template for your document model. Give the editor the name `todo-list-editor` and select the correct document model. In our case that's the `powerhouse/todo-list` ### Editor implementation options You have several options for styling your editor component: 1. **Default HTML Styling:** Standard HTML tags (`

`, `

`, ` ); } ``` **What's happening here:** - We use a form with `onSubmit` handler for better UX (Enter key support) - We extract the text value from the input field - We dispatch the `addTodoItem` action (generated from our SDL) - We reset the form after submission ### Step 4: Create the Todos list component Create `editors/todo-list-editor/components/Todos.tsx` to render the list of todos: ```tsx type Props = { todos: TodoItem[]; }; /** Shows a list of the todo items in the selected todo list */ export function Todos({ todos }: Props) { const hasTodos = todos.length > 0; if (!hasTodos) { return

Start adding things to your todo list

; } return (
    {todos.map((todo) => (
  • ))}
); } ``` **What's happening here:** - We accept `todos` as a prop (passed from `TodoList` parent) - We show a helpful message if the list is empty - We map over todos and render a `Todo` component for each item ### Step 5: Create the Todo item component Create `editors/todo-list-editor/components/Todo.tsx` for individual todo items with edit and delete functionality: ```tsx useState, type ChangeEventHandler, type FormEventHandler, type MouseEventHandler, } from "react"; deleteTodoItem, updateTodoItem, } from "todo-tutorial/document-models/todo-list"; type Props = { todo: TodoItem; }; /** Displays a single todo item in the selected todo list * * Allows checking/unchecking the todo item. * Allows editing the todo item text. * Allows deleting the todo item. */ export function Todo({ todo }: Props) { const [isEditing, setIsEditing] = useState(false); // Even though this component is for a single todo item and not the whole list, // we can use the exact same hook for dispatching updates to it. // The dispatch function works for any action supported by a TodoList document. const [todoList, dispatch] = useSelectedTodoListDocument(); if (!todoList) return null; const todoId = todo.id; const todoText = todo.text; const todoChecked = todo.checked; const onSubmitUpdateTodoText: FormEventHandler = (event) => { event.preventDefault(); const form = event.currentTarget; const textInput = form.elements.namedItem("todoText") as HTMLInputElement; const text = textInput.value; if (!text) return; // We can use the dispatch function for any of the actions // supported by a TodoList document dispatch(updateTodoItem({ id: todo.id, text })); setIsEditing(false); }; const onChangeTodoChecked: ChangeEventHandler = (event) => { dispatch( updateTodoItem({ id: todo.id, checked: event.target.checked, }), ); }; const onClickDeleteTodo: MouseEventHandler = () => { dispatch(deleteTodoItem({ id: todoId })); }; const onClickEditTodo: MouseEventHandler = () => { setIsEditing(true); }; const onClickCancelEditTodo: MouseEventHandler = () => { setIsEditing(false); }; if (isEditing) return (
); return (
{todoText}
); } ``` **What's happening here:** - We use local state (`isEditing`) to toggle between view and edit modes - We dispatch `updateTodoItem` for both checking and text editing - We dispatch `deleteTodoItem` to remove items - We use TypeScript event handlers for type safety ### Step 6: Create the TodoListName component Finally, create `editors/todo-list-editor/components/TodoListName.tsx` for displaying and editing the document name: ```tsx /** Allows editing the name of the selected todo list */ export function TodoListName() { const [isEditing, setIsEditing] = useState(false); const [selectedTodoList, dispatch] = useSelectedTodoListDocument(); if (!selectedTodoList) return null; const documentName = selectedTodoList.name; const onSubmitEditName: FormEventHandler = (event) => { event.preventDefault(); const form = event.currentTarget; const nameInput = form.elements.namedItem("name") as HTMLInputElement; const name = nameInput.value; if (name) { dispatch(setName(name)); setIsEditing(false); } }; if (isEditing) { return (
); } return (

setIsEditing(true)} > {documentName}

); } ``` **What's happening here:** - We use the `setName` action from `document-model/document` (a built-in action) - We toggle between viewing and editing the name - Click the name to edit it ## Test your editor Now you can run the Vetra Studio Preview and see the **todo-list** editor in action: ```bash ph vetra --watch ``` In the bottom right corner you'll find a new Document Model that you can create: **todo-list**. Click on it to create a new todo-list document. **INFO:** The editor will update dynamically as you make changes, so you can experiment with styling and functionality while seeing your results appear in Vetra Studio in real-time. **Try it out:** 1. Add some todo items using the input form 2. Click on the document name to edit it 3. Check/uncheck items to mark them as complete 4. Click "Edit" on any item to modify its text 5. Click "Delete" to remove items Congratulations! 🎉 If you managed to follow this tutorial until this point, you have successfully implemented the **todo-list** document model with its reducer operations and editor. ## Compare with the reference implementation The tutorial repository's step-6 branch includes additional enhancements you can explore: **Additional components in step-6:** ``` editors/todo-list-editor/components/ ├── CloseButton.tsx # Editor close functionality ├── UndoRedoButtons.tsx # Operation history navigation └── Stats.tsx # Display metadata (creation/modification times) ``` **View individual components from the reference:** ```bash # See the enhanced TodoList component with all features git show tutorial/step-6-add-basic-todo-editor-ui-components:editors/todo-list-editor/components/TodoList.tsx # Explore the UndoRedoButtons component git show tutorial/step-6-add-basic-todo-editor-ui-components:editors/todo-list-editor/components/UndoRedoButtons.tsx # Compare your implementation with the reference git diff tutorial/step-6-add-basic-todo-editor-ui-components -- editors/todo-list-editor/ ``` **TIP:** To make sure everything works as expected: ```bash # Check types compile correctly pnpm tsc # Check linting passes pnpm lint # Run tests pnpm test # Test in Vetra Studio ph vetra --watch # Compare with reference implementation git diff tutorial/step-6-add-basic-todo-editor-ui-components -- editors/todo-list-editor/ ``` In Connect, you should be able to: - Create a new todo-list document - Add, edit, and delete todo items - Check/uncheck items to mark them complete ## Up next You've built a working package by hand. From here you can go deeper or put it to use: - **Go deeper — [Mastery Track: Document Model Creation](/academy/Build/DocumentModelCreation/WhatIsADocumentModel)** — the theory behind the steps you just followed, plus an advanced version of the todo-list (computed stats), the Document Engineering UI components, and custom Drive Explorers. - **Expose your data — [Work With Data](/academy/Build/WorkWithData/ConfiguringDrives)** — configure drives, query documents over the GraphQL API, and build subgraphs and processors. - **Ship it — [Launch](/academy/Build/Launch/PublishYourProject)** — publish your package and deploy Connect and Switchboard. --- ## What is a document model? > Source: https://academy.vetra.io/academy/Build/DocumentModelCreation/WhatIsADocumentModel **TIP:** This chapter on **Document Model Creation** will help you with an in-depth practical understanding while building an **advanced to-do list** document model. If you have completed the [Manual Todo tutorial](/academy/Build/ManualTodoTutorial/CreateNewPowerhouseProject) (which includes creating a simple to-do list document model), you will revisit familiar topics and can enhance your existing document model with the advanced features covered in this Mastery Track, such as statistics tracking. Although not required, completing the Manual Todo tutorial first is recommended as it provides a hands-on foundation for the concepts explored in depth here. **INFO:** A Document Model is a programmable document structure that defines how data is stored, changed, and interpreted in a decentralized system. It acts like a living blueprint—capturing state, tracking changes, and enabling interaction through defined operations. For instance, an invoice document model might define fields like _issuer_, _lineItems_, and _status_, with operations such as _AddLineItem_ and _MarkAsPaid_. Document models are central to **Specification Driven Design & Development**—an approach where you communicate your solution and intent through structured specification documents. These specs are machine-readable and executable, serving as a shared language between developers, designers, and AI agents. This enables precise, iterative development and lays the groundwork for AI-assisted workflows. A Document Model can be understood as: - A structured software framework that represents and **manages business logic** within a digital environment. - A sophisticated template that **encapsulates the essential aspects of a digital process or a set of data**. - A blueprint that defines how data is **captured, manipulated, and visualised** within a system. - A **standardized way to store, modify, and query data** in scalable, decentralized applications. ### How does a document model function? #### Structure and composition Each document model consists of three key components: 1. **State Schema** – Defines the structure of the document. 2. **Document Operations** – Defines how the document can be modified. 3. **Event History** – Maintains an append-only log of changes. Document models use **event sourcing, CQRS (Command Query Responsibility Segregation), and an append-only architecture** for immutability, auditability, and scalability. --- ## 1. Structure of a document model A document model consists of the following key components: ### 1.1 State schema The **state schema** defines the structure of the document, including its fields and data types. It serves as a blueprint for how data is stored and validated. Example of a **GraphQL-like state schema** for an invoice document: ```graphql type InvoiceState { id: OID! # Unique identifier for the invoice issuer: OID! # Reference to the issuing entity recipient: OID! # Reference to the recipient entity status: String # (value: "DRAFT") # Invoice status dueDate: DateTime # Payment due date lineItems: [LineItem!]! # List of line items totalAmount: Currency # Computed field for total invoice value } type LineItem { id: OID! description: String quantity: Int unitPrice: Currency } ``` ### State schema features: - Uses **GraphQL-like definitions** for a **clear, structured schema**. - Supports **custom scalar types** like `OID`, `Currency`, and `DateTime`. Or other Web3 specific scalars - Defines **relationships** using object references (`OID!`). The state schema acts as a **template** for document instances. Every new invoice created will follow this structure. --- ### 1.2 Document operations Document models are **append-only**, meaning changes are not made directly to the document state. Instead, **document operations** define valid state transitions. Example operations for modifying an invoice: ```graphql input AddLineItemInput { invoiceId: OID! description: String quantity: Int unitPrice: Currency } input UpdateRecipientInput { invoiceId: OID! newRecipient: OID! } input MarkAsPaidInput { invoiceId: OID! } ``` Each operation **modifies the document state** without altering past data. Instead, a new event is appended to the document history. --- ### 1.3 Event history (append-only log) Every operation applied to a document is **stored as an event** in an append-only log. #### Example event log for an invoice document: ```json [ { "timestamp": 1700000001, "operation": "CREATE_INVOICE", "data": { "id": "inv-001", "issuer": "company-123", "recipient": "client-456" } }, { "timestamp": 1700000100, "operation": "ADD_LINE_ITEM", "data": { "description": "Software Development", "quantity": 10, "unitPrice": 100 } }, { "timestamp": 1700000200, "operation": "MARK_AS_PAID", "data": {} ``` ### Event history benefits: - Provides a **transparent audit trail** of changes. - Enables **time travel debugging** by reconstructing past states. - Supports **event sourcing**, allowing developers to **replay events** to restore state. --- ## 2. How document models work technically Document models in Powerhouse rely on **event-driven architecture, event sourcing, and CQRS principles**. Here's a step-by-step breakdown: ### 2.1 Document creation 1. A user (or system) **submits an operation** to create a new document. 2. The document model **validates** the input data against the state schema. 3. The system **appends the operation** as an event in the document history. 4. The **initial state is computed** by applying the recorded events. **Example:** ```json { "operation": "CREATE_INVOICE", "data": { "id": "inv-001", "issuer": "company-123", "recipient": "client-456" } } ``` --- ### 2.2 Document modification 1. A user submits an **operation** (e.g., `ADD_LINE_ITEM`). 2. The **event is appended** to the document history. 3. The **state transition logic updates the computed state**. 4. The UI re-renders the updated document. **Example:** Adding a line item: ```json { "operation": "ADD_LINE_ITEM", "data": { "description": "Software Development", "quantity": 10, "unitPrice": 100 } } ``` Since changes are **not applied directly**, this model is **highly scalable and auditable**. --- ### 2.3 Querying document models Powerhouse uses **GraphQL queries** to fetch document states efficiently. Because documents store structured data, developers can instantly query: ```graphql query { invoice(id: "inv-001") { issuer recipient status lineItems { description quantity unitPrice } } } ``` This removes the need for **complex database joins** and allows for **fast, structured access to data**. --- ### What document models give you Document models support: - **Automation**: Automate workflows using consistent, structured document logic. - **Auditability**: Maintain a full history of changes for compliance and transparency. - **API Integration**: Connect with Switchboard or external APIs for data exchange. - **Data Analysis**: Get real-time and historical insights through structured read models. - **Version Control**: Track and compare document states over time, similar to Git. - **Collaboration**: Let decentralized teams build, modify, and share documents asynchronously. - **Extensibility**: Add new fields, operations, and integrations over time without rewriting logic. - **Schema Evolution**: Evolve document models with [versioning](/academy/Build/DocumentModelCreation/DocumentModelVersioning): upgrade schemas while keeping backward compatibility with existing documents. ### Up next: How to build a document model Next, you'll build a To-do List document model, with the theory explained as you go. --- ## Specify the state schema > Source: https://academy.vetra.io/academy/Build/DocumentModelCreation/SpecifyTheStateSchema **NOTE:** This is the same step from the [Manual Todo tutorial](/academy/Build/ManualTodoTutorial/DefineToDoListDocumentModel), covered here in depth. The Mastery Track's only addition is the computed `stats` field — if you've done the basic build, skim to the stats parts. The state schema is the backbone of your document model. It defines the structure, data types, and relationships of the information your document will hold. In Powerhouse, you define this schema with the **GraphQL Schema Definition Language (SDL)**. A well-defined state schema keeps data consistent and is what makes the document queryable. **TIP:** Your state schema is more than just a data structure—it's a **specification** that enables **Specification Driven Design & Development**. This schema becomes a machine-readable blueprint that AI agents can interpret and execute, enabling precise collaboration between you and AI throughout the development process. ## Core concepts ### Types At the heart of GraphQL SDL are **types**. Types define the shape of your data. You can define custom object types that represent the entities in your document. For example, in a `TodoList` document, you might have a `TodoListState` type and a `TodoItem` type. - **`TodoListState`**: This could be the root type representing the overall state of the to-do list. It might contain a list of `TodoItem` objects. - **`TodoItem`**: This type would represent an individual to-do item, with properties like an `id`, `text` (the task description), and `checked` (a boolean indicating if the task is completed). ### Fields Each type has **fields**, which represent the properties of that type. Each field has a name and a type. For instance, the `TodoItem` type would have an `id` field of type `OID!`, a `text` field of type `String!`, and a `checked` field of type `Boolean!`. ### Scalars GraphQL has a set of built-in **scalar types**: - `String`: A UTF‐8 character sequence. - `Int`: A signed 32‐bit integer. - `Float`: A signed double-precision floating-point value. - `Boolean`: `true` or `false`. - `ID`: A unique identifier, often used as a key for a field. It is serialized in the same way as a String; however, it is not intended to be human-readable. In addition to these standard types, the Powerhouse Document-Engineering system introduces custom scalars that are linked to reusable front-end components. These scalars are tailored for the web3 ecosystem and will be explored in the Component Library section of the documentation. **TIP:** Powerhouse provides the `OID` (Object ID) scalar type, which is a custom scalar specifically designed for unique identifiers in document models. It provides automatic ID generation capabilities when used with the `generateId()` function from the document-model core library. ### Lists and non-null You can modify types using lists and non-null indicators: - **Lists**: To indicate that a field will return a list of a certain type, you wrap the type in square brackets, e.g., `[TodoItem!]!`. This means the field `items` in `TodoListState` will be a list of `TodoItem` objects. - **Non-Null**: To indicate that a field cannot be null, you add an exclamation mark `!` after the type name, e.g., `String!`. This means that the `text` field of a `TodoItem` must always have a value. The outer `!` in `[TodoItem!]!` means the list itself cannot be null (it must be at least an empty list), and the inner `!` on `TodoItem!` means that every item within that list must also be non-null. ## Example: TodoList state schema Revisit the `TodoList` example from the "Define the TodoList document specification" step of the Manual Todo tutorial. ### Basic schema (matching the Manual Todo tutorial) This is the same schema you built in the Manual Todo tutorial: ```graphql # The state of our TodoList type TodoListState { items: [TodoItem!]! } # A single to-do item type TodoItem { id: OID! text: String! checked: Boolean! } ``` ### Advanced schema (with statistics tracking) **INFO:** In this Mastery Track, we'll extend the basic schema with a `stats` field to demonstrate how you can add computed statistics to your document model. This is an **optional enhancement** that builds on the foundation from the Manual Todo tutorial. ```graphql # The state of our TodoList (advanced version with stats) type TodoListState { items: [TodoItem!]! stats: TodoListStats! } # A single to-do item type TodoItem { id: OID! text: String! checked: Boolean! } # The statistics on our to-do's (advanced feature) type TodoListStats { total: Int! checked: Int! unchecked: Int! } ``` ### Breakdown: - **`TodoListState` type**: - `items: [TodoItem!]!`: This field defines that our `TodoListState` contains a list called `items`. - `[TodoItem!]`: This signifies that `items` is a list of `TodoItem` objects. - `TodoItem!`: The `!` after `TodoItem` means that no item in the list can be null. Each entry must be a valid `TodoItem`. - The final `!` after `[TodoItem!]` means that the `items` list itself cannot be null. It can be an empty list `[]`, but it cannot be absent. - `stats: TodoListStats!` _(advanced)_: Holds aggregated statistics about the to-do items. - **`TodoItem` type**: - `id: OID!`: Each `TodoItem` has a unique identifier using Powerhouse's custom `OID` scalar. This is crucial for referencing specific items, for example, when updating or deleting them. - `text: String!`: The textual description of the to-do item. It cannot be null, ensuring every to-do has a description. - `checked: Boolean!`: Indicates whether the to-do item is completed. It defaults to a boolean value (true or false) and cannot be null. - **`TodoListStats` type** _(advanced)_: This type holds the summary statistics for the to-do list. - `total: Int!`: The total count of all to-do items. This field must be an integer and cannot be null. - `checked: Int!`: The number of to-do items that are marked as completed. This must be an integer and cannot be null. - `unchecked: Int!`: The number of to-do items that are still pending. This also must be an integer and cannot be null. ## Best practices for designing your state schema 1. **Start Simple, Iterate**: Begin with the core entities and properties. You can always expand and refine your schema as your understanding of the document's requirements grows. 2. **Clarity and Explicitness**: Name your types and fields clearly and descriptively. This makes the schema easier to understand and maintain. 3. **Use Non-Null Wisely**: Enforce data integrity by using non-null (`!`) for fields that must always have a value. However, be mindful not to over-constrain if a field can genuinely be optional. 4. **Normalize vs. Denormalize**: - **Normalization**: Similar to relational databases, you can normalize your data by having distinct types and linking them via IDs. This can reduce data redundancy. For example, if you had `User` and `TodoItem` and wanted to assign tasks, you might have an `assigneeId` field in `TodoItem` that links to a `User`'s `id`. - **Denormalization**: Sometimes, for performance or simplicity, you might embed data directly. For instance, if user information associated with a to-do item was very simple and only used in that context, you might embed user fields directly in `TodoItem`. - The choice depends on your specific use case, query patterns, and how data is updated. 5. **Consider Future Needs**: While you shouldn't over-engineer, think a little about potential future enhancements. For example, adding a `createdAt: String` or `dueDate: String` field to `TodoItem` might be useful later. 6. **Root State Type**: It's a common pattern to have a single root type for your document state (e.g., `TodoListState`). This provides a clear entry point for accessing all document data. The schema dictates how data is stored, and how it can be queried and mutated through operations. Operations are covered in the next section. ## Practical implementation: defining the state schema in Vetra Studio Now that you understand the concepts behind the state schema, let's put it into practice. This section will guide you through creating a document model specification for the TodoList example discussed above.
Tutorial: The state schema specification ### Prerequisites - You have a Powerhouse project set up. If not, please follow the [Create a new Powerhouse Project](/academy/Build/ManualTodoTutorial/CreateNewPowerhouseProject) tutorial. - Vetra Studio is running. If not, navigate to your project directory in the terminal and run `ph vetra --watch`. ### Steps 1. **Create a New Document Model**: - With Vetra Studio open in your browser, you'll see the Vetra Studio Drive. - Click the **Document Models 'Add new specification'** button to create a new document model specification. 2. **Define Document Metadata**: - **Name**: Give your document model a descriptive name: `TodoList`. **Pay close attention to capitalization, as it influences our code generation.** - **Document Type**: In the 'Document Type' field, enter a unique identifier for this document type: `powerhouse/todo-list`. 3. **Specify the State Schema**: - In the code editor provided, you'll see a template for a GraphQL schema. - Replace the entire content of the editor with the advanced `TodoList` schema we've designed in this chapter: ```graphql # The state of our TodoList (advanced version with stats) type TodoListState { items: [TodoItem!]! stats: TodoListStats! } # A single to-do item type TodoItem { id: OID! text: String! checked: Boolean! } # The statistics on our to-do's (advanced feature) type TodoListStats { total: Int! checked: Int! unchecked: Int! } ``` 4. **Sync Schema and View Initial State**: - After pasting the schema, click the **'Sync with schema'** button. - This action processes your schema and generates an initial JSON state for your document model based on the `TodoListState` type. You can view this initial state, which helps you verify that your schema is structured correctly. For now, you can ignore the "Modules & Operations" section. We will define and implement the operations that modify this state in the upcoming sections of this Mastery Track. By completing these steps, you have successfully specified the data structure for the advanced TodoList document model. The next step is to define the operations that will allow users to interact with and change this state.
Alternatively: Define the state schema in Connect ### Prerequisites - You have a Powerhouse project set up. If not, please follow the [Create a new Powerhouse Project](/academy/Build/ManualTodoTutorial/CreateNewPowerhouseProject) tutorial. - Connect is running. If not, navigate to your project directory in the terminal and run `ph connect`. ### Steps 1. **Create a New Document Model**: - With Connect open in your browser, navigate into your local drive. - At the bottom of the page in the 'New Document' section, click the `DocumentModel` button to create a new document model specification. 2. **Define Document Metadata**: - **Name**: Give your document model a descriptive name: `TodoList`. **Pay close attention to capitalization, as it influences our code generation.** - **Document Type**: In the 'Document Type' field, enter a unique identifier for this document type: `powerhouse/todo-list`. 3. **Specify the State Schema**: - In the code editor provided, you'll see a template for a GraphQL schema. - Replace the entire content of the editor with the advanced `TodoList` schema we've designed in this chapter: ```graphql # The state of our TodoList (advanced version with stats) type TodoListState { items: [TodoItem!]! stats: TodoListStats! } # A single to-do item type TodoItem { id: OID! text: String! checked: Boolean! } # The statistics on our to-do's (advanced feature) type TodoListStats { total: Int! checked: Int! unchecked: Int! } ``` 4. **Sync Schema and View Initial State**: - After pasting the schema, click the **'Sync with schema'** button. - This action processes your schema and generates an initial JSON state for your document model based on the `TodoListState` type. You can view this initial state, which helps you verify that your schema is structured correctly. For now, you can ignore the "Modules & Operations" section. We will define and implement the operations that modify this state in the upcoming sections of this Mastery Track. By completing these steps, you have successfully specified the data structure for the advanced TodoList document model. The next step is to define the operations that will allow users to interact with and change this state.
For a complete, working example, you can always have a look at the [Example TodoList Repository](/academy/Build/DocumentModelCreation/ExampleToDoListRepository) which contains the full implementation of the concepts discussed in this Mastery Track. --- ## Specify document operations > Source: https://academy.vetra.io/academy/Build/DocumentModelCreation/SpecifyDocumentOperations **NOTE:** You defined these operations in the [Manual Todo tutorial](/academy/Build/ManualTodoTutorial/DefineToDoListDocumentModel); this page explains them in depth and adds the operations behind the advanced `stats` feature. In the previous section, we defined the state schema for our document model. Now, we turn our attention to a critical aspect of document model creation: **specifying document operations**. These operations are the heart of your document's behavior, dictating how its state can be modified. ## What are document operations? In Powerhouse, document models adhere to event sourcing principles. This means that every change to a document's state is the result of a sequence of operations (or events). Instead of directly mutating the state, you define specific, named operations that describe the intended change. For example, in our `TodoList` document model, operations might include: - `ADD_TODO_ITEM`: To add a new task. - `UPDATE_TODO_ITEM`: To modify an existing task (e.g., change its text or mark it as completed). - `DELETE_TODO_ITEM`: To remove a task. Each operation acts as a command that, when applied, transitions the document from one state to the next. The complete history of these operations defines the document's journey to its current state. ## Connecting operations to the schema In the "Define TodoList Document Model" step of the Manual Todo tutorial, we used GraphQL `input` types to define the structure of the data required for each operation. Revisit that: ```graphql # Defines a GraphQL input type for adding a new to-do item input AddTodoItemInput { text: String! } # Defines a GraphQL input type for updating a to-do item input UpdateTodoItemInput { id: OID! text: String checked: Boolean } # Defines a GraphQL input type for deleting a to-do item input DeleteTodoItemInput { id: OID! } ``` These `input` types are not just abstract definitions; they are the **specifications for our document operations**. - **`AddTodoItemInput`** specifies that to execute an `ADD_TODO_ITEM` operation, we only need the `text` for the new item. The `id` is automatically generated by the reducer using Powerhouse's `generateId()` function. - **`UpdateTodoItemInput`** specifies that for an `UPDATE_TODO_ITEM` operation, we need the `id` of the item to update, and optionally new `text` or a `checked` status. - **`DeleteTodoItemInput`** specifies that a `DELETE_TODO_ITEM` operation requires the `id` of the item to be removed. **TIP:** Notice that `AddTodoItemInput` only requires `text` — not an `id`. This is because the ID is generated automatically in the reducer using `generateId()` from `document-model/core`. This ensures unique, consistent IDs and follows the pattern used in the [todo-demo repository](https://github.com/powerhouse-inc/todo-demo). Vetra Studio uses these GraphQL input types when you define operations within a module (e.g., the `todos` module with operations `ADD_TODO_ITEM`, `UPDATE_TODO_ITEM`, `DELETE_TODO_ITEM`). ## Designing effective document operations Careful design of your document operations is crucial for a robust and maintainable document model. Here are some key considerations: ### 1. Granularity Operations should be granular enough to represent distinct user intentions or logical changes. - **Too coarse:** An operation like `MODIFY_TODOLIST` that takes a whole new list of items would be too broad. It would be hard to track specific changes and could lead to complex reducer logic. - **Too fine:** While possible, having separate operations like `SET_TODO_ITEM_TEXT` and `SET_TODO_ITEM_CHECKED_STATUS` might be overly verbose if these are often updated together. `UPDATE_TODO_ITEM` with optional fields offers a good balance. - **Just right:** The `ADD_TODO_ITEM`, `UPDATE_TODO_ITEM`, and `DELETE_TODO_ITEM` operations for our `TodoList` are good examples. They represent clear, atomic changes. ### 2. Naming conventions Clear and consistent naming makes your operations understandable. A common convention is `VERB_NOUN` or `VERB_NOUN_SUBJECT`. - Examples: `ADD_ITEM`, `UPDATE_USER_PROFILE`, `ASSIGN_TASK_TO_USER`. - In our case: `ADD_TODO_ITEM`, `UPDATE_TODO_ITEM`, `DELETE_TODO_ITEM`. The name you provide in Vetra Studio (or Connect) (e.g., `ADD_TODO_ITEM`) directly corresponds to the operation type that will be recorded and that your reducers will handle. ### 3. Input types (payloads) The input type for an operation (its payload) should contain all the necessary information to perform that operation, and nothing more. - **Completeness:** If an operation needs a user ID to authorize a change, include it in the input. - **Conciseness:** Avoid including data that isn't directly used by the operation. - **Clarity:** Use descriptive field names within your input types. `action.input.text` is clearer than `action.input.t`. The GraphQL `input` types we defined earlier (`AddTodoItemInput`, `UpdateTodoItemInput`, `DeleteTodoItemInput`) serve precisely this purpose. They ensure that whoever triggers an operation provides the correct data in the correct format. ### 4. Immutability and pure functions While not specified in the operation definition itself, remember that the _implementation_ of these operations (the reducers) should treat state as immutable and behave as pure functions. The operation specification (input type) provides the data for these pure functions. ## Role in event sourcing and CQRS - **Events:** Each successfully executed operation is recorded as an event in the document's history. This history provides an audit trail and allows for replaying events to reconstruct state, which is invaluable for debugging and understanding how a document evolved. - **Commands:** Document operations are essentially "commands" in a Command Query Responsibility Segregation (CQRS) pattern. They represent an intent to change the state. The processing of this command (by the reducer) leads to one or more events being stored and the state being updated. ## From specification to implementation Specifying your document operations is the bridge between defining your data structure (the state schema) and implementing the logic that changes that data (the reducers). 1. **You define the state schema** (e.g., `TodoListState`, `TodoItem`). 2. **You specify the operations** that can alter this state, along with their required input data (e.g., `ADD_TODO_ITEM` with `AddTodoItemInput`). 3. **Next, you will implement reducers** for each specified operation. Each reducer will take the current state and an operation's input, and produce a new state. The generated code from `ph generate` (as seen in `03-ImplementOperationReducers.md`) will create a structure for your reducers based on the operations you specified in the Connect application (which, in turn, were based on your GraphQL input types). For example, the `TodoListTodosOperations` type generated by Powerhouse will expect methods corresponding to `addTodoItemOperation`, `updateTodoItemOperation`, and `deleteTodoItemOperation`. ```typescript export const todoListTodosOperations: TodoListTodosOperations = { addTodoItemOperation(state, action) { // Implementation uses action.input which matches AddTodoItemInput }, updateTodoItemOperation(state, action) { // Implementation uses action.input which matches UpdateTodoItemInput }, deleteTodoItemOperation(state, action) { // Implementation uses action.input which matches DeleteTodoItemInput }, }; ``` ## Practical implementation: Defining operations in Vetra Studio Now that you understand the theory, let's walk through the practical steps of defining these operations for our `TodoList` document model within Vetra Studio.
Tutorial: Specifying TodoList operations Assuming you have already defined the state schema for the `TodoList` as covered in the previous section, follow these steps to add the operations: 1. **Create a Module for Operations:** Below the schema editor in Vetra Studio, find the input field labeled `Add module`. Modules help organize your operations. - Type `todos` into the field and press Enter. 2. **Add the `ADD_TODO_ITEM` Operation:** A new field, `Add operation`, will appear under your new module. - Type `ADD_TODO_ITEM` into this field and press Enter. - An editor will appear for the operation's input type. You need to define the data required for this operation. Paste the following GraphQL `input` definition into the editor: ```graphql # Defines a GraphQL input type for adding a new to-do item input AddTodoItemInput { text: String! } ``` :::info Notice we don't include `id` in the input — the reducer will generate it automatically using `generateId()` from `document-model/core`. ::: 3. **Add the `UPDATE_TODO_ITEM` Operation:** - In the `Add operation` field again, type `UPDATE_TODO_ITEM` and press Enter. - Paste the corresponding `input` definition into its editor: ```graphql # Defines a GraphQL input type for updating a to-do item input UpdateTodoItemInput { id: OID! text: String checked: Boolean } ``` 4. **Add the `DELETE_TODO_ITEM` Operation:** - Finally, type `DELETE_TODO_ITEM` in the `Add operation` field and press Enter. - Paste its `input` definition: ```graphql # Defines a GraphQL input type for deleting a to-do item input DeleteTodoItemInput { id: OID! } ``` 5. **Review:** After adding all three operations, your document model specification in Vetra Studio is complete for now. You can see how each operation (`ADD_TODO_ITEM`, etc.) is now explicitly linked to an input type that defines its payload. Vetra Studio automatically tracks your document model specifications. In the next chapter, we will see how the generator is used to create code for our reducers.
Alternatively: Define operations in Connect Assuming you have already defined the state schema for the `TodoList` as covered in the previous section, follow these steps to add the operations in Connect: 1. **Create a Module for Operations:** Below the schema editor in Connect, find the input field labeled `Add module`. Modules help organize your operations. - Type `todos` into the field and press Enter. 2. **Add the `ADD_TODO_ITEM` Operation:** A new field, `Add operation`, will appear under your new module. - Type `ADD_TODO_ITEM` into this field and press Enter. - An editor will appear for the operation's input type. You need to define the data required for this operation. Paste the following GraphQL `input` definition into the editor: ```graphql # Defines a GraphQL input type for adding a new to-do item input AddTodoItemInput { text: String! } ``` :::info Notice we don't include `id` in the input — the reducer will generate it automatically using `generateId()` from `document-model/core`. ::: 3. **Add the `UPDATE_TODO_ITEM` Operation:** - In the `Add operation` field again, type `UPDATE_TODO_ITEM` and press Enter. - Paste the corresponding `input` definition into its editor: ```graphql # Defines a GraphQL input type for updating a to-do item input UpdateTodoItemInput { id: OID! text: String checked: Boolean } ``` 4. **Add the `DELETE_TODO_ITEM` Operation:** - Finally, type `DELETE_TODO_ITEM` in the `Add operation` field and press Enter. - Paste its `input` definition: ```graphql # Defines a GraphQL input type for deleting a to-do item input DeleteTodoItemInput { id: OID! } ``` 5. **Review and Export:** After adding all three operations, your document model specification in Connect is complete for now. You can see how each operation (`ADD_TODO_ITEM`, etc.) is now explicitly linked to an input type that defines its payload. The next step in a real project would be to click the `Export` button to save this specification file. In the next chapter, we will see how this exported file is used to generate code for our reducers.
## Conclusion Specifying document operations is a foundational step in building robust and predictable document models in Powerhouse. By clearly defining the **"what" (the operation and its input)** before implementing the **"how" (the reducer logic)**, you create a clear contract for state transitions. This approach enhances type safety, testability, and the overall maintainability of your document model. In the next section, we will dive deeper into the implementation of the reducer functions for these specified operations. --- ## Use the Document Model Generator > Source: https://academy.vetra.io/academy/Build/DocumentModelCreation/UseTheDocumentModelGenerator When building document models with **Vetra Studio**, code generation happens automatically. As you add and update specification documents in your Vetra Studio Drive, Vetra monitors your changes and generates the necessary scaffolding in real-time. You'll receive updates directly in your terminal as Vetra processes your specifications. This article covers the **manual code generation method** using the `ph generate` command—an alternative approach that remains available when working with **Connect** and exported `.phd` specification files. While Vetra Studio is the recommended workflow for most developers, understanding the generator command provides useful context for how the scaffolding works under the hood. ## When to Use Manual Generation | Workflow | Code Generation | | ---------------- | -------------------------------------------------------------------------- | | **Vetra Studio** | Automatic—Vetra watches your specifications and generates code as you work | | **Connect** | Manual—Export a `.phd` file and run `ph generate` | If you're using Vetra Studio with `ph vetra --interactive`, you don't need to run any generation commands. Vetra handles everything for you, prompting for confirmation before processing changes. ## Prerequisites (Connect Workflow Only) If you're using the Connect workflow and need to manually generate code: 1. **Powerhouse CLI (`ph-cmd`) Installed:** The generator is part of the Powerhouse CLI. If you haven't installed it, see [Prerequisites](/academy/Build/GettingStartedBuilding/Prerequisites). 2. **Exported `.phd` File:** You must have exported your document model specification from Connect as a `.phd` file (e.g., `TodoList.phd`). ## The Generate Command The core command to invoke the Document Model Generator is: ```bash ph generate document-model --document ``` Replace `` with the actual filename of your exported document model specification. For instance, if your exported file is named `TodoList.phd`, the command would be: ```bash ph generate document-model --document TodoList.phd ``` When executed, this command reads and parses the specification file and generates a set of files and directories within your Powerhouse project. ## Understanding the Generated Artifacts Whether generated automatically by Vetra or manually via `ph generate`, the output structure is the same. Understanding these artifacts helps you work effectively with your document model. The generator creates a new directory specific to your document model, located at: `document-models//` For example, using `TodoList.phd` would result in a directory structure under `document-models/todo-list/`. Inside this directory, you will find: ### 1. Specification Files - **`todo-list.json`**: A JSON representation of your document model specification containing the parsed schema, operation definitions, document type, and metadata. - **`schema.graphql`**: The raw GraphQL Schema Definition Language (SDL) for both the state and operations—a human-readable reference of your schema. ### 2. The `gen/` Directory (Auto-Generated Code) This directory houses all code automatically generated from your specification. **Do not manually edit files within the `gen/` directory**—they will be overwritten when the model is regenerated. Key files include: - **`types.ts`**: TypeScript interfaces derived from your GraphQL schema, including types for your document's state (e.g., `TodoListState`), complex types (e.g., `TodoItem`), and operation inputs (e.g., `AddTodoItemInput`). - **`creators.ts`**: Action creator functions for each operation. Instead of manually constructing action objects, you use functions like `addTodoItem({ text: 'Buy groceries' })`. - **`utils.ts`**: Utility functions including helpers to create initial document instances (e.g., `utils.createDocument()`). - **`reducer.ts`**: A TypeScript interface defining the expected shape of your reducer implementation. ### 3. The `src/` Directory (Your Implementation) This is where you write custom logic. Unlike `gen/`, these files are meant for manual editing. - **`reducers/`**: Contains skeleton reducer files (e.g., `todos.ts`) with function stubs for each operation that you implement with state transition logic. - **`tests/`**: Test files for your reducer logic. ## Versioned Document Models When your document model needs to evolve over time—adding new fields, operations, or changing behavior—you can use **versioning**. This allows multiple versions of the same document model to coexist, with automatic upgrade paths between them. ### Enabling Versioning Versioning is enabled by default. Simply run: ```bash ph generate document-model --document TodoList.phd ``` ### Versioned Folder Structure With versioning enabled, the generator creates a different structure: ``` document-models/ └── todo/ ├── v1/ # Version 1 code │ ├── gen/ # Auto-generated v1 types and utilities │ ├── src/reducers/ # V1 reducer implementations │ └── module.ts # Exports DocumentModelModule with version: 1 ├── v2/ # Version 2 code │ ├── gen/ │ ├── src/reducers/ │ └── module.ts # Exports DocumentModelModule with version: 2 ├── upgrades/ # Migration logic │ ├── versions.ts # Supported versions list │ ├── v2.ts # Upgrade reducer: v1 → v2 │ └── upgrade-manifest.ts └── document-models.ts # Exports all versions + manifests ``` ### Key Differences with Versioning | Standard Generation | Versioned Generation | | ------------------------------- | ----------------------------------------- | | Single `gen/` and `src/` folder | Separate `v1/`, `v2/` folders per version | | One reducer implementation | Version-specific reducers | | No upgrade logic | `upgrades/` folder with manifests | | Direct module export | Exports all versions + upgrade manifests | For comprehensive documentation on implementing versioning, including upgrade reducers and integration with Connect and Switchboard, see [Document Model Versioning](/academy/Build/DocumentModelCreation/DocumentModelVersioning). ## Benefits of Generated Scaffolding The generation process—whether automatic via Vetra or manual via `ph generate`—provides: 1. **Reduced Boilerplate:** Automates creation of type definitions, action creators, and utilities. 2. **Type Safety:** TypeScript types from your GraphQL schema catch errors at compile-time. 3. **Consistency:** Standardized project structure across document models. 4. **Accelerated Development:** Focus on business logic instead of foundational plumbing. 5. **Ecosystem Alignment:** Generated code integrates seamlessly with the Powerhouse ecosystem. 6. **Single Source of Truth:** Code stays synchronized with your specification. 7. **Version Support:** Optional versioning enables safe schema evolution over time. ## Practical Examples ### Using Vetra Studio (Recommended) When using Vetra Studio, code generation is automatic: 1. **Start Vetra in Interactive Mode:** ```bash ph vetra --interactive ``` 2. **Create Your Document Model:** Define your `TodoList` document model in the Vetra Studio Drive—either manually or with AI assistance through Claude and the Reactor MCP. 3. **Watch the Terminal:** As you add specifications, Vetra automatically detects changes and generates scaffolding. In interactive mode, you'll be prompted to confirm before generation proceeds. 4. **Explore Generated Files:** Once complete, find your generated files at `document-models/todo-list/`: - `todo-list.json` and `schema.graphql`: Your model definition - `gen/`: Type-safe generated code - `src/reducers/todos.ts`: Skeleton reducer functions ready for implementation ### Using Connect (Alternative Method)
Tutorial: Manual Generation with Connect This approach is useful when working with Connect's Document Model Editor or when you need explicit control over the generation process. #### Prerequisites - **`TodoList.phd` file**: Your document model specification exported from Connect. #### Steps 1. **Place the Specification File in Your Project:** Navigate to your Powerhouse project root and copy your `TodoList.phd` file there. 2. **Run the Generator Command:** ```bash ph generate document-model --document TodoList.phd ``` 3. **Explore the Generated Files:** After the command completes, find the new directory at `document-models/todo-list/`: - `todo-list.json` and `schema.graphql`: The definition of your model - `gen/`: Type-safe generated code including `types.ts`, `creators.ts`, etc. - `src/`: Implementation skeleton, including `src/reducers/todos.ts` with empty functions for `addTodoItemOperation`, `updateTodoItemOperation`, and `deleteTodoItemOperation`
## Next Steps With your document model scaffolded, the next step is implementing the reducer logic in `document-models/todo-list/src/reducers/todos.ts`. Each reducer function takes the current state and action input, returning the new document state. Subsequently, write unit tests for your reducers to ensure they behave correctly. This cycle of defining, generating, implementing, and testing forms the core loop of document model development in Powerhouse. --- ## Implement document reducers > Source: https://academy.vetra.io/academy/Build/DocumentModelCreation/ImplementDocumentReducers **NOTE:** This is the same step from the [Manual Todo tutorial](/academy/Build/ManualTodoTutorial/ImplementOperationReducers), covered here in depth. The Mastery Track's only addition is the reducer logic for the computed `stats` field — if you've done the basic build, skim to the stats parts. ## The heart of document logic In our journey through Powerhouse Document Model creation, we've defined the "what" – the structure of our data ([State Schema](02-SpecifyTheStateSchema.md)) and the ways it can be changed ([Document Operations](03-SpecifyDocumentOperations.md)). We've also seen how the [Document Model Generator](04-UseTheDocumentModelGenerator.md) translates these specifications into a coded scaffold. Now, we arrive at the "how": implementing **Document Reducers**. Reducers are the core logic units of your document model. They are the functions that take the current state of your document and an operation (an "action"), and then determine the _new_ state of the document. They are the embodiment of your business rules and the engine that drives state transitions in a predictable, auditable, and immutable way. ## Recap: The journey to reducer implementation Before diving into the specifics of writing reducers, let's recall the preceding steps: 1. **State Schema Definition**: You designed the GraphQL `type` definitions for your document's data structure (e.g., `TodoListState`, `TodoItem`). 2. **Document Operation Specification**: You defined the GraphQL `input` types that specify the parameters for each allowed modification to your document (e.g., `AddTodoItemInput`, `UpdateTodoItemInput`). These were then associated with named operations (e.g., `ADD_TODO_ITEM`) in the Connect application. 3. **Code Generation**: You used `ph generate ` to create the necessary TypeScript types, action creators, and, crucially, the skeleton file for your reducers (typically `document-models//src/reducers/todos.ts`). This generated reducer file is our starting point. It will contain function stubs or an object structure expecting your reducer implementations, all typed according to your schema. ## What is a reducer? ### The core principles In the context of Powerhouse and inspired by patterns like Redux, a reducer is a **pure function** with the following signature (conceptually): `(currentState, action) => newState` Let's break down its components and principles: - **`currentState`**: This is the complete, current state of your document model instance before the operation is applied. It's crucial to treat this as **immutable**. - **`action`**: This is an object describing the operation to be performed. It typically has: - A `type` property: A string identifying the operation (e.g., `'ADD_TODO_ITEM'`). - An `input` property (or similar, like `payload`): An object containing the data necessary for the operation, matching the GraphQL `input` type you defined (e.g., `{ text: 'Buy groceries' }` for `AddTodoItemInput`). - **`newState`**: The reducer must return a _new_ state object representing the state after the operation has been applied. If the operation does not result in a state change, the reducer should return the `currentState` object itself. ### Key principles guiding reducer implementation: 1. **Purity**: - **Deterministic**: Given the same `currentState` and `action`, a reducer must _always_ produce the same `newState`. - **No Side Effects**: Reducers must not perform any side effects. This means no API calls, no direct DOM manipulation, no `Math.random()` (unless seeded deterministically for specific testing scenarios), and no modification of variables outside their own scope. Their sole job is to compute the next state. 2. **Immutability**: - **Never Mutate `currentState`**: You must never directly modify the `currentState` object or any of its nested properties. - **Always Return a New Object for Changes**: If the state changes, you must create and return a brand new object. If the state does not change, you return the original `currentState` object. - This is fundamental to Powerhouse's event sourcing architecture, enabling time travel, efficient change detection, and a clear audit trail. :::tip[Powerhouse uses Immer.js] Powerhouse uses **Immer.js** under the hood, which means you can write code that _looks like_ it's mutating the state directly (e.g., `state.items.push(...)`), but Immer ensures it results in an immutable update. This gives you the best of both worlds: readable code and immutable state. ::: 3. **Single Source of Truth**: The document state managed by reducers is the single source of truth for that document instance. All UI rendering and data queries are derived from this state. 4. **Delegation to specific operation handlers**: While you can write one large reducer that uses a `switch` statement or `if/else if` blocks based on `action.type`, Powerhouse's generated code typically encourages a more modular approach. You'll often implement a separate function for each operation, which are then combined into a main reducer object or map. The `ph generate` command usually sets up this structure for you. For example, in your `document-models/todo-list/src/reducers/todos.ts`, you'll find an object structure like this: ```typescript import type { TodoListTodosOperations } from "todo-tutorial/document-models/todo-list"; export const todoListTodosOperations: TodoListTodosOperations = { addTodoItemOperation(state, action) { // Your logic for ADD_TODO_ITEM }, updateTodoItemOperation(state, action) { // Your logic for UPDATE_TODO_ITEM }, deleteTodoItemOperation(state, action) { // Your logic for DELETE_TODO_ITEM }, }; ``` The `TodoListTodosOperations` type is generated by Powerhouse and ensures your reducer object correctly implements all defined operations. The `state` and `action` parameters within these methods will also be strongly typed based on your schema. ## Implementing reducer logic: A practical guide Let's use our familiar `TodoList` example to illustrate common patterns. ### Basic implementation (matching the Manual Todo tutorial) The basic implementation matches what you built in the Manual Todo tutorial: ```typescript export const todoListTodosOperations: TodoListTodosOperations = { addTodoItemOperation(state, action) { // Generate a unique ID for the new todo item const id = generateId(); // Add the new item to the state (Immer handles immutability) state.items.push({ ...action.input, id, checked: false }); }, updateTodoItemOperation(state, action) { // Find the item to update by its ID const item = state.items.find((item) => item.id === action.input.id); // Return early if item not found if (!item) return; // Update only the fields that are provided (partial update) item.text = action.input.text ?? item.text; item.checked = action.input.checked ?? item.checked; }, deleteTodoItemOperation(state, action) { // Filter out the item with the matching ID state.items = state.items.filter((item) => item.id !== action.input.id); }, }; ``` **INFO:** Notice that `addTodoItemOperation` uses `generateId()` from `document-model/core` to create a unique ID. This is the recommended pattern — the ID is generated in the reducer, not passed from the UI. This ensures consistent, unique IDs across all operations. ### Advanced implementation (with statistics tracking) **INFO:** This section extends the basic reducers with statistics tracking, matching the advanced schema from the previous section. This demonstrates how to update computed/derived state alongside your primary data. For the advanced version with `stats`, we need to update the statistics whenever items are added, updated, or deleted: ```typescript export const todoListTodosOperations: TodoListTodosOperations = { addTodoItemOperation(state, action) { // Generate a unique ID for the new todo item const id = generateId(); // Update statistics state.stats.total += 1; state.stats.unchecked += 1; // Add the new item to the state state.items.push({ id, text: action.input.text, checked: false, // New items always start as unchecked }); }, updateTodoItemOperation(state, action) { // Find the specific item we want to update const item = state.items.find((item) => item.id === action.input.id); if (!item) { throw new Error(`Item with id ${action.input.id} not found`); } // Update text if provided if (action.input.text !== undefined) { item.text = action.input.text; } // Handle checked status changes and update stats if ( action.input.checked !== undefined && action.input.checked !== item.checked ) { if (action.input.checked) { state.stats.unchecked -= 1; state.stats.checked += 1; } else { state.stats.unchecked += 1; state.stats.checked -= 1; } item.checked = action.input.checked; } }, deleteTodoItemOperation(state, action) { // Find the item to determine its checked status for stats const item = state.items.find((item) => item.id === action.input.id); if (item) { // Update statistics state.stats.total -= 1; if (item.checked) { state.stats.checked -= 1; } else { state.stats.unchecked -= 1; } } // Remove the item from the list state.items = state.items.filter((item) => item.id !== action.input.id); }, }; ``` ### Common patterns explained #### 1. Adding an item ```typescript addTodoItemOperation(state, action) { const id = generateId(); // Generate unique ID state.items.push({ ...action.input, id, checked: false }); } ``` - We use `generateId()` to create a unique identifier - We spread `action.input` to get the text, add the generated ID and default `checked: false` - With Immer, this "mutation" is actually immutable #### 2. Updating an item ```typescript updateTodoItemOperation(state, action) { const item = state.items.find((item) => item.id === action.input.id); if (!item) return; item.text = action.input.text ?? item.text; item.checked = action.input.checked ?? item.checked; } ``` - We find the item by ID - We use nullish coalescing (`??`) to only update fields that were provided - This allows partial updates (e.g., just changing `checked` without touching `text`) #### 3. Deleting an item ```typescript deleteTodoItemOperation(state, action) { state.items = state.items.filter((item) => item.id !== action.input.id); } ``` - We use `filter` to create a new array without the deleted item - Immer handles making this immutable ## Leveraging generated types As highlighted in [Using the Document Model Generator](04-UseTheDocumentModelGenerator.md), `ph generate` produces TypeScript types for your state (e.g., `TodoListState`, `TodoItem`) and the inputs for your operations (e.g., `AddTodoItemInput`, `UpdateTodoItemInput`). **Always use these generated types in your reducer implementations!** ```typescript export const todoListTodosOperations: TodoListTodosOperations = { addTodoItemOperation(state, action) { // TypeScript knows action.input has { text: string } const id = generateId(); state.items.push({ id, text: action.input.text, checked: false }); }, // ... other reducers }; ``` Using these types provides: - **Compile-time safety**: Catch errors related to incorrect property names or data types before runtime. - **Autocompletion and IntelliSense**: Improved developer experience in your IDE. - **Clearer code**: Types serve as documentation for the expected data structures. ## Practical implementation: Writing the `TodoList` reducers Now that you understand the principles, let's put them into practice by implementing the reducers for our `TodoList` document model.
Tutorial: Implementing the TodoList reducers This tutorial assumes you have followed the steps in the previous chapters, especially using `ph generate TodoList.phd` to scaffold your document model's code. ### Implement the operation reducers Navigate to `document-models/todo-list/src/reducers/todos.ts`. The generator will have created a skeleton file. Replace its contents with the following logic. **Basic version (without stats):** ```typescript export const todoListTodosOperations: TodoListTodosOperations = { addTodoItemOperation(state, action) { const id = generateId(); state.items.push({ ...action.input, id, checked: false }); }, updateTodoItemOperation(state, action) { const item = state.items.find((item) => item.id === action.input.id); if (!item) return; item.text = action.input.text ?? item.text; item.checked = action.input.checked ?? item.checked; }, deleteTodoItemOperation(state, action) { state.items = state.items.filter((item) => item.id !== action.input.id); }, }; ``` **Advanced version (with stats):** ```typescript export const todoListTodosOperations: TodoListTodosOperations = { addTodoItemOperation(state, action) { const id = generateId(); state.stats.total += 1; state.stats.unchecked += 1; state.items.push({ id, text: action.input.text, checked: false, }); }, updateTodoItemOperation(state, action) { const item = state.items.find((item) => item.id === action.input.id); if (!item) { throw new Error(`Item with id ${action.input.id} not found`); } if (action.input.text !== undefined) { item.text = action.input.text; } if ( action.input.checked !== undefined && action.input.checked !== item.checked ) { if (action.input.checked) { state.stats.unchecked -= 1; state.stats.checked += 1; } else { state.stats.unchecked += 1; state.stats.checked -= 1; } item.checked = action.input.checked; } }, deleteTodoItemOperation(state, action) { const item = state.items.find((item) => item.id === action.input.id); if (item) { state.stats.total -= 1; if (item.checked) { state.stats.checked -= 1; } else { state.stats.unchecked -= 1; } } state.items = state.items.filter((item) => item.id !== action.input.id); }, }; ```
## Reducers and the event sourcing model Every time a reducer processes an operation and returns a new state, Powerhouse records the original operation (the "event") in an append-only log associated with the document instance. The current state of the document is effectively a "fold" or "reduction" of all past events, applied sequentially by the reducers. This is why purity and immutability are so critical: - **Purity** ensures that replaying the same sequence of events will always yield the exact same final state. - **Immutability** ensures that each event clearly defines a discrete state transition, making it easy to audit changes and understand the document's history. ## Conclusion Implementing document reducers is where you breathe life into your document model's specification. By adhering to the principles of purity and immutability, and by leveraging the type safety provided by Powerhouse's code generation, you can build predictable, testable, and maintainable business logic. These reducers form the immutable backbone of your document's state management, perfectly aligning with the event sourcing architecture that underpins Powerhouse. With your reducers implemented, your document model is now functionally complete from a data manipulation perspective. The next chapter covers how to write tests for this logic to ensure its correctness and reliability. --- ## Implement document model tests > Source: https://academy.vetra.io/academy/Build/DocumentModelCreation/ImplementDocumentModelTests **NOTE:** This is the same step from the [Manual Todo tutorial](/academy/Build/ManualTodoTutorial/WriteDocumentModelTests), covered here in depth. The Mastery Track's only addition is tests for the computed `stats` field — if you've done the basic build, skim to the stats parts. ## Ensuring robustness and reliability In the previous chapter, we implemented the core reducer logic for our document model. Now, we reach a critical stage that underpins the reliability and correctness of our entire model: **Implementing Document Model Tests**. Testing is not an afterthought; it's an integral part of the development lifecycle, especially in systems like Powerhouse where data integrity and predictable state transitions are paramount. Well-crafted tests serve as a safety net, allowing you to refactor and extend your document model with confidence. This document provides a practical, hands-on tutorial for testing the `TodoList` document model reducers you have just built. ## Practical implementation: Writing and running the TodoList tests This tutorial assumes you have implemented the `TodoList` reducers as described in the previous chapter and that the code generator has created a test file skeleton at `document-models/todo-list/src/tests/todos.test.ts`.
Tutorial: Implementing and running the TodoList reducer tests ### 1. Implement the reducer tests With the reducer logic in place, it's critical to test it. Navigate to the generated test file at `document-models/todo-list/src/tests/todos.test.ts` and replace its contents with comprehensive tests. This suite tests each operation, verifying not only that the `items` array is correct, but also that the operation itself is recorded properly in the document's history. **Basic tests (matching the Manual Todo tutorial):** ```typescript AddTodoItemInput, DeleteTodoItemInput, UpdateTodoItemInput, } from "todo-tutorial/document-models/todo-list"; reducer, utils, isTodoListDocument, addTodoItem, AddTodoItemInputSchema, updateTodoItem, UpdateTodoItemInputSchema, deleteTodoItem, DeleteTodoItemInputSchema, TodoItemSchema, } from "todo-tutorial/document-models/todo-list"; describe("Todos Operations", () => { it("should handle addTodoItem operation", () => { const document = utils.createDocument(); const input: AddTodoItemInput = generateMock(AddTodoItemInputSchema()); const updatedDocument = reducer(document, addTodoItem(input)); expect(isTodoListDocument(updatedDocument)).toBe(true); // Verify the operation was recorded expect(updatedDocument.operations.global).toHaveLength(1); expect(updatedDocument.operations.global[0].action.type).toBe( "ADD_TODO_ITEM", ); expect(updatedDocument.operations.global[0].action.input).toStrictEqual( input, ); expect(updatedDocument.operations.global[0].index).toEqual(0); }); it("should handle updateTodoItem operation to update text", () => { const mockItem = generateMock(TodoItemSchema()); const input: UpdateTodoItemInput = generateMock( UpdateTodoItemInputSchema(), ); input.id = mockItem.id; const newText = "new text"; input.text = newText; input.checked = undefined; const document = utils.createDocument({ global: { items: [mockItem], }, }); const updatedDocument = reducer(document, updateTodoItem(input)); expect(isTodoListDocument(updatedDocument)).toBe(true); // Verify the operation was recorded expect(updatedDocument.operations.global).toHaveLength(1); expect(updatedDocument.operations.global[0].action.type).toBe( "UPDATE_TODO_ITEM", ); // Verify the state was updated correctly const updatedItem = updatedDocument.state.global.items.find( (item) => item.id === input.id, ); expect(updatedItem?.text).toBe(newText); expect(updatedItem?.checked).toBe(mockItem.checked); }); it("should handle updateTodoItem operation to update checked", () => { const mockItem = generateMock(TodoItemSchema()); const input: UpdateTodoItemInput = generateMock( UpdateTodoItemInputSchema(), ); input.id = mockItem.id; const newChecked = !mockItem.checked; input.checked = newChecked; input.text = undefined; const document = utils.createDocument({ global: { items: [mockItem], }, }); const updatedDocument = reducer(document, updateTodoItem(input)); expect(isTodoListDocument(updatedDocument)).toBe(true); const updatedItem = updatedDocument.state.global.items.find( (item) => item.id === input.id, ); expect(updatedItem?.text).toBe(mockItem.text); expect(updatedItem?.checked).toBe(newChecked); }); it("should handle deleteTodoItem operation", () => { const mockItem = generateMock(TodoItemSchema()); const document = utils.createDocument({ global: { items: [mockItem], }, }); const input: DeleteTodoItemInput = generateMock( DeleteTodoItemInputSchema(), ); input.id = mockItem.id; const updatedDocument = reducer(document, deleteTodoItem(input)); expect(isTodoListDocument(updatedDocument)).toBe(true); // Verify the operation was recorded expect(updatedDocument.operations.global).toHaveLength(1); expect(updatedDocument.operations.global[0].action.type).toBe( "DELETE_TODO_ITEM", ); // Verify the item was removed from state const updatedItems = updatedDocument.state.global.items; expect(updatedItems).toHaveLength(0); }); }); ``` **Advanced tests (with stats verification):** **INFO:** If you implemented the advanced version with statistics tracking, add these additional tests to verify the stats are updated correctly. ```typescript describe("Todos Operations with Stats", () => { it("should update stats when adding a todo item", () => { const document = utils.createDocument(); const input = { text: "Buy milk" }; const updatedDocument = reducer(document, addTodoItem(input)); expect(updatedDocument.state.global.items).toHaveLength(1); expect(updatedDocument.state.global.stats.total).toBe(1); expect(updatedDocument.state.global.stats.unchecked).toBe(1); expect(updatedDocument.state.global.stats.checked).toBe(0); }); it("should update stats when checking a todo item", () => { const document = utils.createDocument(); // Add an item first const addedDocument = reducer(document, addTodoItem({ text: "Buy milk" })); const itemId = addedDocument.state.global.items[0].id; // Now check it const updatedDocument = reducer( addedDocument, updateTodoItem({ id: itemId, checked: true }), ); expect(updatedDocument.state.global.stats.total).toBe(1); expect(updatedDocument.state.global.stats.unchecked).toBe(0); expect(updatedDocument.state.global.stats.checked).toBe(1); }); it("should update stats when deleting an unchecked todo item", () => { const document = utils.createDocument(); // Add an item const addedDocument = reducer(document, addTodoItem({ text: "Buy milk" })); const itemId = addedDocument.state.global.items[0].id; // Delete it const updatedDocument = reducer( addedDocument, deleteTodoItem({ id: itemId }), ); expect(updatedDocument.state.global.items).toHaveLength(0); expect(updatedDocument.state.global.stats.total).toBe(0); expect(updatedDocument.state.global.stats.unchecked).toBe(0); expect(updatedDocument.state.global.stats.checked).toBe(0); }); it("should update stats when deleting a checked todo item", () => { const document = utils.createDocument(); // Add and check an item const addedDocument = reducer(document, addTodoItem({ text: "Buy milk" })); const itemId = addedDocument.state.global.items[0].id; const checkedDocument = reducer( addedDocument, updateTodoItem({ id: itemId, checked: true }), ); // Delete it const updatedDocument = reducer( checkedDocument, deleteTodoItem({ id: itemId }), ); expect(updatedDocument.state.global.items).toHaveLength(0); expect(updatedDocument.state.global.stats.total).toBe(0); expect(updatedDocument.state.global.stats.checked).toBe(0); }); }); ``` ### 2. Run the tests Now, run the tests from your project's root directory to verify your implementation. ```bash pnpm run test ``` Or with npm: ```bash npm test ``` If all tests pass, you have successfully verified the core logic of your `TodoList` document model. This ensures that the reducers you wrote behave exactly as expected.
## Best practices for document model tests While the tutorial provides a concrete example, keep these general best practices in mind when writing your tests: - **Isolate Tests**: Each `it` block should ideally test one specific aspect or scenario. `beforeEach` is crucial for resetting state between tests. - **Descriptive Names**: Name your `describe` and `it` blocks clearly so they explain what's being tested. - **AAA Pattern (Arrange, Act, Assert)**: - **Arrange**: Set up the initial state and any required test data (e.g., using `utils.createDocument()` and defining `input` objects). - **Act**: Execute the operation by calling the `reducer` with an action from a `creator`. - **Assert**: Check if the outcome is as expected using `expect()`. - **Test Immutability**: A key assertion is to ensure the state is not mutated directly. You can check that a new array or object was created: `expect(newState.items).not.toBe(oldState.items);`. - **Cover Edge Cases**: Test what happens when an operation receives invalid input (e.g., trying to update an item that doesn't exist). Your test should confirm the reducer either throws an error or returns the state unchanged, depending on your implementation. - **Run Tests Frequently**: Integrate testing into your development workflow. Run tests after making changes to ensure you haven't broken anything. The `pnpm run test` (or `npm test`) command is your friend. ## Conclusion: The payoff of diligent testing Implementing comprehensive tests for your document model reducers is an investment that pays dividends in the long run. It leads to: - **Higher Quality Models**: More reliable and robust document models with fewer bugs. - **Increased Confidence**: Ability to make changes and refactor code without fear of breaking existing functionality. - **Easier Debugging**: When tests fail, they pinpoint the exact operation and scenario that's problematic. - **Better Collaboration**: Tests clarify the intended behavior of the document model for all team members. By following the tutorial and applying these best practices, you can build a strong suite of tests that safeguard the integrity and functionality of your document models. This diligence is a hallmark of a "Mastery Track" developer, ensuring that the solutions you build are not just functional but also stable, maintainable, and trustworthy. ## Up next In the next chapter of the Mastery Track - Building User Experiences you will learn how to implement an [editor](/academy/Build/BuildingUserExperiences/BuildingDocumentEditors) for your document model so you can see a simple user interface for the **TodoList** document model in action. For a complete, working example, you can always have a look at the [Example TodoList Repository](/academy/Build/DocumentModelCreation/ExampleToDoListRepository) which contains the full implementation of the concepts discussed in this Mastery Track. --- ## Example: Todo-demo-package > Source: https://academy.vetra.io/academy/Build/DocumentModelCreation/ExampleToDoListRepository **INFO:** The Todo-demo is maintained by the Powerhouse Team and serves as a reference for testing and introducing new features. It will be continuously updated alongside the accompanying documentation. https://github.com/powerhouse-inc/todo-demo There are several ways to explore this package: ### Option 1: Rebuild the Todo-demo The Todo-demo and repository are your main reference points during the Mastery Track. Follow the steps in the "Mastery Track – Document Model Creation" chapters to build along with the examples. Key patterns used in the repository: - **Naming convention**: `TodoList`, `TodoItem`, `TodoListState` (one word, PascalCase) - **Document type**: `powerhouse/todo-list` - **Module name**: `todos` - **ID generation**: Uses `generateId()` from `document-model/core` in the reducer - **Hooks**: Uses `useSelectedTodoListDocument` for state management in the editor ### Option 2: Clone and run the code locally The package includes: - The Document Model - Reducer Code - Reducer Tests - Editor Code - Drive-app Code You can clone the repository and run Vetra Studio to see all the code in action: ```bash git clone https://github.com/powerhouse-inc/todo-demo cd todo-demo pnpm install ph vetra --watch ```
Alternatively: Run with Connect ```bash git clone https://github.com/powerhouse-inc/todo-demo cd todo-demo pnpm install ph connect ```
### Option 3: Install the todo demo package in a (local) host app Alternatively, you can install this package in a Powerhouse project or in your deployed host apps: ```bash ph install @powerhousedao/todo-demo ``` ## Comparing the Manual Todo tutorial vs Mastery Track | Aspect | Manual Todo tutorial | Mastery Track (Advanced) | | ------------------ | -------------------------- | ------------------------------------ | | Schema | Basic `items` array only | Includes `stats` object for tracking | | Reducer complexity | Simple CRUD operations | Includes statistics updates | | Editor | Component-based with hooks | Same approach + stats display | | Tests | Basic operation tests | Includes stats verification tests | Both approaches use the same naming conventions and patterns — the Mastery Track simply extends the foundation with additional features to demonstrate more advanced concepts. --- ## Document Model Versioning > Source: https://academy.vetra.io/academy/Build/DocumentModelCreation/DocumentModelVersioning **TIP:** This chapter covers **advanced document model versioning**—a system for evolving document schemas and operations while maintaining backward compatibility with existing documents. This is essential when your document models need to change over time in production environments. ## Why Versioning? Document models in Powerhouse are **event-sourced**. Once a document is created with a certain schema (v1), and operations are applied to it, you can't simply change the schema without breaking existing documents. Versioning solves this problem by allowing you to: - **Add new fields** to the state schema - **Add new operations** to the document model - **Modify reducer logic** for new documents - **Automatically upgrade** old documents to new versions when needed **INFO:** Document Model Versioning is a system that allows multiple versions of the same document model to coexist. Each version has its own schema, operations, and reducers. Documents created with older versions continue to work with their original reducers, while new documents use the latest version. Upgrade manifests define how to migrate documents between versions. --- ## How Versioning Works ### The Problem It Solves Consider a simple Todo document model: **Version 1 State:** ```graphql type TodoState { todos: [Todo!]! } ``` Now you want to add a `title` field to track the list's name: **Version 2 State:** ```graphql type TodoState { title: String todos: [Todo!]! } ``` Without versioning, existing v1 documents would break because they don't have a `title` field. With versioning: - V1 documents continue to work with the v1 reducer - New documents are created with v2 - V1 documents can be **upgraded** to v2 when needed ### Key Components Document model versioning consists of four key components: | Component | Purpose | | ----------------------- | ------------------------------------------------------------------ | | **Version Folders** | Separate `v1/`, `v2/` directories containing version-specific code | | **DocumentModelModule** | Each version exports a module with explicit `version` number | | **Upgrade Manifest** | Declares supported versions and upgrade paths | | **Upgrade Reducer** | Transforms document state from one version to another | --- ## Folder Structure When versioning is enabled, the document model generator creates a versioned folder structure: ``` document-models/ └── todo/ ├── v1/ # Version 1 │ ├── gen/ # Auto-generated code (DO NOT EDIT) │ │ ├── reducer.ts │ │ ├── creators.ts │ │ ├── types.ts # V1 TypeScript types │ │ └── ... │ ├── src/ │ │ └── reducers/ # Your v1 reducer implementations │ │ └── todo-operations.ts │ └── module.ts # Exports DocumentModelModule with version: 1 │ ├── v2/ # Version 2 │ ├── gen/ │ │ └── types.ts # V2 TypeScript types (includes 'title') │ ├── src/ │ │ └── reducers/ │ └── module.ts # Exports DocumentModelModule with version: 2 │ ├── upgrades/ # Migration logic │ ├── versions.ts # Supported versions list │ ├── v2.ts # Upgrade reducer: v1 → v2 │ └── upgrade-manifest.ts # Ties everything together │ └── document-models.ts # Exports all versions + manifests ``` --- ## Core Type Definitions Understanding the underlying types helps you implement versioning correctly: ### UpgradeTransition Defines a single version upgrade: ```typescript type UpgradeTransition = { toVersion: number; upgradeReducer: UpgradeReducer; description?: string; }; ``` ### UpgradeManifest Declares all supported versions and their upgrade paths: ```typescript type UpgradeManifest = { documentType: string; latestVersion: number; supportedVersions: TVersions; upgrades: { // Keys are "v2", "v3", etc. (never "v1" - nothing to upgrade from) [V in Exclude, 1> as `v${V}`]: UpgradeTransition; }; }; ``` --- ## Implementation Guide ### Step 1: Enable Versioning in Code Generation Versioning is enabled by default when using the Powerhouse CLI: ```bash ph generate TodoList.phd ``` Or when using Vetra Studio, versioning support is configured in your project settings. ### Step 2: Version Configuration Files **versions.ts** - Declare supported versions: ```typescript // upgrades/versions.ts export const supportedVersions = [1, 2] as const; export const latestVersion = supportedVersions[1]; // 2 ``` ### Step 3: Document Model Module Each version exports a `DocumentModelModule` with an explicit version number: ```typescript // v1/module.ts export const Todo: DocumentModelModule = { version: 1, // Explicit version number reducer, actions, utils, documentModel: createState(defaultBaseState(), documentModel), }; ``` ```typescript // v2/module.ts export const Todo: DocumentModelModule = { version: 2, // Different version reducer, actions, utils, documentModel: createState(defaultBaseState(), documentModel), }; ``` ### Step 4: Upgrade Reducer The upgrade reducer transforms a document from one version to the next: ```typescript // upgrades/v2.ts function upgradeReducer( document: PHDocument, action: Action, ): PHDocument { return { ...document, state: { ...document.state, global: { ...document.state.global, title: "", // Initialize the new field }, }, initialState: { ...document.initialState, global: { ...document.initialState.global, title: "", // Also in initial state }, }, }; } export const v2: UpgradeTransition = { toVersion: 2, upgradeReducer, description: "Add title field to global state", }; ``` ### Step 5: Upgrade Manifest Tie everything together in the manifest: ```typescript // upgrades/upgrade-manifest.ts export const upgradeManifest: UpgradeManifest = { documentType: "my-org/todo", latestVersion, supportedVersions, upgrades: { v2 }, }; ``` ### Step 6: Export All Versions ```typescript // document-models.ts export const documentModels: DocumentModelModule[] = [TodoV1, TodoV2]; export const upgradeManifests: UpgradeManifest[] = [ todoUpgradeManifest, ]; ``` --- ## Integration with Connect and Switchboard ### How Connect Loads Versioned Documents Connect automatically loads all document model versions and upgrade manifests from your Vetra packages: ```typescript // Simplified view of Connect's reactor setup const documentModelModules = vetraPackages.flatMap( (pkg) => pkg.modules.documentModelModules, ); const upgradeManifests = vetraPackages.flatMap((pkg) => pkg.upgradeManifests); const reactor = await createBrowserReactor( documentModelModules, upgradeManifests, renown, ); ``` ### Creating Documents at Specific Versions By default, new documents are created at the **latest version**. You can optionally specify a version: ```typescript // Create at latest version (default) const doc = await client.createEmpty("my-org/todo"); // doc.state.document.version === 2 (latest) // Create at specific version const v1Doc = await client.createEmpty("my-org/todo", { documentModelVersion: 1, }); // v1Doc.state.document.version === 1 ``` ### Querying Documents Documents can be queried regardless of version: ```typescript // Find all todo documents (both v1 and v2) const result = await client.find({ type: "my-org/todo" }); ``` --- ## Use Cases ### 1. Adding a New Field **Scenario:** Your Todo document needs a `title` field. **Solution:** 1. Create v2 with the new field in the state schema 2. Implement upgrade reducer that sets `title: ""` 3. New documents get v2; existing v1 documents can be upgraded ### 2. Adding New Operations **Scenario:** V1 has `ADD_TODO`, `REMOVE_TODO`. V2 adds `EDIT_TITLE`. **How it works:** - V2 module includes the new operation - V1 documents don't have access to `EDIT_TITLE` until upgraded - The upgrade manifest handles the migration ### 3. Changing Reducer Behavior **Scenario:** V2 items should include an `addedAt` timestamp. ```typescript // V1 reducer - no timestamp function v1StateReducer(state, action) { if (action.type === "ADD_ITEM") { return { ...state, global: { items: [ ...state.global.items, { id: action.input.id, name: action.input.name, }, ], }, }; } } // V2 reducer - adds timestamp field function v2StateReducer(state, action) { if (action.type === "ADD_ITEM") { return { ...state, global: { items: [ ...state.global.items, { id: action.input.id, name: action.input.name, addedAt: action.input.addedAt, // New field from input }, ], }, }; } } ``` --- ## Best Practices ### Upgrade Reducer Guidelines 1. **Always handle both `state` and `initialState`** - Both need to be migrated 2. **Provide sensible defaults** for new fields 3. **Never lose data** - Transform existing data, don't delete it 4. **Keep upgrade reducers pure** - No side effects or async operations ### Version Compatibility - **Don't remove operations** from newer versions unless absolutely necessary - **Don't change existing operation input schemas** - add new operations instead - **Document breaking changes** in the upgrade transition description ### Testing Upgrades Test your upgrade reducers thoroughly: ```typescript it("should upgrade v1 document to v2", () => { const v1Doc = createV1Document(); v1Doc.state.global.todos = [{ id: "1", title: "Test", completed: false }]; const v2Doc = upgradeReducer(v1Doc, {} as Action); expect(v2Doc.state.global.title).toBe(""); // New field initialized expect(v2Doc.state.global.todos).toEqual(v1Doc.state.global.todos); // Data preserved }); ``` --- ## Summary | Concept | Description | | -------------------------- | ----------------------------------------------------------- | | **Version Folders** | `v1/`, `v2/` directories with version-specific code | | **DocumentModelModule** | Exports with explicit `version` field | | **UpgradeTransition** | Defines how to migrate from one version to the next | | **UpgradeManifest** | Declares all versions and upgrade paths for a document type | | **Backward Compatibility** | Old documents work with their original reducers | | **Automatic Upgrades** | Reactor handles version detection and migration | Document model versioning enables your applications to evolve safely while preserving the integrity of existing data. By following these patterns, you can confidently add new features, modify schemas, and improve your document models over time. --- ## Related Documentation - [Use the Document Model Generator](/academy/Build/DocumentModelCreation/UseTheDocumentModelGenerator) - [Implement Document Reducers](/academy/Build/DocumentModelCreation/ImplementDocumentReducers) - [Powerhouse CLI Reference](/academy/Reference/CLITooling/PowerhouseCLI) --- ## Build document editors > Source: https://academy.vetra.io/academy/Build/BuildingUserExperiences/BuildingDocumentEditors ## Build with React on Powerhouse At Powerhouse, frontend development for document editors follows a simple and familiar flow, leveraging the power and flexibility of React. ### Development environment **Vetra Studio** is your primary tool for builder workflows and editor development. When you run `ph vetra --watch`, it provides a dynamic, local environment where you can define and preview your document models and their editors live. This replaces the need for tools like Storybook for editor development, though Storybook remains invaluable for exploring the [Powerhouse Component Library](#powerhouse-component-library). #### Key aspects of the Powerhouse development environment: - **React Foundation**: Build your editor UIs using React components, just as you would in any standard React project. - **Automatic Build Processes**: Tailwind CSS is installed by default and fully managed by Vetra Studio. There's no need to manually configure or run Tailwind or other build processes during development. Vetra Studio handles CSS generation and other necessary build steps automatically, especially when you publish a package. - **Styling Flexibility**: You are not limited to Tailwind. Regular CSS (`.css` files), inline styles, and any React-compatible styling method work exactly as you would expect. #### Powerhouse aims to keep your developer experience clean, familiar, and focused: - Build React components as you normally would. - Use styling approaches you're comfortable with. - Trust Vetra Studio to handle the setup and build processes for you.
Alternatively: Use Connect for development You can also use **Connect** as your development environment by running `ph connect`. Connect provides a similar dynamic local environment where you can preview your document models and their editors live. The development experience is essentially the same, with Connect also handling Tailwind CSS and build processes automatically.
### Generating your editor template When using **Vetra Studio**, editor generation is automatic and integrated into your workflow. Simply create an **Editor specification document** in your Vetra Studio Drive, and Vetra will automatically generate the editor template code for you. #### With Vetra Studio (Recommended) 1. Open Vetra Studio (`ph vetra --watch`) 2. In your Vetra Studio Drive, click **"Add new specification"** in the Editors section 3. Select your document model (e.g., `TodoList`) to link the editor to 4. Name your editor (e.g., `todo-list-editor`) 5. Vetra automatically generates the `editors/todo-list-editor/editor.tsx` template That's it! No manual commands needed. Vetra watches your specifications and generates code as you work.
Alternatively: Manual generation with ph generate If you're using Connect or prefer manual control, you can use the `ph generate` command to create an editor template: ```bash ph generate --editor todo-list-editor --document-types powerhouse/todo-list ``` This will create the template in the `editors/todo-list-editor/editor.tsx` folder. If you want a refresher on how to define your document model specification please read the chapter on [specifying the State Schema](/academy/Build/DocumentModelCreation/SpecifyTheStateSchema)
### Styling your editor You have several options for styling your editor components: 1. **Default HTML Styling**: Standard HTML tags (`

`, `

`, ` ); } ``` **Why hooks are recommended:** - ✅ **Self-contained components**: Each component gets its own connection to the document - ✅ **Less boilerplate**: No need to pass props through multiple levels - ✅ **Easier refactoring**: Move components around without rewiring props - ✅ **Modern React pattern**: Follows React's recommended approach for state management ### Method 2: Using Props 📦 The **props-based approach** receives the document and dispatch function as properties passed from a parent component. ```typescript export type IProps = EditorProps; export default function Editor(props: IProps) { const { document, dispatch } = props; const state = document.state.global; // Now you'd pass state and dispatch to child components as props return (

); } ``` **When props might be useful:** - When you need strict control over which components can access state - When building components that should work outside of Powerhouse context - For testing purposes where you want to inject mock state ### Which should you use? | Scenario | Recommended Approach | | ------------------------------------------------- | -------------------- | | Building a standard Powerhouse editor | **Hooks** 🪝 | | Component needs document state | **Hooks** 🪝 | | Building reusable UI components (buttons, inputs) | **Props** 📦 | | Need to test components in isolation | **Props** 📦 | **Bottom line**: Use hooks for most Powerhouse editor development. It's simpler, cleaner, and matches the patterns used in the [todo-demo repository](https://github.com/powerhouse-inc/todo-demo). ### Additional hooks for editors Beyond the document-specific hooks (like `useSelectedTodoListDocument`), the reactor-browser package provides these hooks for your editors: | Hook | Description | | --------------------------- | --------------------------------------------- | | `useSelectedDocument` | Returns the currently selected document | | `useSelectedDocumentId` | Returns just the ID of the selected document | | `useDocumentById` | Returns a document by its ID | | `useSelectedDrive` | Returns the currently selected drive | | `useRevisionHistoryVisible` | Check and control revision history visibility | | `usePHModal` | Manage modals in your editor | **Example: Using `useDocumentById` to reference another document** ```typescript export function RelatedDocument({ documentId }: { documentId: string }) { const relatedDoc = useDocumentById(documentId); if (!relatedDoc) return Loading...; return (

Related: {relatedDoc.name}

{/* Display related document info */}
); } ``` **Example: Showing a modal from your editor** ```typescript export function CreateNewButton({ documentType }: { documentType: string }) { return ( ); } ``` For a complete list of all available hooks, see the [React Hooks API Reference](/academy/Reference/EditorsUI/ReactHooks). ## Local vs. Global State When building editors, you'll work with two types of state: - **Global Document State**: Data that is part of the document itself and should be saved. This is accessed via hooks (`useSelectedTodoListDocument`) or props (`document.state.global`). You modify it by dispatching actions. - **Local Component State**: UI-specific state that doesn't need to be saved (e.g., "is the dropdown open?", "what's in the input field before submission?"). Use React's `useState` hook for this. ```typescript export function AddTodo() { // Local state - just for this component's UI const [inputValue, setInputValue] = useState(''); // Global document state - saved in the document const [todoList, dispatch] = useSelectedTodoListDocument(); const handleSubmit = () => { if (inputValue.trim()) { dispatch(addTodoItem({ text: inputValue })); // Updates global state setInputValue(''); // Clears local state } }; return (
setInputValue(e.target.value)} />
); } ``` ## Handling dispatch errors When dispatching actions to a document, you may want to handle errors that occur during action execution. The `dispatch` function accepts an optional `onErrors` callback as its second parameter, which is invoked with any errors thrown by the reducers when processing the actions. ```typescript useSelectedTodoListDocument, addTodoItem, } from "todo-tutorial/document-models/todo-list"; export function AddTodo() { const [todoList, dispatch] = useSelectedTodoListDocument(); const handleAdd = (text: string) => { dispatch(addTodoItem({ text }), (errors) => { // Handle errors - e.g., show a toast notification console.error("Failed to add todo:", errors); alert(`Error: ${errors[0]?.message}`); }); }; // ... rest of component } ``` This pattern is useful when you need to: - Display error messages to users - Log errors for debugging - Trigger recovery actions when an operation fails ## Powerhouse component library The **`@powerhousedao/document-engineering/scalars`** package provides reusable UI components, many of them based on GraphQL scalar types. For more information read our chapter on the [Component Library](/academy/Reference/EditorsUI/DocumentEngineering). ### Exploring components You can explore available components, see usage examples, and understand their properties (props) using our Storybook instance: [https://storybook.powerhouse.academy](https://storybook.powerhouse.academy) Storybook allows you to: - Visually inspect each component. - Interact with different states and variations. - View code snippets for basic implementation. - Consult the props table for detailed configuration options. ### Using components 1. **Import**: Add an import statement at the top of your editor file: ```typescript import { Checkbox, StringField, Form, } from "@powerhousedao/document-engineering/scalars"; ``` 2. **Implement**: Use the component in your JSX, configuring it with props: ```typescript // Example using StringField for an input
{ /* Handle submission */ }}> setTaskText(e.target.value)} /> ```
Tutorial: Implementing the TodoList Editor ## Build a TodoList editor Now build the editor: the user interface for the **TodoList** document model. It runs inside the Connect app to create, update, and delete TodoList items, and (if you followed the advanced version) displays the statistics from your reducers. ## Generate the editor template ### Using Vetra Studio (Recommended) With Vetra Studio running (`ph vetra --watch`), simply create an Editor specification: 1. In your Vetra Studio Drive, click **"Add new specification"** in the Editors section 2. Select the **TodoList** document model to link the editor to 3. Name your editor `todo-list-editor` 4. Vetra automatically generates `editors/todo-list-editor/editor.tsx` Once complete, navigate to the `editors/todo-list-editor/editor.tsx` file and open it in your IDE.
Alternatively: Manual generation with ph generate If you're not using Vetra Studio, run the command below to generate the editor template: ```bash ph generate --editor todo-list-editor --document-types powerhouse/todo-list ``` This command reads the **TodoList** document model definition from the `document-models` folder and generates the editor template in the `editors/todo-list-editor` folder as `editor.tsx`. Notice the `--editor` flag which specifies the editor name, and the `--document-types` flag defines the document type `powerhouse/todo-list`.
### Editor implementation options You have several options for styling your editor component: 1. **Default HTML Styling:** Standard HTML tags (`

`, `

`, ` ); } ``` ### Todo item component ```typescript // editors/todo-list-editor/components/Todo.tsx type Props = { todo: TodoItem; }; export function Todo({ todo }: Props) { const [isEditing, setIsEditing] = useState(false); const [todoList, dispatch] = useSelectedTodoListDocument(); if (!todoList) return null; const onChangeTodoChecked: ChangeEventHandler = (event) => { dispatch(updateTodoItem({ id: todo.id, checked: event.target.checked })); }; const onClickDeleteTodo: MouseEventHandler = () => { dispatch(deleteTodoItem({ id: todo.id })); }; const onSubmitUpdateTodoText: FormEventHandler = (event) => { event.preventDefault(); const form = event.currentTarget; const textInput = form.elements.namedItem("todoText") as HTMLInputElement; const text = textInput.value; if (!text) return; dispatch(updateTodoItem({ id: todo.id, text })); setIsEditing(false); }; if (isEditing) { return (

); } return (
{todo.text}
); } ``` --- ## Advanced: Adding stats display **INFO:** If you implemented the advanced version with statistics tracking, you can add a stats component to display the todo counts. ```typescript // Add to TodoList.tsx export function TodoList() { const [selectedTodoList] = useSelectedTodoListDocument(); if (!selectedTodoList) return null; const { items, stats } = selectedTodoList.state.global; return (

TodoList

{/* Stats section (only show if there are items) */} {items.length >= 2 && (
Total
{stats.total}
Completed
{stats.checked}
Remaining
{stats.unchecked}
)}
); } ``` --- ## Test your editor Now you can run Vetra Studio and see the **TodoList** editor in action: ```bash ph vetra --watch ``` In Vetra Studio, you'll be able to create and test your **TodoList** documents. Click on the Document Models section and create a new TodoList document. **TIP:** The editor will update dynamically, so you can play around with your editor styling while seeing your results appear in Vetra Studio.
Alternatively: Test with Connect You can also run the Connect app to see the **TodoList** editor in action: ```bash ph connect ``` In Connect, in the bottom right corner you'll find a new Document Model that you can create: **TodoList**. Click on it to create a new TodoList document. The editor will update dynamically, so you can play around with your editor styling while seeing your results appear in Connect.

## Up Next Next, build a [custom Drive-app](/academy/Build/BuildingUserExperiences/BuildingADriveExplorer) for your TodoList document. When you have many TodoLists sitting in a drive, a Drive-app lets you organize and track them at a glance. ### Further Reading - [React Hooks API Reference](/academy/Reference/EditorsUI/ReactHooks) — Complete reference for all available Powerhouse hooks - [Component Library](/academy/Reference/EditorsUI/DocumentEngineering) — Pre-built UI components for your editors --- ## Build a Drive-app > Source: https://academy.vetra.io/academy/Build/BuildingUserExperiences/BuildingADriveExplorer **Drive-apps** enhance how contributors and organizations interact with document models. They create an 'app-like' experience by providing a **custom interface** for exploring and interacting with the contents of a drive. **TIP:** A Drive-app offers a tailored application designed around its document models. Think of a Drive-app as a specialized lens—it offers **different ways to visualize, organize, and interact with** the data stored within a drive, making it more intuitive and efficient for specific use cases. ### Drive-apps are purpose-built Organizations typically build Drive-apps for specific use cases, often packaging them with a corresponding document model. This allows for customized user experiences, streamlined workflows, and maximized efficiency for contributors. Drive-apps **bridge the gap between raw data and usability**, unlocking the full potential of document models within the Powerhouse framework. ### Key features of Drive-apps - **Custom Views & Organization** – Drive-apps can present data in formats like Kanban boards, list views, or other structured layouts to suit different workflows. - **Aggregated Insights** – They can provide high-level summaries of important details across document models, enabling quick decision-making. - **Enhanced Interactivity** – Drive-apps can include widgets, data processors, or read models to process and display document data dynamically. ## Build a Drive-app Drive-apps provide custom interfaces for interacting with the contents of a drive. Let's start with a **quick overview** of the steps for building a Drive-app. We will then apply these steps to create our **todo-list Drive-app**. ### Step 1. Generate the scaffolding code When using **Vetra Studio**, Drive-app generation is automatic. Simply create a **Drive-app specification document** in your Vetra Studio Drive: 1. Open Vetra Studio (`ph vetra --watch`) 2. In your Vetra Studio Drive, click **"Add new specification"** in the Apps section 3. Name your Drive-app (e.g., `todo-list-drive-explorer`) 4. Vetra automatically generates the Drive-app template code
Alternatively: Manual generation with ph generate If you're not using Vetra Studio, use the `generate drive editor` command to create the basic template structure: ```bash ph generate --drive-editor ```
### Step 2. Update the manifest file After creating your Drive-app, you need to update its `powerhouse.manifest.json` file. This file identifies your project and its components within the Powerhouse ecosystem. ### Step 3. Customize the Drive-app Review the generated template and modify it to better suit your document model: 1. Remove unnecessary files and components 2. Add custom views specific to your data model 3. Implement specialized interactions for your use case ### About the Drive-app template The default template provides a solid foundation. It contains: - A tree structure navigation panel - Basic file/folder operations - Standard layout components But the real power comes from tailoring the interface to your specific document models. Now, let's implement a specific example for the to-do list we've been working on throughout this guide. ## Implementation example: todo-list Drive-app This example demonstrates how to create a todo-list Drive-app application using the Powerhouse platform. The application allows users to create and manage to-do lists with a visual progress indicator. **WARNING:** If you've been following the Mastery Track, you can continue with the to-do list document model and Powerhouse project you've created. For more details, you can refer to the [Document Model Creation guide](/academy/Build/DocumentModelCreation/SpecifyTheStateSchema). If not, you can follow the shortened guide below to prepare your project for this tutorial.
Prepare your Powerhouse Project to create a custom drive ### 1. Create a To-do document model: - Initialize a new project with `ph init` and give it a project name. - Start by running Vetra Studio locally with `ph vetra --watch` - Follow the [Manual Todo tutorial](/academy/Build/ManualTodoTutorial/DefineToDoListDocumentModel) to create your TodoList document model specification. - Drop the downloaded file in the Vetra Studio drive. You'll find it under document models. Vetra should now automatically generate the necessary code for your project ### 2. Add the reducer code: - Copy the code from [`todos.ts`](https://github.com/powerhouse-inc/todo-tutorial/blob/step-3-complete-implement-todo-list-document-model-reducer-operation-handlers/document-models/todo-list/src/reducers/todos.ts) - Paste it into `document-models/todo-list/src/reducers/todos.ts` ### 3. Generate a document editor: In Vetra Studio, create an Editor specification: 1. Click **"Add new specification"** in the Editors section 2. Select the **TodoList** document model 3. Name your editor `TodoList` 4. Vetra automatically generates the editor template
Alternatively: Manual generation ```bash ph generate --editor TodoList --document-types powerhouse/todo-list ```
### 4. Add the editor code: - Follow the [Build TodoList Editor guide](/academy/Build/ManualTodoTutorial/BuildToDoListEditor) to implement your editor components.
Alternatively: Use Connect instead of Vetra Studio You can also start by running Connect locally with `ph connect` instead of Vetra Studio. The workflow is the same, with Connect providing a similar development environment.
## Generate the Drive-app ### 1. Generate a Drive-app: With Vetra Studio running (`ph vetra --watch`), create a Drive-app specification: 1. In your Vetra Studio Drive, click **"Add new specification"** in the Apps section 2. Name your Drive-app `todo-list-drive-explorer` 3. Vetra automatically generates the Drive-app template in `editors/todo-list-drive-explorer/`
Alternatively: Manual generation with ph generate ```bash ph generate --drive-editor todo-list-drive-explorer ```
### 2. Update the `powerhouse.manifest.json` file: - The manifest file contains metadata for your package that is displayed when other users install it. Update the manifest to register your new Drive-app: ```json { "name": "To-do List Package", "description": "A simple todo-list with a dedicated Drive-app", "category": "Productivity", "publisher": { "name": "Powerhouse", "url": "https://www.powerhouse.inc/" }, "documentModels": [ { "id": "todo-list", "name": "TodoList" } ], "editors": [ { "id": "todo-list-editor", "name": "TodoList Editor", "documentTypes": ["todo-list"] } ], "apps": [ { "id": "todo-list-drive-explorer", "name": "TodoList drive-app", "driveEditor": "todo-list-drive-explorer" } ], "subgraphs": [], "importScripts": [] } ``` ### 3. Remove Unnecessary Default Components: - First, let's remove some default template files that we won't need for this specific demo. If you want to see what the default template looks like before removing files, you can run `ph connect` at any time. ```bash rm -rf editors/todo-list-drive-explorer/hooks rm -rf editors/todo-list-drive-explorer/components/FileItemsGrid.tsx rm -rf editors/todo-list-drive-explorer/components/FolderItemsGrid.tsx rm -rf editors/todo-list-drive-explorer/components/FolderTree.tsx ``` ### 4. Create custom components for your Drive-app: - Next, create the following files. These will define the data types for our todo-list items and provide the custom React components for our Drive-app.
Create `editors/todo-list-drive-explorer/types/todo.ts` This file defines the TypeScript type `ToDoState`. It specifies the shape of todo-list document data within the Drive-app, combining the document's revision information with its global state. This ensures that our components work with a predictable and strongly-typed data structure. ```typescript import type { TodoListDocument } from "todo-tutorial/document-models/todo-list"; export type TodoState = { documentType: string; revision: { global: number; local: number; }; global: TodoListDocument["state"]["global"]; }; ```
Create `editors/todo-list-drive-explorer/components/ProgressBar.tsx` This is a simple React component that renders a visual progress bar. It takes a `value` and `max` number to calculate the percentage of completed tasks. It also displays the percentage and has a special state for when there are no tasks. ```tsx import type { FC } from 'react'; interface ProgressBarProps { value: number; max: number; } export const ProgressBar: FC = ({ value, max }) => { if (max === 0) { return (
No tasks
); } const percentage = Math.min(100, (value / max) * 100); return (
{Math.round(percentage)}%
); }; ```
Update `editors/todo-list-drive-explorer/components/DriveExplorer.tsx` This is the main component of our Drive-app. It fetches all `powerhouse/todo-list` documents from the drive, displays them in a table with their progress, and allows a user to click on a document to open it in the `EditorContainer`. It also includes a button to create new documents. ```typescript type TodoState = { documentType: string; revision: { global: number; local: number; }; global: TodoListDocument["state"]["global"]; }; interface DriveExplorerProps { driveId: string; nodes: Node[]; onAddFolder: (name: string, parentFolder?: string) => void; onDeleteNode: (nodeId: string) => void; renameNode: (nodeId: string, name: string) => void; onCopyNode: (nodeId: string, targetName: string, parentId?: string) => void; context: DriveEditorContext; } export function DriveExplorer({ driveId, nodes, context, }: DriveExplorerProps) { const { getDocumentRevision } = context; const [activeDocumentId, setActiveDocumentId] = useState< string | undefined >(); const [openModal, setOpenModal] = useState(false); const selectedDocumentModel = useRef(null); const { addDocument, documentModels, useDriveDocumentStates } = useDriveContext(); const [state, fetchDocuments] = useDriveDocumentStates({ driveId }); useEffect(() => { fetchDocuments(driveId).catch(console.error); }, [activeDocumentId]); const { todoNodes } = useMemo(() => { return Object.keys(state).reduce( (acc, curr) => { const document = state[curr]; if (document.documentType === "powerhouse/todo-list") { acc.todoNodes[curr] = document as TodoState; } return acc; }, { todoNodes: {} as Record, }, ); }, [state]); const handleEditorClose = useCallback(() => { setActiveDocumentId(undefined); }, []); const onCreateDocument = useCallback( async (fileName: string) => { setOpenModal(false); const documentModel = selectedDocumentModel.current; if (!documentModel) return; const node = await addDocument( driveId, fileName, documentModel.documentModel.id, ); selectedDocumentModel.current = null; setActiveDocumentId(node.id); }, [addDocument, driveId], ); const onSelectDocumentModel = useCallback( (documentModel: DocumentModelModule) => { selectedDocumentModel.current = documentModel; setOpenModal(true); }, [], ); const onGetDocumentRevision = useCallback( (options?: GetDocumentOptions) => { if (!activeDocumentId) return; return getDocumentRevision?.(activeDocumentId, options); }, [getDocumentRevision, activeDocumentId], ); const filteredDocumentModels = documentModels; const fileNodes = nodes.filter((node) => node.kind === "file") as FileNode[]; // Get the active document info from nodes const activeDocument = activeDocumentId ? fileNodes.find((file) => file.id === activeDocumentId) : undefined; const documentModelModule = activeDocument ? context.getDocumentModelModule(activeDocument.documentType) : null; const editorModule = activeDocument ? context.getEditor(activeDocument.documentType) : null; return (
{/* Main Content */}
{activeDocument && documentModelModule && editorModule ? ( ) : ( <>

ToDos:

{Object.entries(todoNodes).map(([documentId, todoNode]) => ( ))}
Document ID Document Type Tasks Completed Progress
setActiveDocumentId(documentId)} className="text-blue-600 hover:text-blue-800 cursor-pointer" > {documentId}
{todoNode.documentType} {todoNode.global.stats.total} {todoNode.global.stats.checked}
{/* Create Document Section */} )}
{/* Create Document Modal */} setOpenModal(open)} open={openModal} />
); } ```
Update `editors/todo-list-drive-explorer/components/EditorContainer.tsx` This component acts as a wrapper for the document editor. When a user selects a document in `DriveExplorer.tsx`, this component mounts the appropriate editor (`todo-list-editor` in this case) and provides it with the necessary context and properties to function. It also renders the `DocumentToolbar` which provides actions like closing, exporting, and viewing revision history. ```typescript useDriveContext, type User, type DriveEditorContext, } from "@powerhousedao/reactor-browser"; documentModelDocumentModelModule, type DocumentModelModule, type EditorContext, type EditorProps, type PHDocument, type EditorModule, type Operation, } from "document-model"; DocumentToolbar, RevisionHistory, DefaultEditorLoader, generateLargeTimeline, type TimelineItem, } from "@powerhousedao/design-system"; export interface EditorContainerProps { driveId: string; documentId: string; documentType: string; onClose: () => void; title: string; context: Omit & Pick; documentModelModule: DocumentModelModule; editorModule: EditorModule; } export const EditorContainer: React.FC = (props) => { const { driveId, documentId, documentType, onClose, title, context, documentModelModule, editorModule } = props; const [selectedTimelineItem, setSelectedTimelineItem] = useState(null); const [showRevisionHistory, setShowRevisionHistory] = useState(false); const { useDocumentEditorProps } = useDriveContext(); const user = context.user as User | undefined; const timelineItems = useTimelineItems(documentId); const { dispatch, error, document } = useDocumentEditorProps({ documentId, documentType, driveId, documentModelModule, user, }); const loadingContent = (
); if (!document) return loadingContent; const moduleWithComponent = editorModule as EditorModule; const EditorComponent = moduleWithComponent.Component; return showRevisionHistory ? ( setShowRevisionHistory(false)} /> ) : ( {}} /> ); }; ```
- In case you are getting stuck and want to verify your progress with the reference repository you can find the example repository of the [Todo Tutorial here](https://github.com/powerhouse-inc/todo-tutorial) ### 3. Run the application: - With the code for our Drive-app in place, it's time to see it in action. If you've been running Vetra Studio with `ph vetra --watch`, your Drive-app is already available. Otherwise, run Connect: ```bash ph connect ``` ## Up Next You've built a custom drive explorer. Next, style it with [CSS customization](/academy/Build/BuildingUserExperiences/CSSCustomization). --- ## CSS Customization for Connect Integration > Source: https://academy.vetra.io/academy/Build/BuildingUserExperiences/CSSCustomization When your editor runs inside Connect, it's rendered within a specific container hierarchy. Understanding this structure allows you to customize your editor's appearance to match your application's design requirements. ## Understanding the Editor Container Hierarchy Connect wraps your editor component in two key containers that you can target for styling: ```
└── └──
└── ``` ### Container Details | Container ID | Default Classes | Data Attributes | Purpose | | ---------------------------- | ----------------- | ----------------------------------- | ----------------------------------------------------------- | | `#document-editor-container` | `flex-1` | `data-document-type` | Outermost wrapper, controls overall editor space allocation | | `#document-editor-context` | `relative h-full` | `data-editor`, `data-document-type` | Inner context, provides positioning context and full height | These containers are defined in Connect's source: - [`document-editor-container.tsx`](https://github.com/powerhouse-inc/ph-monorepo/blob/main/apps/connect/src/components/document-editor-container.tsx) (line 94) - [`editors.tsx`](https://github.com/powerhouse-inc/ph-monorepo/blob/main/apps/connect/src/components/editors.tsx) (line 173) ## Customizing Your Editor's Appearance ### Method 1: Inline Styles in Your Editor Component (Recommended) The simplest and most maintainable approach is to apply styles directly to your editor's root element. This keeps your styling self-contained within your editor. ```tsx export function Editor() { return (
{/* Your editor content */}
); } ``` **TIP:** Using `height: "100%"` ensures your editor fills the available vertical space within Connect's container hierarchy. ### Method 2: CSS File with Container Selectors For more complex customizations or when you need to override Connect's default container styles, you can target the container IDs directly in a CSS file: **DANGER:** Targeting container IDs directly will apply styles to **ALL** editors in your Connect application. For editor-specific styling, use [Method 3: Scoped Styling with Data Attributes](#method-3-scoped-styling-with-data-attributes) instead. ```css /* editors/my-editor/editor.css */ #document-editor-container { /* Customize the outer container */ background-color: #f8fafc; } #document-editor-context { /* Customize the inner context */ max-width: 1200px; margin: 0 auto; } /* Scope styles to your editor within the context */ #document-editor-context .my-editor-root { padding: 2rem; } ``` **WARNING:** Remember to import styles in your `styles.css` file rather than directly in `.tsx` files. Direct imports work in development but won't be included in production builds. ```css /* styles.css */ @import "./editors/my-editor/editor.css"; ``` ### Method 3: Scoped Styling with Data Attributes Connect adds `data-editor` and `data-document-type` attributes to editor containers, allowing you to scope CSS rules to specific editors without affecting others. ```css /* Only applies to a specific editor */ #document-editor-context[data-editor="document-editor-editor"] { background-color: #f0f9ff; } /* Only applies to a specific document type */ #document-editor-context[data-document-type="powerhouse/document-editor"] { max-width: 900px; margin: 0 auto; } /* Combine both for precise targeting */ #document-editor-context[data-editor="document-editor-editor"][data-document-type="powerhouse/document-editor"] { padding: 1rem; } ``` #### Finding Your Editor ID The `data-editor` value comes from the `id` property in your editor module configuration: ```typescript // editors/my-editor/module.ts export const MyEditor: EditorModule = { config: { id: "my-custom-editor", // <-- This becomes the data-editor value documentTypes: ["my-org/my-document-model"], }, Component: MyEditorComponent, }; ``` #### Common Editor IDs | Editor ID | Document Type | Description | | ------------------------ | ---------------------------- | --------------- | | `document-editor-editor` | `powerhouse/document-editor` | Document Editor | | `vetra-drive-app` | `powerhouse/document-drive` | Drive Explorer | | `app-editor` | `powerhouse/app` | App Editor | **TIP:** You can inspect the `data-editor` and `data-document-type` attributes in your browser's developer tools when editing a document to find the exact values for your target editor. ## Reference Implementation: Vetra Drive App The Vetra Drive App provides a real-world example of CSS customization. Here's how it styles its editor wrapper: ```tsx // From: packages/vetra/editors/vetra-drive-app/editor.tsx
``` This example demonstrates: - **`height: "100%"`** - Ensures the editor fills the full container height - **`bg-gray-50`** - Applies a light gray background color - **`p-6`** - Adds consistent padding around the content - **`after:*` pseudo-element** - Creates a visual effect layer for transitions ## Common Use Cases ### Full-Height Editor with Scrollable Content When your editor needs a fixed header/toolbar with scrollable main content: ```tsx export function Editor() { return (

Document Title

{/* Toolbar buttons */}
{/* Scrollable content area */}
); } ``` ### Custom Background and Theming Apply custom backgrounds or gradients to match your application's theme: ```tsx export function Editor() { return (
{/* Themed content */}
); } ``` ### Centered Content with Max Width Constrain content width for better readability: ```tsx export function Editor() { return (
{/* Centered, width-constrained content */}
); } ``` ## Troubleshooting ### Editor Doesn't Fill Available Height **Problem:** Your editor content appears squished or doesn't use the full height. **Solution:** Ensure your root element has `height: "100%"` or uses flex utilities: ```tsx // Option 1: Inline style
// Option 2: Tailwind class
``` ### Styles Not Applied in Production **Problem:** Styles work in development but not in production builds. **Solution:** Move style imports from `.tsx` files to your `styles.css` file: ```css /* styles.css - correct location for imports */ @import "./editors/my-editor/editor.css"; ``` ### Z-Index Conflicts **Problem:** Overlays, modals, or dropdowns appear behind other elements. **Solution:** The `#document-editor-context` has `position: relative`. Use this as your positioning context: ```tsx
{/* Your content */}
{/* Positioned overlay */}
``` ### Content Overflows Container **Problem:** Content extends beyond the editor boundaries. **Solution:** Add overflow handling to your root element: ```tsx
{/* Scrollable when content overflows */}
// Or hide overflow
{/* Content is clipped */}
``` ## Further Reading - [Building Document Editors](/academy/Build/BuildingUserExperiences/BuildingDocumentEditors) - Fundamentals of editor development including basic styling - [Building a Drive Explorer](/academy/Build/BuildingUserExperiences/BuildingADriveExplorer) - Creating custom drive apps with styling --- ## Document Toolbar > Source: https://academy.vetra.io/academy/Build/BuildingUserExperiences/DocumentTools/DocumentToolbar The `DocumentToolbar` renders a default set of document controls for common document actions: undo, redo, download, document name editing, revision history, opening in Switchboard, and closing the current document view. The toolbar can be customized by enabling or disabling built-in controls, replacing individual controls, adding custom controls to toolbar slots, replacing the toolbar containers, applying custom styles, or replacing the entire toolbar contents with `children`.
Document Toolbar
The Document Toolbar can be found at the top of any generic document.
## Basic usage ```tsx export function MyDocumentPage({ document }) { return ; } ``` When no `document` prop is provided, the toolbar falls back to the currently selected document. ```tsx ``` ## Built-in controls The default toolbar includes these controls: ```ts ["undo", "redo", "download", "name", "history", "switchboard", "close"]; ``` The controls are arranged into three slots: ```ts { first: ["undo", "redo", "download"], second: ["name"], third: ["history", "switchboard", "close"], } ``` ## Disabling controls Use `disabledControls` to remove specific built-in controls from the default toolbar. ```tsx ``` ## Enabling only specific controls Use `enabledControls` to render only a subset of the built-in controls. ```tsx ``` ## Combining enabled and disabled controls A control renders only when it is included in `enabledControls` and absent from `disabledControls`. When a control appears in both lists, `disabledControls` takes precedence. ```tsx ``` In this example, only `switchboard` and `close` render. ## Adding a custom control to a slot Use `customControls` to add controls to a specific toolbar slot. Custom controls receive the current document when available. ```tsx ( ), }, }} /> ``` ## Adding a custom control at the end of a slot By default, custom controls render at the start of their slot. Use `position: "end"` to render a custom control after the built-in controls in that slot. ```tsx ( ), }, }} /> ``` ## Adding multiple custom controls to a slot A slot can receive a list of custom controls. Each item needs a `key`. ```tsx ( ), }, { key: "custom-two", position: "end", component: ({ document }) => ( ), }, ], }} /> ``` ## Replacing the toolbar container Use `toolbarContainer` to replace the outer toolbar container. The custom toolbar container receives the toolbar children and the resolved `toolbarClassName`. ```tsx (
{children}
)} /> ``` ## Replacing the controls container Use `controlsContainer` to replace the container used for each toolbar slot. The custom controls container receives the slot children and the resolved `controlsContainerClassName`. ```tsx (
{children}
)} /> ``` ## Replacing a built-in control Use `componentOverrides` to replace individual built-in controls while keeping the default toolbar structure. This is useful when you want to reuse the built-in control behavior or styling but change part of the rendering or click behavior. ```tsx ( alert(props.document?.header.name)} > Download?? ), }} />; ``` The `name` control can also be replaced through `componentOverrides`. ```tsx (